

A Sweet Start
I love a recipe that feels like a hug. This one starts with warm milk and yeast. You watch it get foamy. It’s like magic in a bowl. I still laugh at that. My grandson calls it “the dough’s breakfast.” Then you stir in the red color and cocoa. Doesn’t that smell amazing? It turns a soft, pretty pink. This matters because baking is about joy. The color just adds to the fun.
Mixing the dough is simple. You just add flour until it feels soft. Kneading it is the best part. You push and fold it with your hands. It becomes smooth and stretchy. This is how you build strength in the dough. It’s why your rolls will be fluffy later. Do you like to knead dough by hand or with a mixer? Let me know. While it rises, you can think about other treats, like my cinnamon sugar rhubarb breakfast muffins.
The Heart of the Roll
Now for the filling. This is where the magic happens. You mix soft butter with brown sugar and cinnamon. I add the mini chocolate chips too. Why not? It’s a little surprise in every bite. *Fun fact: cinnamon was once more valuable than gold!* Spreading this on the rolled-out dough is my favorite step. You cover every inch with sweet, spiced goodness.
Rolling it up tight is important. You want to keep all that filling inside. Then you slice it into twelve pieces. I use a piece of plain dental floss to cut them. It gives a clean cut without squishing. Seeing them all snuggled in the pan makes me smile. They look like little red spirals of promise. If you love cinnamon, you might also enjoy this apple cinnamon baked oatmeal breakfast.
Patience is a Virtue
Here is the hard part. You must wait. Let the rolls rise again. They get all puffy and cozy together. This second rise matters so much. It makes the baked rolls light and tender, not dense. I use this time to clean up. Or I sit with a cup of tea. The waiting makes the eating even better. What do you do while you wait for dough to rise?
Then they go into a warm oven. The smell that fills your kitchen is heavenly. It’s cinnamon, sugar, and warm bread all at once. It reminds me of Saturday mornings at my grandma’s house. She always had something baking. That smell means love and home. While they bake, you can whip up the frosting. It’s the perfect final touch.
The Icing on the Cake… er, Roll!
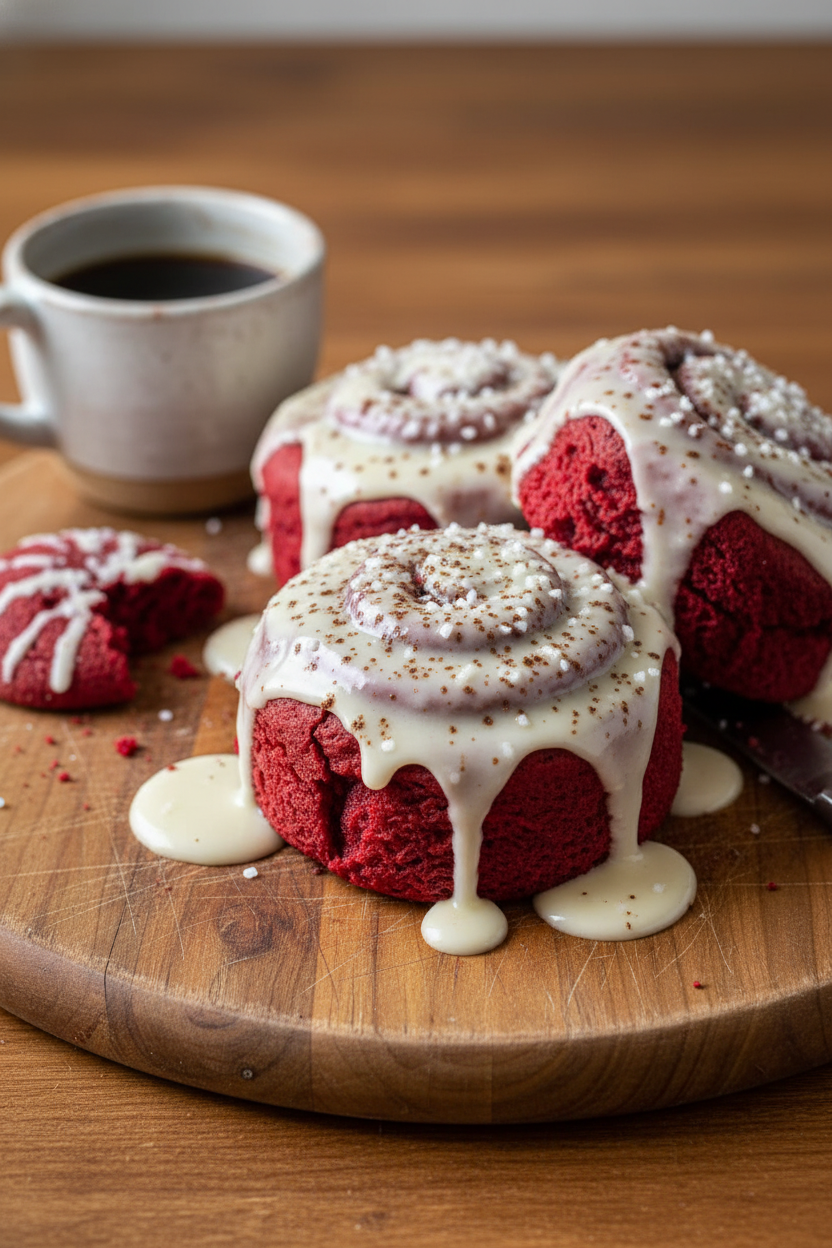
The frosting is simple. Just cream cheese, butter, and powdered sugar. Beat it until it’s smooth and creamy. The little bit of vanilla makes it sing. You must let the rolls cool just slightly before you frost them. Too hot, and the frosting will melt right off. Too cool, and it won’t melt into the swirls. I like it when it gets a little gooey in the warm layers.
Spreading that white frosting over the bright red rolls is so pretty. The colors pop! It looks like a holiday any day of the year. This final step matters because it’s about sharing. A frosted roll is a gift you made with your hands. It’s perfect with a cold glass of milk. For another creamy, spiced dessert, try these carrot cake snack bars with cinnamon frosting.
Your Turn to Bake
So there you have it. My heavenly red velvet cinnamon rolls. They seem fancy, but they’re just simple steps. Anyone can make them. The best part is sharing them. I love seeing the smile on someone’s face with that first bite. It’s a special treat for a birthday, a holiday, or just because.
Baking teaches us wonderful things. It teaches patience. It teaches how small steps make something great. And it always teaches sharing. Will you make these for a special someone soon? I’d love to hear about it. Tell me, what’s your favorite thing to bake for people you love? If you’re looking for more cozy bakes, this viral cinnamon roll bread pudding is a fantastic way to use leftover rolls.

Instructions
Step 1: First, wake up your yeast. Mix the warm milk, sugar, and yeast in a big bowl. Let it sit for 5 minutes. It should get foamy, like a little science experiment. I still laugh at that. Now add the butter, egg, vanilla, red color, cocoa, and salt. Give it a good stir until it’s all combined.
Step 2: Time to make the dough. Slowly mix in the flour until a soft dough forms. Turn it onto a floured counter. Knead it for 5 minutes until it’s smooth. (A warm spot helps it rise faster!). Place it in a greased bowl, cover it, and walk away. Let it get big and puffy for about an hour.
Step 3: Make the sweet filling while you wait. Mix the soft butter, brown sugar, and cinnamon. I love adding those mini chocolate chips too. Doesn’t that smell amazing? Set this bowl aside. What’s your favorite filling add-in? Share below! For another sweet treat, try these carrot cake snack bars.
Step 4: Now, roll out that risen dough. Flatten it into a big rectangle on your floured counter. Spread the filling all over, right to the edges. Roll it up tightly into a long log. Use dental floss to cut it into 12 pieces. It gives you such clean slices!
Step 5: Place your swirls in a greased dish. Let them rise again for 30 minutes. They’ll get all cozy and puffy. Bake them until they’re just cooked through. While they bake, make the frosting. Beat the cream cheese and butter until smooth. Mix in the powdered sugar and vanilla. Frost those warm rolls and enjoy the magic, just like this viral cinnamon roll bread pudding.
Creative Twists
Orange Zest Frosting: Add a teaspoon of orange zest to the cream cheese frosting. It’s so bright and cheerful!
Cookie Dough Center: Hide a small ball of edible cookie dough in the center of each roll before baking.
Mocha Swirl: Add a teaspoon of instant espresso powder to the cinnamon filling. Perfect for coffee lovers! Which one would you try first? Comment below!
Serving & Pairing Ideas
Serve these warm, with a cold glass of milk. They’re perfect for a special weekend breakfast. For a bigger spread, add some crispy bacon or fresh fruit on the side. You could even crumble one over a bowl of vanilla ice cream for dessert! It’s as fun as apple cinnamon baked oatmeal. Which would you choose tonight?
Keeping Your Rolls Heavenly
Let’s talk about storing these beauties. Cool rolls completely before storing. They keep in the fridge for three days. For longer, freeze them on a tray then bag them. Reheat in a warm oven for the best texture.
I remember my first batch. I left them on the counter. They dried out so fast! Now I always use my fridge. This matters because good storage saves your hard work. It means a sweet treat is always ready for you.
You can also bake and freeze the rolls before the second rise. Just thaw overnight in the fridge. This batch cooking trick is a lifesaver for busy mornings. It turns a big project into simple joy. Have you ever tried storing it this way? Share below!
Simple Fixes for Common Hiccups
Dough not rising? Your milk may be too hot. It should feel warm on your wrist. I once used hot milk and waited an hour. My poor yeast never woke up! Fixing this matters. It builds your cooking confidence when you know why things work.
Is your filling leaking out? Your butter might be too soft. It should be spreadable, not melted. Try chilling your rolled log for 15 minutes before cutting. This helps keep all that sugary goodness inside where it belongs.
Are the rolls dry? You might be adding too much flour. The dough should be tacky, not stiff. This matters for flavor. A softer dough makes a more tender, moist roll. Which of these problems have you run into before?
Your Quick Questions, Answered
What is the best flour for red velvet cinnamon rolls?
Use regular all-purpose flour. It has the right amount of protein. This gives your rolls a soft and fluffy texture. Bread flour can make them too chewy. Cake flour might make them too delicate. All-purpose is the perfect middle ground for these sweet treats.
Can I make the dough ahead of time?
Yes, you absolutely can. After the first rise, punch it down. Wrap the dough tightly and put it in the fridge. It will be good for up to 24 hours. Let it sit at room temperature before you roll it out. This slow rise can even improve the flavor.
How do I keep the cinnamon rolls moist?
The key is not to overbake them. Take them out when they are just set. Covering them with frosting while warm also helps. The frosting melts into every layer. Storing them correctly in an airtight container is crucial too. Try a similar method for other baked goods.
What can I substitute for buttermilk?
You can make a quick version. Add one tablespoon of lemon juice or vinegar to a cup of milk. Let it sit for five minutes. It will curdle and thicken slightly. This works just like real buttermilk in your recipe. It adds a nice tang to balance the sweetness.
How do I get a vibrant red color?
Use a good quality gel food coloring. Liquid coloring can make the dough too wet. Gel color is more concentrated. You need less to get a deep, rich red. Add it with the wet ingredients. A fun fact: the cocoa powder helps the red color look deeper and richer.
Can the cream cheese frosting be made in advance?
Yes, it can be made a day ahead. Keep it in a sealed container in the fridge. Let it soften at room temperature before spreading. Give it a quick stir to make it creamy again. This is a great trick for easy morning prep. Which tip will you try first?
From My Kitchen to Yours
I hope you love making these rolls as much as I do. The smell of them baking is pure happiness. It fills the whole house with warmth and love. Sharing them with family is the best part.
I would love to hear about your baking adventure. Did your family gobble them up? Did you add your own special twist? Tell me all about it in the comments below. Your stories are my favorite thing to read. Have you tried this recipe?
Happy cooking!
—Elowen Thorn.

My Gooey Red Velvet Cinnamon Rolls with Cream Cheese Frosting
Description
Indulge in these festive and decadent red velvet cinnamon rolls, featuring a soft, cocoa-infused dough, a gooey cinnamon filling, and a rich cream cheese frosting.
Ingredients
Instructions
- Prepare the Dough: In a large bowl or the bowl of a stand mixer, combine warm milk, granulated sugar, and active dry yeast. Let sit for 5-10 minutes until foamy. Add melted butter, egg, vanilla extract, red food coloring, cocoa powder, and salt. Mix until combined. Gradually add flour, mixing until a soft dough forms.
- Knead the Dough: Turn the dough out onto a floured surface and knead for 5-7 minutes, or knead with a dough hook in a stand mixer for 4-5 minutes, until smooth and elastic. Place in a greased bowl, cover, and let rise in a warm place for 1-1.5 hours, or until doubled in size.
- Make the Filling: While the dough rises, prepare the filling by mixing softened butter, brown sugar, cinnamon, and optional mini chocolate chips in a bowl until combined.
- Shape the Rolls: Punch down the risen dough. On a floured surface, roll the dough into a large rectangle, about 12×18 inches. Spread the filling evenly over the dough, leaving a small border. Tightly roll the dough lengthwise into a log. Using a sharp knife or dental floss, cut the log into 12 equal pieces.
- Second Rise: Place the rolls cut-side up in a greased 9×13 inch baking dish. Cover and let rise for 30-45 minutes, until puffy.
- Bake: Preheat oven to 350°F (175°C). Bake the risen rolls for 20-25 minutes, or until cooked through. Let cool slightly.
- Make the Frosting: While the rolls bake, prepare the cream cheese frosting. Beat softened cream cheese and butter together until smooth. Gradually add powdered sugar and vanilla extract, beating until creamy.
- Frost and Serve: Spread the frosting over the warm rolls. Serve immediately.
Notes
- For best results, ensure your milk is warm but not hot to activate the yeast. The rolls are best served fresh but can be stored in an airtight container for up to 2 days.