

My First Taste of Butter Cake Magic
I first had Kentucky Butter Cake at a church picnic. A sweet lady named Mabel brought it. It was so soft and buttery. I asked her for the secret right there. She just winked and said, “Love, dear. And a good bit of butter.” I still laugh at that.
Turning that cake into a cookie was my idea. I wanted that rich flavor in a little treat. These cookies are like tiny, portable cakes. They are perfect with a glass of cold milk. What’s your favorite treat from a family gathering or potluck?
Why the Butter Matters So Much
You will use butter twice here. It goes in the cookie and the glaze. This makes them extra tender and rich. The butter flavor is the star. It’s a simple thing, but it makes all the difference. Doesn’t that smell amazing when it’s baking?
Using good butter is my one big tip. It’s the heart of the recipe. This matters because food made with care tastes better. It’s not just fuel. It’s a little hug for your taste buds. For another buttery delight, try this bright and buttery lemon cobbler.
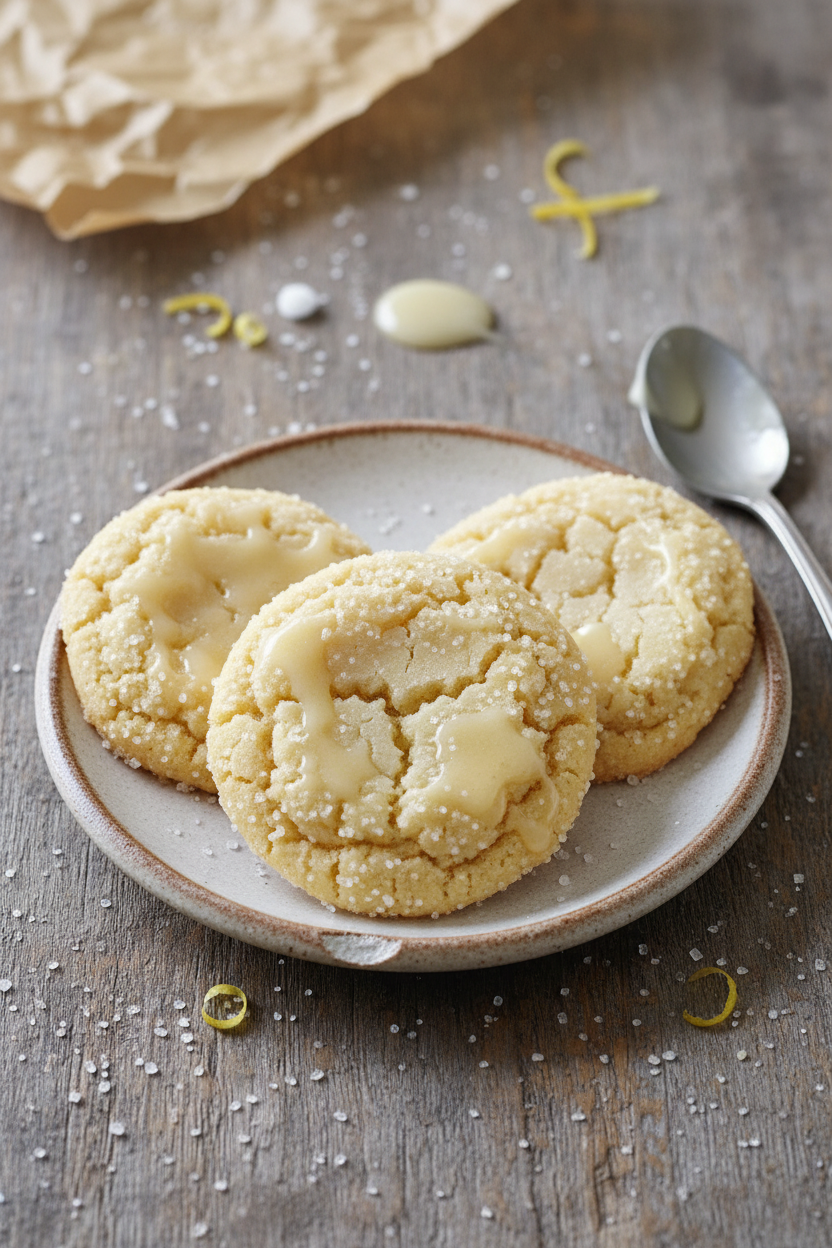
The Secret is in the Glaze
Do not skip the warm glaze. This is the magic step. You pour it over the warm cookies. It soaks in and makes them unbelievably moist. It gives them a shiny, sweet top too. *Fun fact*: This soak-in glaze is what makes a real Kentucky Butter Cake special.
Let the cookies cool completely after glazing. The glaze will set into a delicate crust. This matters because texture is everything. A soft inside with a slight sugary crunch is perfect. It’s like the satisfying layers in a good oatmeal bar.
Baking Them Just Right
Watch the clock when they bake. Take them out when the edges look set. The centers should still look a tiny bit soft. They keep cooking on the hot pan. This keeps them from getting dry. It’s the trick to a perfect cookie.
Let them rest on the pan for five minutes. This helps them firm up just enough to move. Then, move them to a rack. Do you prefer your cookies soft and cakey, or crisp and thin? I’m always a soft cookie person myself.
A Treat for Sharing
These cookies are made for sharing. They are sweet and simple. They remind people of home. I love to pack them in a tin for a neighbor. It’s a small way to show you care. Food connects us.
That’s the final lesson here. The best recipes are bridges. They connect us to memories and to each other. Whether it’s these cookies, a chocolate peanut butter cup cake, or an angel food dessert, the joy is in the sharing. What’s your go-to recipe when you want to make someone smile?
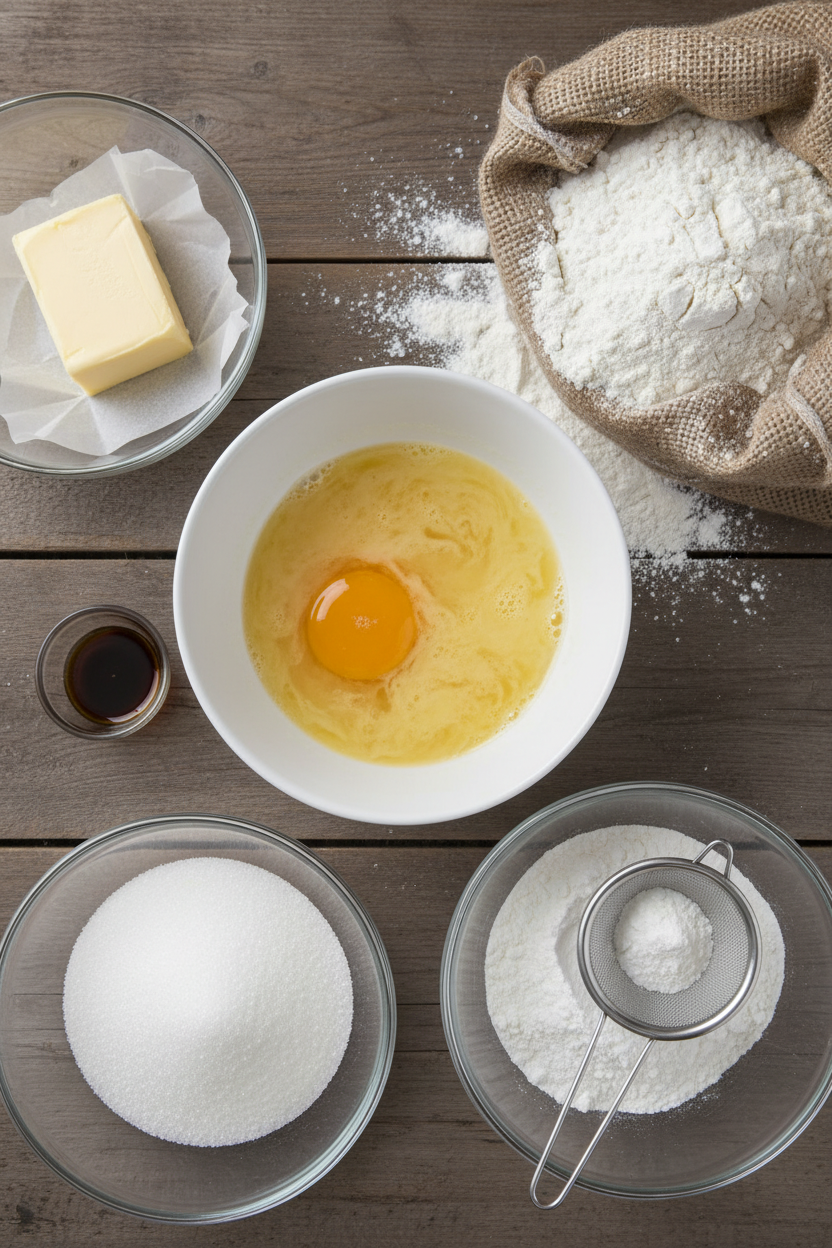
Instructions
Step 1: First, get your oven cozy at 350°F. Line your baking sheets. I always use parchment paper. It makes cleanup a breeze. (A warm oven is a happy oven for baking!)
Step 2: Now, cream the butter and sugars together. Use a big bowl. Mix until it’s light and fluffy. Doesn’t that smell amazing? It’s the start of something wonderful, like my grandma’s classic buttermilk donut bars.
Step 3: Beat in the eggs and extracts. Mix until it’s all one happy family. The vanilla makes the kitchen smell like home. I still laugh at how my grandson always tries to lick the spoon at this stage!
Step 4: Gently fold in your flour, baking powder, and salt. Don’t overmix! A soft dough is what we want. (Overmixing makes tough cookies, trust me.) Do you prefer chewy or cakey cookies? Share below!
Step 5: Roll dough into little balls. Flatten them gently on your sheet. Give them room to grow. Bake for about 11 minutes. The edges should be just golden. Let them rest for 5 minutes, like a easy homemade peanut butter chocolate oatmeal bar needs a rest too.
Step 6: For the glaze, melt butter with sugar and water. Stir until the sugar vanishes. Take it off the heat and add vanilla. Brush this magic onto your warm cookies. It soaks right in, adding so much love.
Step 7: Let them cool completely. The glaze will set into a sweet, delicate shell. This patience is the hardest part! They are worth the wait, just like a zesty lemon cobbler bake.
Creative Twists
Add a pinch of nutmeg to the dough. It whispers of old-fashioned spice cakes. Mix in lemon zest with the vanilla. It gives a sunny little zing. Drizzle with chocolate after the glaze sets. Because chocolate makes everything better, like in this easy peanut butter cup chocolate cake. Which one would you try first? Comment below!
Serving & Pairing Ideas
Serve these cookies with a cold glass of milk. It’s the classic way. For a fancy touch, crumble one over vanilla ice cream. You could also pack them for a picnic. They travel so well. A sweet treat like this reminds me of my go-to Butterfinger angel food dessert for sharing. Which would you choose tonight?
Keeping Your Cookies Dreamy
Let’s talk about keeping these cookies soft. Store them in a tight container at room temperature. They will stay perfect for a week. You can also freeze the baked cookies for a month. Just layer them with parchment paper in a freezer bag.
I remember my first batch of these cookies. I left them out on a plate. They turned hard by the next morning. I was so sad. Now, I always use my trusty cookie tin. It makes all the difference for a soft and chewy treat.
Batch cooking saves your future self time. It also fills your home with wonderful smells. Having cookies ready in the freezer is a little gift. You can warm one up anytime you need a smile. Have you ever tried storing it this way? Share below!
Simple Fixes for Common Cookie Troubles
First, if your cookies spread too much, your butter was too warm. Chill your dough longer. I once used melted butter by mistake. My cookies turned into one giant cookie sheet! Chilling the dough firms up the fat. This helps cookies keep their lovely shape.
Second, a dry cookie often means it was over-baked. Take them out when the edges are just set. The centers will finish cooking on the sheet. This matters because a perfect cookie should melt in your mouth. It builds your confidence when you get it right.
Third, a cracked top can mean you over-mixed the dough. Gently fold in the flour just until it disappears. This keeps the texture delicate, like my favorite grandma’s classic dessert bars. Gentle handling matters for a tender crumb. Which of these problems have you run into before?
Your Quick Questions, Answered
What is the secret to keeping butter cookies soft and chewy?
The secret is the glaze and storage. Brush the warm glaze on right after baking. It soaks in and adds moisture. Then, store cooled cookies in an airtight container. This locks in all that softness. The glaze acts like a sweet hug for your cookie, keeping it tender for days.
Can I use margarine instead of butter in butter cookies?
I do not recommend margarine here. Butter gives these cookies their rich, dreamy flavor. Margarine has more water and less fat. This can change the texture and make cookies spread. For the best taste and result, real butter is key. It is the star of the show, just like in a bright and buttery dessert.
How do I prevent my butter cookies from spreading too much?
Chill your dough! This is the most important step. Chill the shaped dough disks for 30 minutes before baking. This firms up the butter. Cold butter melts slower in the oven. Your cookies will hold their perfect round shape. Also, make sure your baking powder is fresh.
What is the best type of glaze for butter cookies?
The simple butter glaze in the recipe is perfect. It is made with melted butter, sugar, and vanilla. It soaks into the warm cookie beautifully. This creates a moist, sweet crust. A powdered sugar glaze sits on top. The butter glaze goes inside. This makes the cookie extra special and soft.
How long should I chill butter cookie dough before baking?
Chill the dough for at least 30 minutes. You can chill it for up to 2 days. This rest time lets the flour absorb the wet ingredients. It makes the dough easier to handle. It also prevents too much spreading. *Fun fact: Chilling dough also develops a deeper, richer flavor in your baked goods.*
Can I freeze glazed butter cookies for later?
Yes, you can freeze them beautifully. Let the glaze set completely first. Then, flash-freeze the cookies on a tray for an hour. After that, pack them in a freezer bag. They will keep for a month. Thaw at room temperature. They will taste as fresh as the day you baked them.
Which tip will you try first?
Bake With Love
I hope you enjoy making these cookies. Baking is about sharing joy and creating memories. My kitchen is always full of stories and sweet smells. I would love to hear about your baking adventure. Tell me all about it in the comments below. Have you tried this recipe? I am so excited for you to take that first bite.
Happy cooking!
—Elowen Thorn

My Perfectly Glazed Butter Cookie Recipe
Description
Experience the perfect balance of buttery, tender cookie and a sweet, delicate glaze with this classic, melt-in-your-mouth treat.
Ingredients
For the Cookies:
For the Glaze:
Instructions
- Oven Preparation: Preheat oven to 350F (175C) and line baking sheets with parchment paper, creating an optimal baking environment.
- Sugar Fusion: Vigorously cream butter with granulated and powdered sugars until the mixture transforms into a light, fluffy consistency, developing a smooth base for the cookies.
- Wet Ingredient Integration: Blend eggs, vanilla extract, and butter extract into the sugar mixture, ensuring complete incorporation and a uniform texture.
- Dry Ingredient Fusion: Gently fold flour, baking powder, and salt into the wet ingredients, mixing minimally to maintain the dough’s delicate structure.
- Cookie Shaping: Roll dough into uniform 1.5-inch spheres, arranging them strategically on prepared baking sheets with adequate spacing, then flatten each ball into a gentle disk using a spoon or palm.
- Baking Process: Bake for 10-12 minutes, targeting set edges with slightly underdone centers that will continue to firm during cooling.
- Initial Cooling: Rest cookies on baking sheets for 5 minutes before transferring to a wire rack, allowing initial stabilization.
- Glaze Creation: Melt butter over medium heat, introducing sugar and water while stirring continuously until sugar dissolves completely, then remove from heat and infuse with vanilla extract.
- Glazing Technique: While cookies remain warm, generously brush or drizzle glaze, allowing it to penetrate the surface, optionally applying a second layer for enhanced flavor and moisture.
- Final Cooling: Allow cookies to cool completely, permitting the glaze to solidify and develop a delicate, sugary exterior.
Notes
- For best results, ensure butter is properly softened. The optional butter extract intensifies the buttery flavor. Store glazed cookies in a single layer to preserve the glaze’s texture.