

My Friend Stephanie’s Amazing Pie
My friend Stephanie makes the best pies. She brought this one to a picnic last summer. Everyone went quiet when they took a bite. Then they all asked for the recipe.
I still laugh at that. It’s a no-bake pie, which is perfect for hot days. Your oven stays cool. You get a cool, creamy dessert. What’s your favorite no-bake summer treat? Tell me in the comments.
The Secret is in the Crust
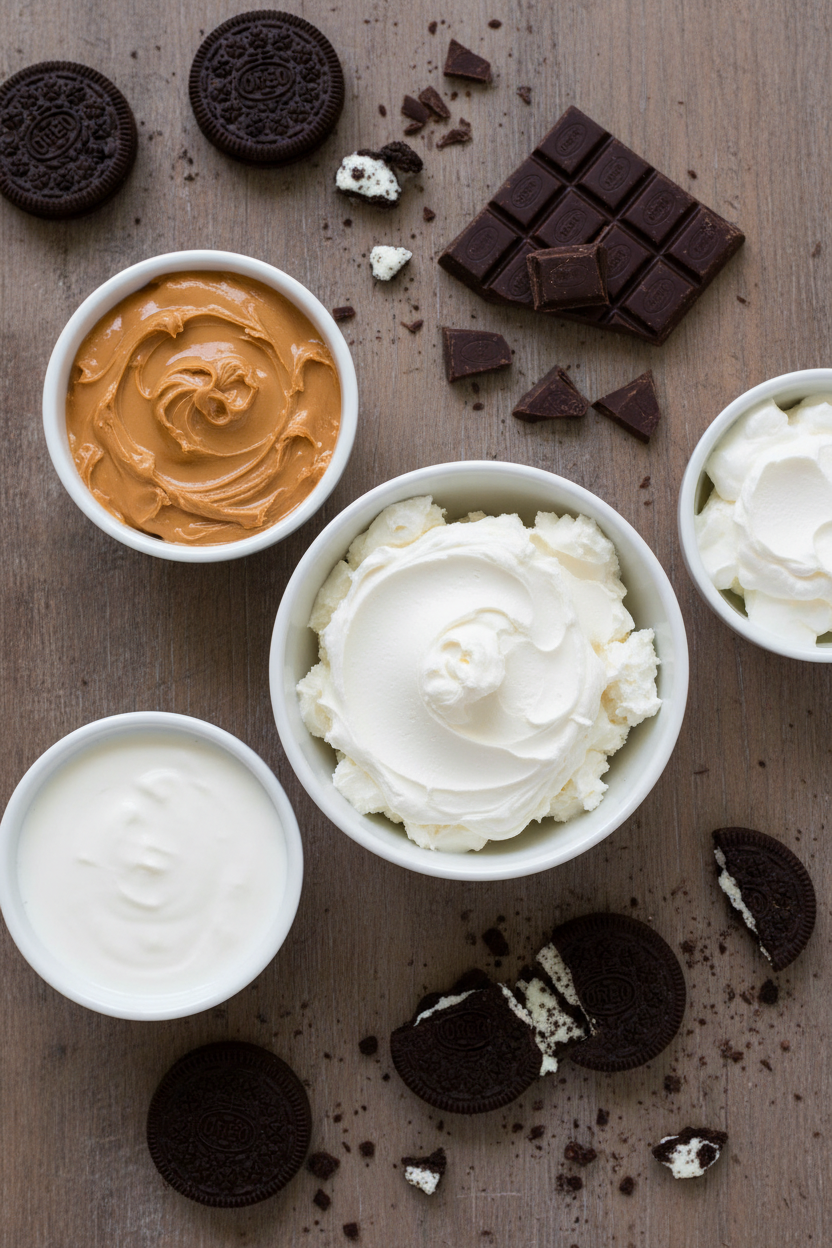
Let’s start with the Oreo crust. You just crush the cookies and mix them with melted butter. Press it into the pan with your hands. It’s messy and fun.
Here’s a tip that matters. Press the crumbs really firm. Use the bottom of a cup. A solid crust holds up the creamy filling. It gives you that perfect crunch with every bite.
Two Creamy Friends
Now for the magic. You make two fillings. One is chocolate. One is peanut butter. You beat the cream cheese until it’s smooth. Doesn’t that smell amazing?
Then you whip the heavy cream. You fold it gently into the fillings. This is the hardest part. Be gentle like you’re folding a cloud. This makes the pie light and fluffy.
The Swirl and The Chill
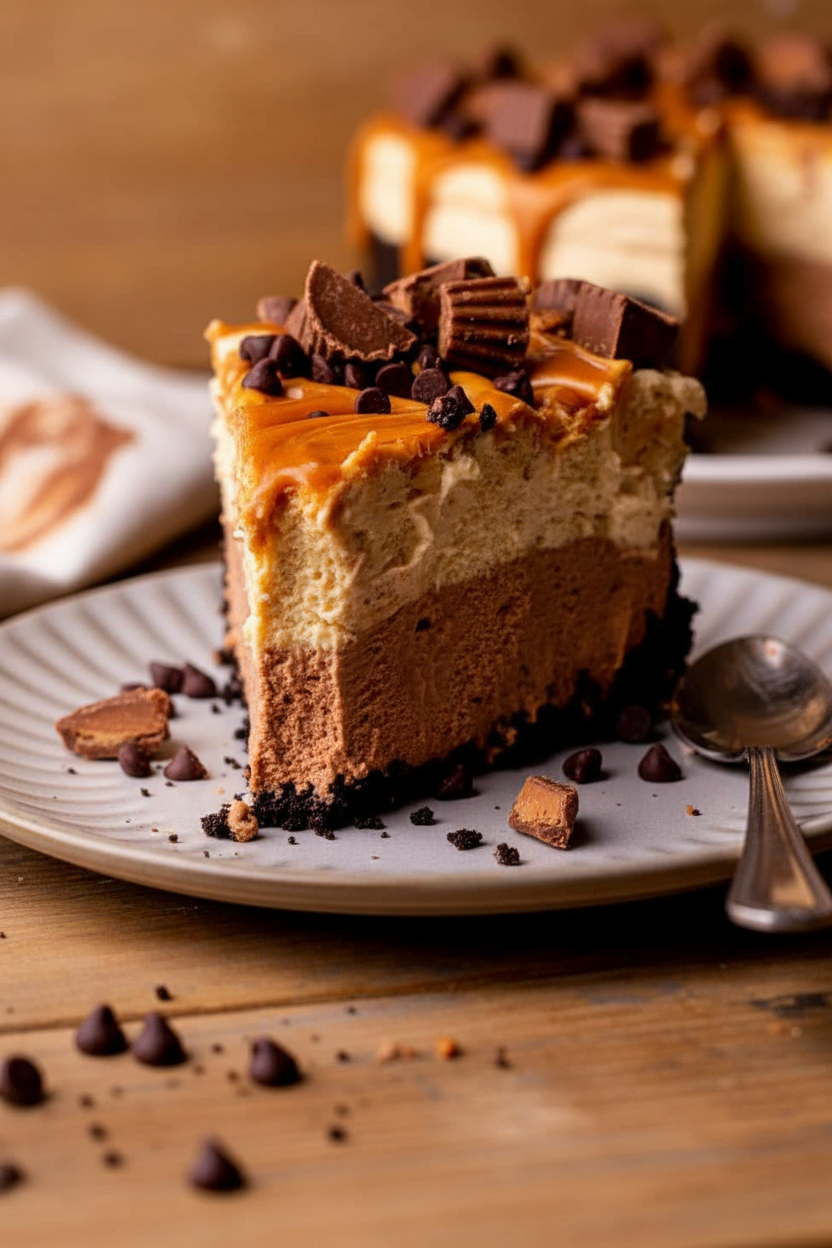
Spread the chocolate layer first. Then the peanut butter layer. Drizzle melted peanut butter on top. Swirl it with a knife. It looks so pretty.
Now, patience. The pie must chill for hours. This matters most. It needs time to become firm and sliceable. If you rush, it will be soup. Trust me, the wait is worth it.
A Little Story and a Fun Fact
I once tried to skip the long chill. I only waited two hours. My first slice slid right off the plate. It was a sweet, delicious mess. My grandson thought it was funny.
Fun fact: The first peanut butter cup was made in 1928. Now they make the perfect pie topping. Do you chop your peanut butter cups or leave them whole?
Your Turn to Make Memories
This pie is for sharing. It’s rich, so cut small slices. Serve it with a big glass of milk. It will make people smile.
Will you make this for a special someone? Or maybe just for yourself? Let me know how it turns out. I love hearing your kitchen stories.
Ingredients:
| Ingredient | Amount | Notes |
|---|---|---|
| Oreo Crust | ||
| Oreos (whole cookie) | 25 | |
| Unsalted butter, melted | 5 TBSP | |
| Chocolate Pie | ||
| Cream cheese | 6 oz | room temperature |
| Unsweetened cocoa powder | 2 TBSP | |
| White granulated sugar | 1/2 cup | |
| Sour cream (or Greek yogurt) | 1/3 cup | room temperature |
| Pure vanilla extract | 1 tsp | |
| Chocolate bar (e.g., Lindt 72%) | 3.5 oz | melted |
| Peanut Butter Pie | ||
| Cream cheese | 10 oz | room temperature |
| White granulated sugar | 1/4 cup | |
| Creamy peanut butter | 3/4 cup | for the batter |
| Pure vanilla extract | 1 tsp | |
| Sour cream (or Greek yogurt) | 1/4 cup | room temperature |
| Heavy cream | 2 cups | cold |
| Powdered sugar | 1/2 cup | |
| Peanut butter | 1/4 cup | melted, for swirling on top |
| Topping | ||
| Peanut butter cups | As needed | for decoration |
Instructions
Step 1: First, make your Oreo crust. Crush those cookies into fine crumbs. Mix them with melted butter. Press the crumbs firmly into your pie pan. (A hot tip: use a measuring cup to press it flat!)
Step 2: Now, let’s make the chocolate layer. Beat the cream cheese, sugar, and cocoa. It will look so rich and dark. Then, gently mix in the melted chocolate and sour cream. Doesn’t that smell amazing?
Step 3: Next up is the peanut butter layer. Beat more cream cheese with sugar. Then add the peanut butter. This part always makes me smile. It tastes like a candy bar in a bowl!
Step 4: Whip the heavy cream until it’s fluffy and stiff. This gives our pie its dreamy texture. Fold half gently into each bowl of filling. (Go slow here to keep it light and airy!)
Step 5: Time to assemble! Spread the chocolate filling into your crust. Then, carefully add the peanut butter layer on top. Drizzle melted peanut butter and swirl it with a knife. What’s your favorite part to lick from the spoon? Share below!
Step 6: Finally, patience is key. Cover the pie and let it chill for hours. It needs time to set properly. After it’s firm, top it with peanut butter cups. Then slice, serve, and enjoy every bite!
Creative Twists
Use crunchy peanut butter for a fun, surprise texture.
Swap the Oreo crust for a pretzel crust. Sweet and salty!
Top with mini chocolate chips instead of peanut butter cups.
Which one would you try first? Comment below!
Serving & Pairing Ideas
Serve each slice with a big dollop of whipped cream. A glass of cold milk is the perfect partner. For a fancy touch, sprinkle a little sea salt on top. The salt makes the chocolate taste even sweeter. Which would you choose tonight?
Keeping Your Chocolate Peanut Butter Pie Perfect
Let’s talk about storing this lovely pie. It lives happily in the fridge for 4-5 days. Just keep it covered tightly. You can also freeze slices for a sweet later. Wrap each piece in plastic, then foil. Thaw it in the fridge overnight.
I remember my first no-bake pie. I left it uncovered. The top got dry and sad. Now I always press plastic wrap right on the surface. This keeps it creamy. Batch cooking is a friend to busy families. Making two pies saves future you a lot of time.
Having a ready-made treat matters. It turns a hectic day into a special moment. It’s a little gift from past you. Have you ever tried storing it this way? Share below!
Simple Fixes for Common Pie Problems
First, a soggy crust. Make sure your butter is fully mixed into the Oreo crumbs. Press it firmly into the pan. I once rushed this step. My crust fell apart when I sliced it.
Second, a runny filling. Your cream cheese must be room temperature. Cold cream cheese leaves lumps. It won’t mix smoothly. This affects the final set. Getting this right builds your cooking confidence. A smooth batter means a perfect, sliceable pie.
Third, deflated whipped cream. Fold it in gently with a spatula. Do not stir. Being gentle matters for flavor and texture. It keeps the pie light and airy. Which of these problems have you run into before?
Your Quick Questions, Answered
What is the easiest no-bake peanut butter pie recipe?
This recipe is quite simple. You mix, layer, and chill. No oven is needed. The key is letting ingredients like cream cheese soften first. Then, you just blend the layers. The hardest part is folding in the whipped cream gently. Follow the steps for the crust, chocolate layer, and peanut butter layer. Patience during chilling gives you the perfect slice.
Can I use a different nut butter instead of peanut butter?
Yes, you can use almond or cashew butter. The flavor will change, but it will still be delicious. Make sure to use a creamy style, not dry or oily. The pie might set a little differently. Try it and see if your family likes the new taste. It is a fun way to make the recipe your own special creation.
How do you keep a no-bake pie from getting soggy?
The secret is a well-made crust. Blend the Oreos into fine crumbs. Mix the melted butter in completely. Press the crust firmly and evenly in the pan. Chilling the crust before adding filling helps too. A solid crust acts like a bowl. It keeps the creamy layers from making the bottom soft and wet.
How long does no-bake peanut butter pie need to set?
It needs at least 6 hours in the fridge. Overnight is even better. This long chill lets all the layers firm up properly. The whipped cream needs time to stabilize the filling. If you cut it too soon, it will be runny. Planning ahead is the best tip for a perfect, clean slice of this decadent pie.
Can you make this pie without Cool Whip?
This recipe does not use Cool Whip. It uses real whipped cream. You whip heavy cream with powdered sugar. This gives a rich, natural flavor. It is lighter than many store-bought toppings. The key is whipping it to stiff peaks. Then, you fold it gently into the batters. This creates the pie’s fluffy, dreamy texture.
What are good toppings for chocolate peanut butter pie?
Chopped peanut butter cups are classic. You can also use whipped cream rosettes. A drizzle of melted chocolate or extra peanut butter is lovely. Crushed peanuts add a nice crunch. A sprinkle of sea salt balances the sweetness. *Fun fact: The salt makes the chocolate taste even more chocolatey!* Get creative with what you have in your cupboard.
Which tip will you try first?
From My Kitchen to Yours
I hope you love making this pie. It is a celebration of simple, joyful flavors. Sharing it with people you love is the best part. Every slice tells a story of patience and care.
I would love to hear about your baking adventure. Have you tried this recipe? Tell me all about it in the comments below. Did your family gobble it up?
Happy cooking!
—Danielle Monroe

No-Bake Chocolate Peanut Butter Dream Pie
Description
This chocolate peanut butter pie has a layer of chocolate and a peanut butter layer. It has an Oreo crust, chocolate no bake pie, peanut butter no bake pie, and swirled peanut butter on top. Topped with peanut butter cups.
Ingredients
Oreo Crust:
Chocolate Pie:
Peanut Butter Pie:
Instructions
- STEP 1: Prep. Prepare a 9-inch pie pan. Spray it with nonstick baking spray. Set it aside.
- STEP 2: Blend Oreos. Use a food processor to blend the Oreos until they are fine crumbs. Add the melted butter in and mix it together.
- STEP 3: Form crust. Pour the crumb mixture into the prepared pan and press it halfway up the sides with your hands. Compact the bottom using the flat bottom of a measuring cup.
- STEP 4: Chill. Place the crust in the freezer to chill while you make the pie batter.
- STEP 1: Beat cream cheese. Use a medium bowl and hand mixer to beat the cream cheese, sugar, and cocoa powder on high speed for 2 minutes.
- STEP 2: Mix pie batter. Add the vanilla extract, sour cream, and melted chocolate. Mix them in on medium speed until combined.
- STEP 1: Beat cream cheese and sugar. Use a mixer and a medium bowl to beat the cream cheese and sugar together for 2 minutes on high speed.
- STEP 2: Mix pie batter. Add the peanut butter, vanilla extract, and sour cream. Mix them in on medium speed until combined.
- STEP 3: Whip cream. Use a metal bowl and whisk attachment to beat the heavy cream and powdered sugar together on high speed until stiff peaks form.
- STEP 4: Pour in whipped cream. Pour half of the whipped cream into the chocolate pie and half into the peanut butter pie.
- STEP 5: Fold in whipped cream. Fold the whipped cream into the pie batters very gently using a rubber spatula. Be careful not to knock the air out of the whipped cream, this should take a couple of minutes.
- STEP 6: Spread pie batters. Spread the chocolate pie over the pie crust. Make sure to make an even layer. Spread the peanut butter pie over the chocolate pie.
- STEP 7: Add melted peanut butter. Drizzle the melted peanut butter over top of the pie. Use a knife to swirl the peanut butter in.
- STEP 8: Chill. Cover the pie with aluminum foil and place it in the fridge overnight, or at least 6 hours. When it is set, add peanut butter cups on top and keep it chilled until ready to serve.
Step By Step Instructions – Oreo Crust:
Step By Step Instructions – Chocolate Pie:
Step By Step Instructions – Peanut Butter Pie:
Notes
- Expert Baking Tips:
Make sure you spray your pie tin thoroughly with a baking spray that has flour in it. If the crust sticks it can crack and the dessert loses a lot of its structure as the rest is so soft without the crust to hold it together.
Be very careful when you fold in the whipped cream, it is the hardest part. If you are too rough, it will be like adding 2 cups of heavy cream to the batter. It will not set.
This pie needs a long chill time, for it to set. Make sure to be patient!