

My Kind of Kitchen Magic
I love recipes that feel like a little magic trick. You just mix a few things. Then you get a perfect dessert. This no-bake Oreo treat is exactly that. It’s so simple, but the result is pure joy. Doesn’t that sound wonderful?
My grandson calls these his “cloud cups.” He says the filling is like eating a sweet cloud. I still laugh at that. It matters because cooking should be fun, not fussy. This recipe proves that. What’s your favorite “magic” dessert to make?
The Joy of Crushing Cookies
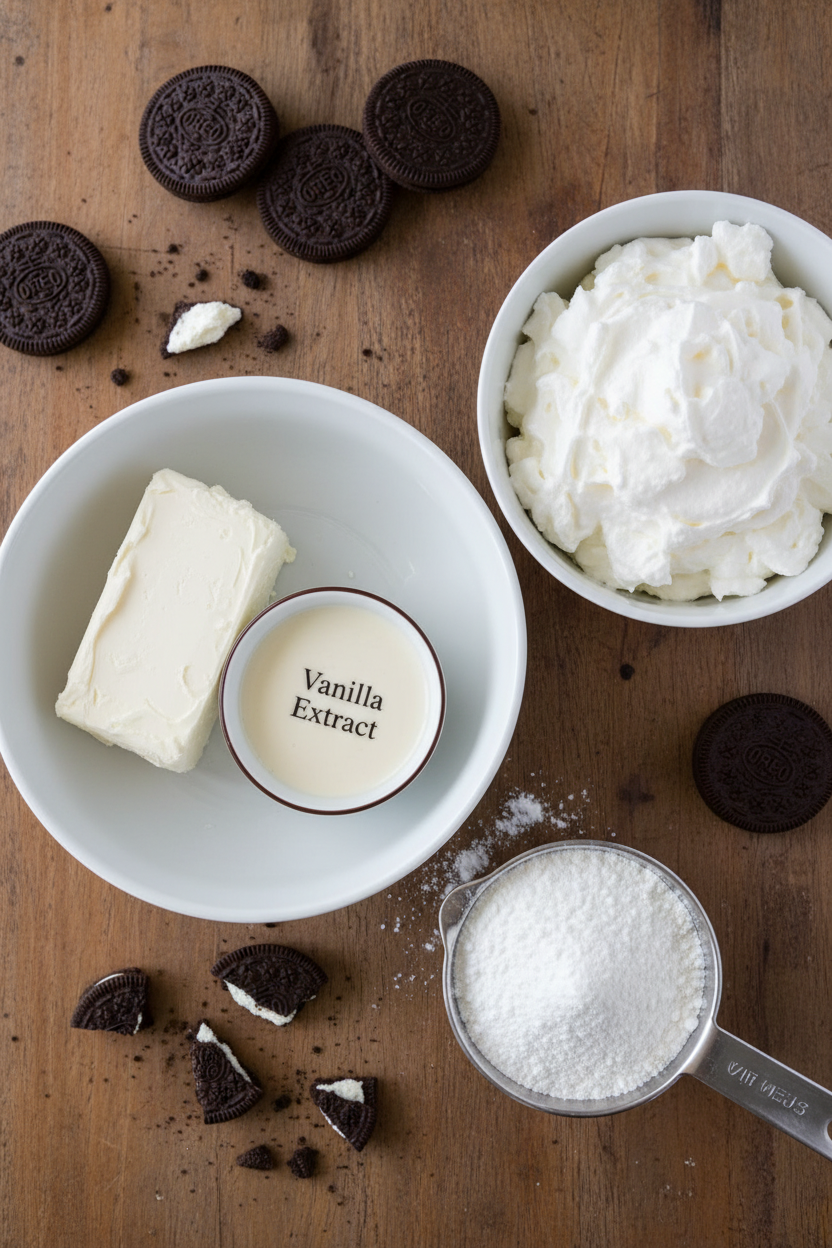
Let’s start with the best part. Crushing the Oreos! There is no wrong way. You can use a bag and a rolling pin. Or put them in a bowl and press with a cup. The whole cookie goes in, cream filling and all. *Fun fact: The cream filling helps the crumbs stick together for a perfect crust.*
I like to save a big handful of crumbs for the top. It gives a nice crunch. This step matters because it’s hands-on. You get to be part of the process. It’s not just opening a package. Have you ever tried a dirt cake dessert? The crushing step is just as fun!
Making the Fluffy Filling
Now for the cloud. Beat the soft cream cheese until it’s smooth. Add the powdered sugar and vanilla. Doesn’t that smell amazing? Then comes the secret. You gently fold in the whipped topping. No beating! Just gentle folds with a spatula.
This keeps it light and airy. That’s the magic. Finally, stir in half of your cookie crumbs. You see all those black and white swirls? That’s when I know it’s right. If you enjoy this, you might also love a creamy Oreo milkshake. It uses similar flavors!
Building Your Cup of Joy
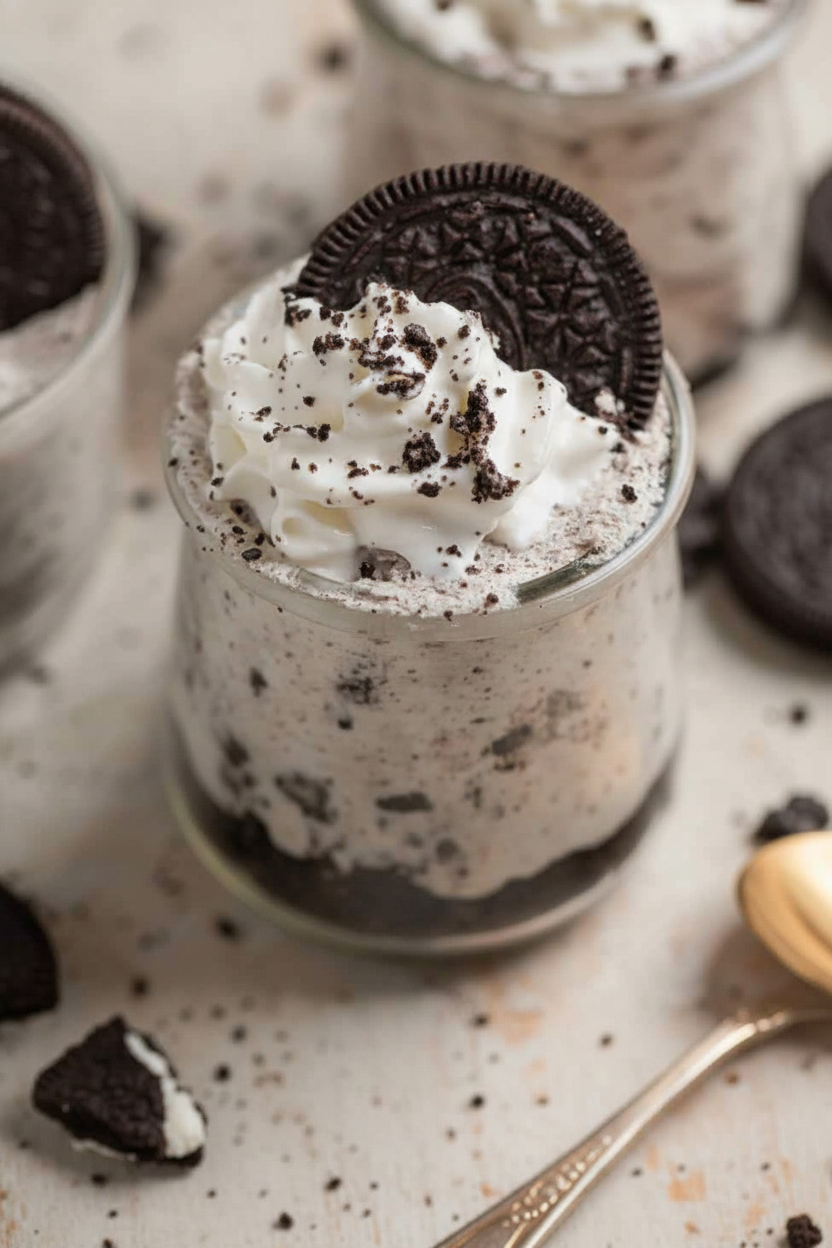
Here’s how we build it. First, a layer of crumbs in the bottom of your cup. Press it down a little. Then, spoon or pipe the fluffy filling on top. I like to use a piping bag. It looks fancy, but it’s easy.
Top it with more crumbs. Then, the hard part. You must wait! Let them chill for an hour or two. This wait matters. It lets the flavors become friends. The texture gets just right. It’s worth the patience. Do you prefer your desserts in a cup, a bowl, or on a plate?
A Treat for Later
These cups keep well. Just cover them tight. They’ll be happy in your fridge for days. You can even freeze them for a future sweet day. I like to make a batch for surprise guests. It’s my little secret stash.
I once forgot I had some in the freezer. Finding them a month later felt like a gift! It’s nice to have a no-bake mint version for a change too. So, tell me, who will you share your first cup with?
Instructions
Step 1: First, let’s crush those Oreos. I put them in a bag and use a rolling pin. The whole cookie goes in, cream filling and all. It’s a fun way to get out the wiggles! (A hard-learned tip: a few big pieces are okay for texture.)
Step 2: Now, beat the softened cream cheese in a big bowl. Make it smooth and fluffy. I think it looks like clouds. This is the heart of our no-bake cheesecake magic.
Step 3: Add the powdered sugar and vanilla. Beat it all together again. Doesn’t that smell amazing? It gets so silky. What’s your favorite vanilla memory? Share below!
Step 4: Time to fold in the whipped topping. Be gentle with your spatula. Fold until you see no white streaks. Then, stir in half the cookie crumbs. It becomes a wonderful, creamy Oreo dessert base.
Step 5: Let’s build our cups! Put some leftover crumbs in the bottom. Spoon the fluffy mixture on top. You can add more crumbs on top, too. Refrigerate for a few hours so they set. The wait is the hardest part!
Creative Twists
Peppermint Party: Add a drop of peppermint extract to the filling. It’s so refreshing!
Fruity Swirl: Gently swirl in some strawberry jam. You get pretty pink ribbons.
Cookie Dough Dream: Mix mini chocolate chips into the cream cheese layer. I still laugh at how fast this one disappears.
Which one would you try first? Comment below!
Serving & Pairing Ideas
These cups are perfect all on their own. For a party, serve them in little clear jars. Everyone loves seeing the layers! You could also make a dirt delight version in a big dish. Top with gummy worms for fun. A cold glass of milk is the best partner. Or, blend one into a creamy Oreo milkshake for the ultimate treat. Which would you choose tonight?
Making Your Treats Last
Let’s talk about keeping your cheesecake cups happy. Store them in the fridge for up to five days. Just use an airtight container. This keeps them fresh and tasty. For longer storage, the freezer is your friend. Wrap them tightly and freeze for three months. Thaw them overnight in the fridge when you’re ready.
I love making a double batch. It saves so much time later. You can have a sweet treat ready anytime. I remember my first time freezing a dessert. I was so worried it would taste funny. It thawed perfectly and was a lovely surprise. Storing food well means less waste and more joy. Have you ever tried storing it this way? Share below!
Simple Fixes for Common Hiccups
Sometimes our desserts need a little help. First, if your cream cheese is lumpy, it was too cold. Always let it soften on the counter first. I once tried to mix it straight from the fridge. My arm got so tired from mixing those lumps! Second, if your mixture is too runny, the whipped topping might be over-mixed. Fold it gently just until combined.
Third, worried about a soggy crust? Press your first cookie layer down a bit. This creates a firmer base for the creamy filling. Getting these steps right builds your kitchen confidence. It also makes sure every bite is full of perfect flavor. Which of these problems have you run into before?
Your Quick Questions, Answered
How to make Oreo cheesecake cups without cream cheese?
You can use full-fat Greek yogurt or mascarpone cheese instead. Both will give you a creamy, tangy result similar to cream cheese. Make sure they are at room temperature. Then mix them with the powdered sugar and vanilla. Gently fold in the whipped topping. The texture will be lovely and light, perfect for a no-bake treat.
What are the ingredients for no-bake Oreo cheesecake?
You need Oreos, soft cream cheese, powdered sugar, vanilla, and whipped topping. That’s it! Crush the Oreos for your crust and filling. Mix the creamy ingredients until smooth. Then layer everything in cups. It’s a simple list for a magical dessert. You can find similar easy ideas in this mint Oreo dessert recipe.
Can I use Cool Whip instead of heavy cream?
Yes, you can! Cool Whip is actually perfect here. The recipe is designed for it. It is already sweet and fluffy. You just fold it in at the end. No need to whip heavy cream yourself. It makes the process so much easier and faster. Your no-bake delight will be just as delicious.
How long do no-bake cheesecake cups need to set?
They need at least one to two hours in the fridge. This lets the filling firm up nicely. For the best texture, I let mine chill longer. Overnight is even better. The wait is worth it for that perfect, cool bite. It’s the same patience needed for a good dirt cake dessert.
Can I make these cheesecake cups ahead of time?
Absolutely! They are a great make-ahead dessert. Assemble them the day before your party. Just keep them covered in the refrigerator. This actually helps the flavors blend together beautifully. It’s one less thing to worry about when guests arrive. This tip works for many no-bake Oreo desserts.
How do you keep no-bake cheesecake cups from getting soggy?
The key is a good, thick base layer of crumbs. Press the first layer of crushed Oreos down gently. This creates a barrier for the creamy filling. Also, make sure your filling is thick and not runny. Assemble them just before chilling. *Fun fact: The cream in the Oreo itself helps resist sogginess!* Which tip will you try first?
From My Kitchen to Yours
I hope you love making these little cups. They always bring a smile. Cooking is about sharing joy and simple pleasures. I would love to hear about your kitchen adventures. Did you add a special twist? Tell me all about it in the comments below. Your stories are my favorite thing to read. Have you tried this recipe?
Happy cooking!
—Elowen Thorn

No-Bake Oreo Cheesecake Cups I Always Make
Ingredients
Instructions
- Crush the Oreos. There is no specific method required; use your preferred system (e.g., placing in a bag and crushing with a rolling pin). Do not separate the cookie filling; crush the whole cookies together.
- In a large bowl, use a hand mixer to beat the cream cheese until smooth and fluffy.
- Add the powdered sugar and vanilla extract to the cream cheese and beat again until fully combined and smooth.
- Gently fold in the entire container of whipped topping (Cool Whip) using a silicone spatula until no streaks remain.
- Fold in about half of the crushed Oreos into the cheesecake mixture.
- To assemble, place a layer of the remaining crushed Oreos into the bottom of individual cups or jars.
- Spoon or pipe the cheesecake mixture over the Oreo layer in the cups.
- Top with additional crushed Oreos if desired.
- Refrigerate for at least 1-2 hours to set before serving.
Notes
- For storage, keep in the refrigerator for up to 5 days in an airtight container or tightly wrapped. For freezing, wrap tightly (preferably twice) and freeze for up to 3 months; thaw overnight in the refrigerator.