

The Turkey and the Paper Blanket
Hello, my dear. Come sit. Let’s talk turkey. This recipe uses a big piece of parchment paper. It’s like a cozy blanket for the bird. It steams the turkey first, keeping it very juicy.
Then we take the blanket off. This lets the skin get crispy and golden. I still laugh at the first time I tried it. My grandson called it “the turkey’s paper robe.” It works so well. Have you ever cooked with parchment paper before?
A Little Story About Stuffing
Now, the stuffing is special. We use brioche bread. It’s a little sweet and very soft. It soaks up all the good turkey juices. This matters because the stuffing should taste like the heart of the meal.
My mother taught me a trick. See that slice of white bread? You tuck it under the skin at the neck. It helps keep all that lovely stuffing inside. No spills! *Fun fact: This is called a “dummy” in old cookbooks. It’s a helper, not an insult!*
Wrapping with Love (and Staples)
The wrapping looks tricky. But it’s just folding a present. You use three big sheets. You wrap, staple, and turn the bird. It’s a little dance with paper and turkey.
Don’t worry about the staples. They just hold the paper shut. You cut them off later. The most important part is making sure no holes are left. We want all that good steam to stay inside. What’s the most unusual cooking trick you’ve ever tried?
The Big Reveal
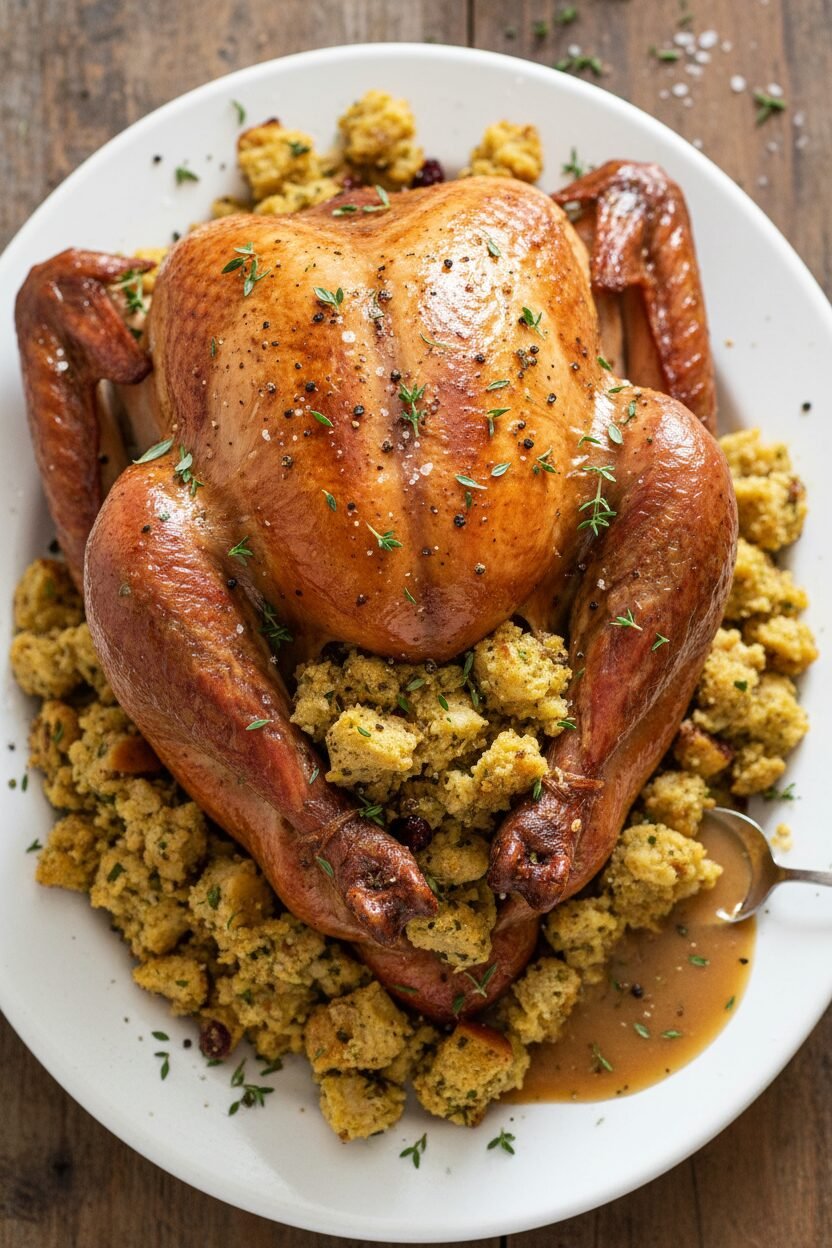
After nearly three hours, you take the turkey out. You cut the paper open. Oh, the smell that comes out! Doesn’t that smell amazing? That’s the smell of patience paying off.
Then you slide the paper away. Back in the oven it goes. Now the skin can get crisp and beautiful. This second step matters. It gives you flavor and texture. Juicy inside, crispy outside. That’s the goal.
Resting is the Secret
When the turkey is done, you must let it rest. I know it’s hard to wait. But let it sit for almost an hour. This is the most important step.
All the juices that are bubbling inside will settle. If you carve too soon, the juice will run out onto the board. We want it in the meat! Use this time to make your gravy from the drippings. Tell me, what side dish are you most excited to serve with your turkey?
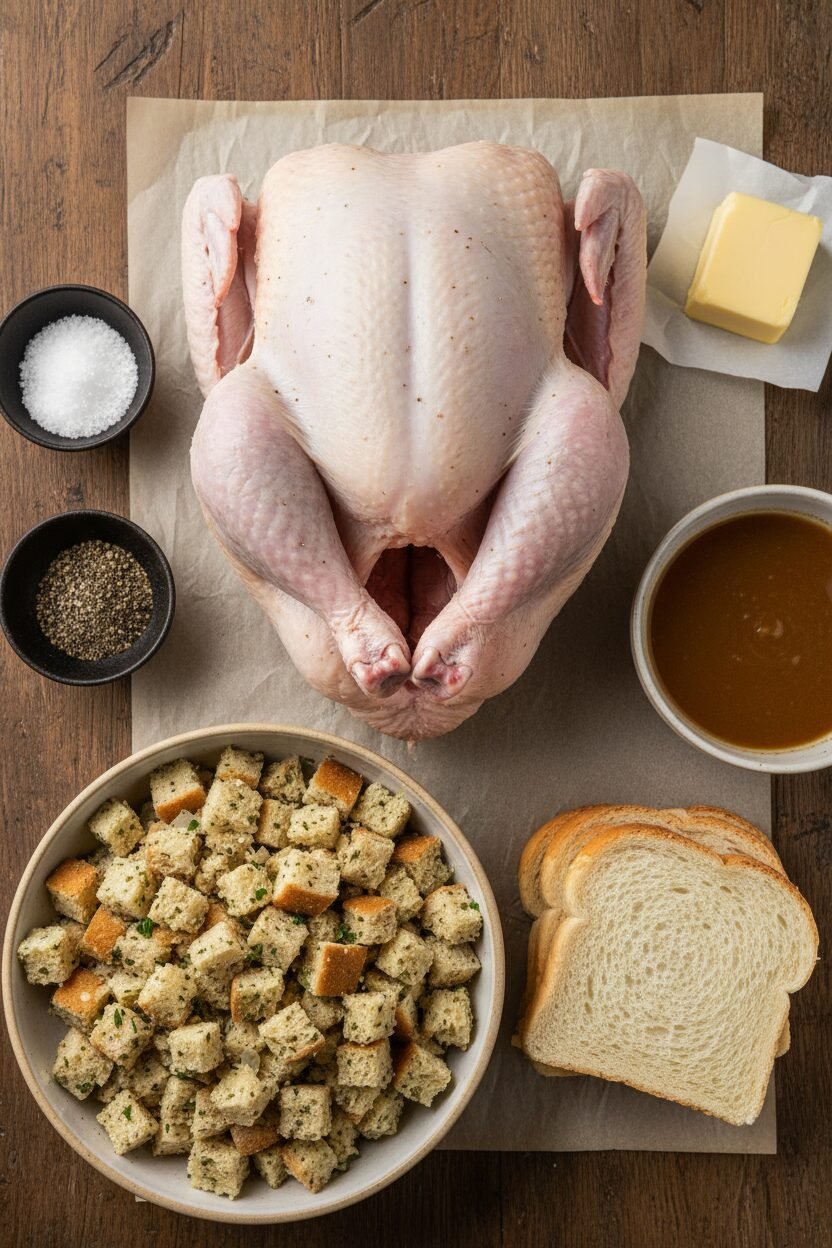
Ingredients:
| Ingredient | Amount | Notes |
|---|---|---|
| Turkey | 1 (14-pound) | Let stand at room temperature for 1 hour before roasting. |
| Kosher salt | To taste | For seasoning inside and outside the turkey. |
| Freshly ground pepper | To taste | For seasoning inside and outside the turkey. |
| Brioche Stuffing | 10 cups | Divided between the body and neck cavities. |
| High-quality white bread | 1 slice | Crusts removed; placed under the skin in the neck cavity. |
| Unsalted butter, softened | 6 tablespoons | Spread all over the turkey before seasoning. |
| Simple Turkey Gravy | For serving | Made from the reserved pan drippings after roasting. |
Instructions
Step 1: Let your turkey rest on the counter for one hour. This helps it cook evenly. Pat it very dry with paper towels. Season the inside with salt and pepper. Now, fill it with that lovely brioche stuffing. Use about 8 cups for the big cavity. Put about 2 cups in the neck. (A hard-learned tip: slide that piece of bread under the neck skin. It keeps the stuffing nice and moist!)
Step 2: Rub the softened butter all over the bird. It’s like giving it a cozy blanket. Season the outside with salt and pepper, too. Tie the legs together with string. Tuck the wings underneath. This keeps everything neat. I still laugh at how my first turkey looked like it was flying!
Step 3: Now for the parchment paper wrap. Lay a big sheet down. Place the turkey on top. Gather the paper up and over, like a present. Staple the flaps to seal it. You’ll wrap it in two more sheets, turning it each time. This keeps all the steam and flavor locked right in. Doesn’t that smell amazing already?
Step 4: Put your wrapped bird on a rack in a pan. Roast it for 2 hours and 45 minutes. Then, take it out and carefully cut the paper open. Turn your oven heat up. Pull the parchment away and throw it out. This next roast makes the skin golden and perfect. What part of the turkey do you get most excited to eat? Share below!
Step 5: Roast the turkey until a thermometer says 165°F in the breast. This takes about 45 more minutes. Let it rest on a board for almost an hour. This wait is the hardest part! Save all the tasty juices in the pan for your gravy. Then, carve and enjoy your beautiful work.
Creative Twists
My grandkids love these little changes. They make the meal feel new. Try adding a cup of chopped apples to the brioche stuffing. It’s a sweet surprise. Rub the turkey with herbs like rosemary and thyme under the butter. Your kitchen will smell like a garden. Use a big piece of thick bacon instead of bread over the neck stuffing. It adds a smoky flavor. Which one would you try first? Comment below!
Serving & Pairing Ideas
This turkey deserves a happy plate. Serve it with mashed potatoes for the gravy. Add some roasted carrots with a little honey. They look so cheerful. For a drink, a sparkling apple cider feels like a celebration. Grown-ups might like a glass of Pinot Noir. It’s fruity and smooth. Which would you choose tonight?
Keeping Your Feast Fresh
Let’s talk about leftovers. They are a gift from your past self. First, let the turkey cool completely. Then, carve the meat off the bone. Store the meat and stuffing in separate containers. They will keep in the fridge for three to four days.
For the freezer, wrap portions tightly. Use freezer bags or airtight containers. Frozen turkey is good for two months. Thaw it in the fridge overnight when you are ready. Reheat slices in a pan with a little gravy or broth. This keeps the meat moist and tender.
You can make the full stuffing recipe ahead. Just bake it in a dish while the turkey rests. I once tried freezing a whole stuffed turkey. It was a soggy mess! Now I keep them separate. Storing food well means less waste and more easy meals. That matters for your budget and your time.
Have you ever tried storing it this way? Share below!
Simple Fixes for Common Hiccups
Every cook faces little problems. Here are three easy fixes. First, a dry turkey breast. The parchment paper helps a lot. But that slice of bread under the neck skin is key. It acts like a shield for the white meat.
Second, stuffing that is too wet or too dry. If it is too wet, add more toasted bread cubes. If it is too dry, mix in a little more broth. I remember when my stuffing was like soup! I learned to add liquid slowly.
Third, skin that is not golden brown. Make sure your oven is fully hot at 425°F for the last step. Do not skip removing the parchment. This final roast gives you that perfect, crispy skin. Getting these right builds your confidence. It also makes your meal taste just like you dreamed.
Which of these problems have you run into before?
Your Quick Questions, Answered
Q: Can I make this gluten-free? A: Yes! Use your favorite gluten-free bread for the stuffing and the single slice.
Q: What can I do ahead? A: Make the stuffing the day before. Keep it chilled in the fridge until you are ready to stuff.
Q: I don’t have brioche. A: Any good, soft bread will work. Challah or a soft white loaf are fine swaps.
Q: I’m cooking for fewer people. A: You can use a smaller turkey. Just remember to shorten the cooking time.
Q: Are the staples safe? A: Yes, parchment staples are made for ovens. Fun fact: They are usually made from plain steel wire.
Which tip will you try first?
From My Kitchen to Yours
I hope this recipe brings warmth to your table. Cooking for others is an act of love. The smells and sounds in the kitchen create the best memories. I would love to hear about your cooking adventure.
Tell me about your family’s favorite part. Did your kitchen smell wonderful? Sharing our stories makes the food taste even better. Thank you for letting me share my table with you today.
Have you tried this recipe?
Happy cooking! —Elowen Thorn.
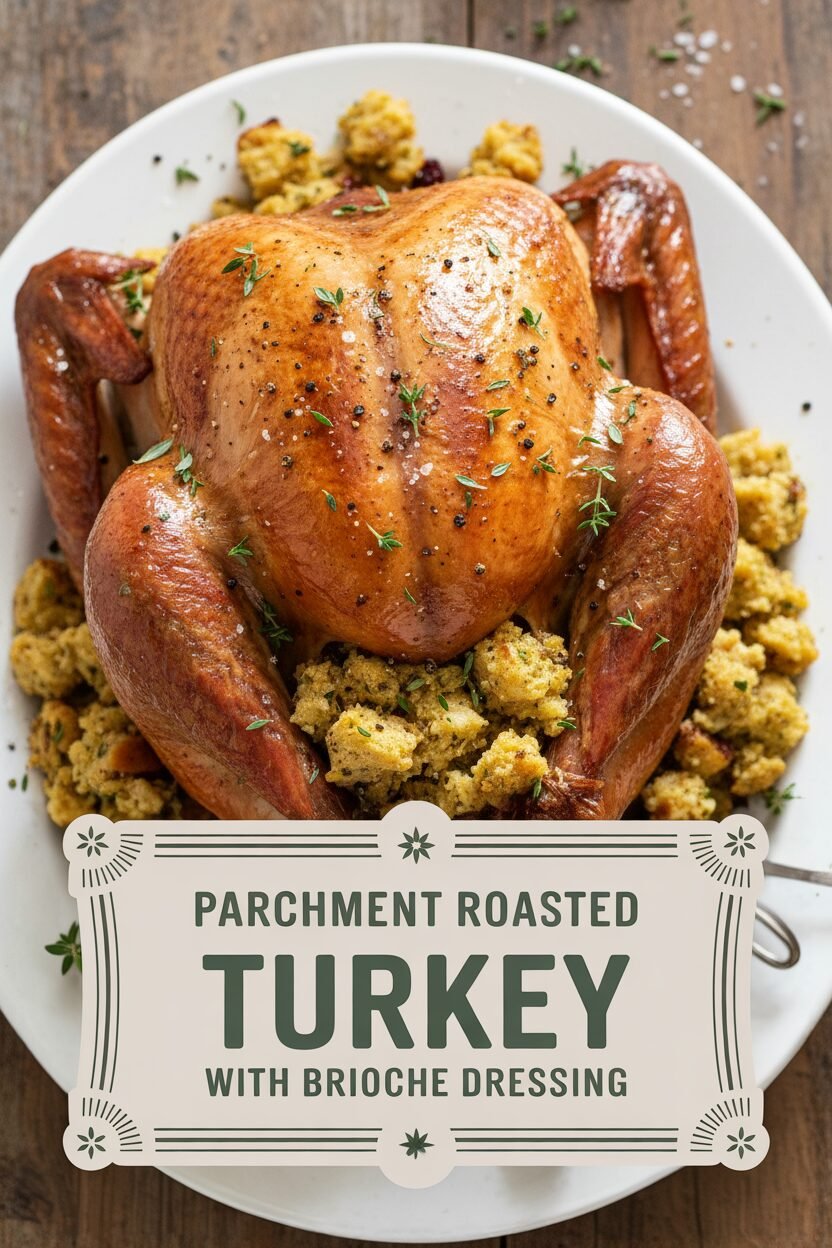

Parchment Roasted Turkey with Brioche Dressing
Description
Roasted Turkey in Parchment with Brioche Stuffing, a classic and flavorful centerpiece for your holiday table.
Ingredients
Instructions
- Let the turkey stand at room temperature for 1 hour. Preheat the oven to 325°F with a rack in the lower third. Pat the turkey dry with paper towels. Season the body cavity with salt and pepper and fill with about 8 cups stuffing. Fill the neck cavity with about 2 cups stuffing (amount will depend on its capacity). Slide the bread under the skin but over the stuffing, in the neck cavity. Secure the skin flaps with toothpicks or skewers. Spread 6 tablespoons butter all over the turkey, then season with salt and pepper. Tie the drumsticks together with kitchen twine. Tuck the wings under the turkey.
- Place a 40-inch sheet of parchment on a work surface. Place the turkey on top, with a short side of the bird facing you. Gather the ends and wrap the turkey. Fold the overlapping ends of the parchment over the turkey and secure with staples. Place a 48-inch sheet of parchment on a work surface, place the turkey on top, and rotate 90 degrees. Fold the short parchment sides over the turkey and secure with staples. Rotate the bird another 90 degrees and repeat the process with another 40-inch sheet of parchment. Secure all paper flaps with staples.
- Place the wrapped turkey on a (not a V-shaped) rack set inside a roasting pan. Roast for 2 hours and 45 minutes. Remove from the oven and cut open the parchment with scissors. Increase the oven to 425°F. While holding drumsticks, slide the parchment out and discard. Return the turkey to the oven. Continue to roast until golden brown and a thermometer inserted into the breast reads 165°F, about 45 minutes more. Transfer to a carving board and let rest at least 45 minutes and up to 1 hour before carving. Reserve the drippings in the pan for the turkey gravy. Carve and serve alongside Simple Turkey Gravy for Roasted Turkey in Parchment.
Notes
- If your turkey is larger than the 14-pounder called for in the recipe: 1. Increase length of parchment sheets so you have enough to come up and over the turkey and to crimp and staple. 2. Increase cooking time to 10 minutes more per pound before removing the parchment. Begin checking the breast temperature 30 minutes after removing parchment.