

A Sweet Start
Hello, my dear. Come sit. The kitchen is warm. I want to tell you about my candy cane cookies. They are a happy little project. We make them every December.
My grandson calls them “magic dough.” One half stays plain. The other gets a dash of red. Then we twist them together. It always feels like a small miracle. What is your favorite cookie to make with your family?
The Twist of the Tale
Now, the twisting part is fun. You roll the two dough squares together. Then you cut them into strips. This is where you need gentle hands.
I remember my first batch. My twists looked more like silly snakes than canes. I still laugh at that. It does not need to be perfect. Your hands make them special. That is why this matters. Food made with patience always tastes better.
Why We Chill the Dough
You must chill the dough twice. I know, waiting is hard. But it is a good lesson. Rushed cookies spread in the oven. They lose their shape.
Chilled dough holds our twist. It keeps the candy cane form. This little wait makes all the difference. It teaches us that good things need their own time. Do you find it hard to wait for treats to bake?
A Pinch of Peppermint
That peppermint smell fills the whole house. Doesn’t that smell amazing? It is the smell of Christmas to me. We use both peppermint and vanilla extract.
The vanilla softens the mint. It makes it cozy, not sharp. *Fun fact: Peppermint is actually a mix of two mint plants!* It is a natural hybrid. That is why its flavor is so bright and cheerful.
Shaping Your Canes
After you twist, roll the strip in sugar. The sugar gives them a little sparkle. Then bend the top into a hook. Place them on the sheet. Give them space to be themselves.
Watch them in the oven. The edges turn a light, toasty brown. That is when you know they are done. They will be crisp and sweet. Will you make yours big or small this year?
The Gift of Sharing
These cookies are made for sharing. We pack them in tins with red ribbons. Giving them away is the best part. Seeing a friend’s smile is the real reward.
This matters too. Cooking connects us. It is a way to say “I thought of you” without any words. A homemade cookie is a tiny piece of love. That is a wonderful thing to give.
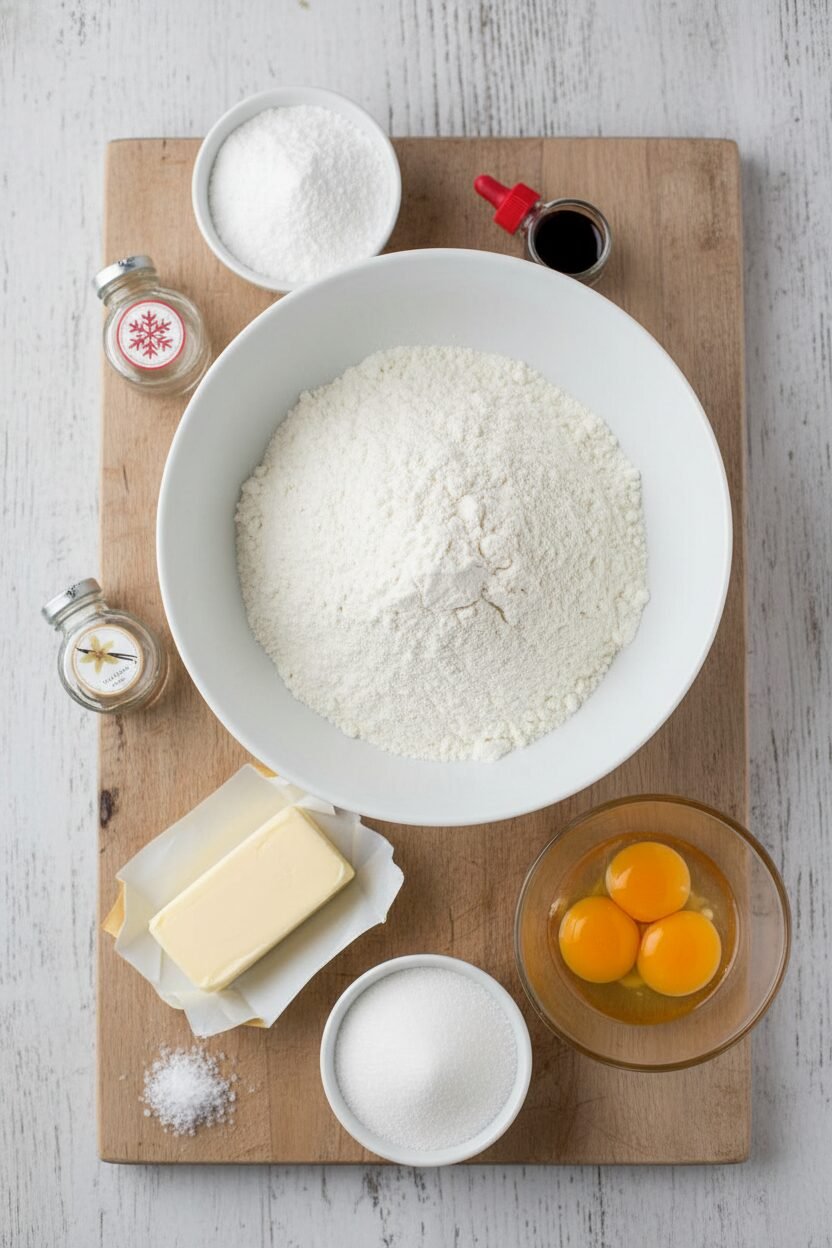
Ingredients:
| Ingredient | Amount | Notes |
|---|---|---|
| All-purpose flour | 2 ¼ cups (11 ¼ ounces/319 grams) | |
| Salt | ½ teaspoon | |
| Unsalted butter, softened | 16 tablespoons | |
| Granulated sugar | ¾ cup (5 ¼ ounces/149 grams) | Plus ½ cup for rolling |
| Confectioners’ sugar | ½ cup (2 ounces/57 grams) | |
| Large egg yolks | 2 | |
| Peppermint extract | 2 teaspoons | |
| Vanilla extract | 1 teaspoon | |
| Red food coloring | 12 drops |
Instructions
Step 1: Whisk your flour and salt in a bowl. In another bowl, beat the soft butter and both sugars. Beat until it looks pale and fluffy. This takes a few minutes. I love this part. Doesn’t that smell amazing already?
Step 2: Add the egg yolks and both extracts to the butter. Mix until it’s all one color. Now, slowly add your flour mixture. Mix on low until just combined. (Scrape the bowl sides halfway for a perfect mix.)
Step 3: Set aside half the plain dough. Add red food coloring to the other half. Mix it until it’s a merry, bright red. Shape each half into a square. Wrap them up and chill for two hours. Patience makes perfect cookies!
Step 4: Heat your oven to 325 degrees. Line your baking sheets. Roll each dough square into a bigger square. Place one sheet on top of the other. Gently roll them to stick together. Can you guess why we layer them? Share below!
Step 5: Cut the dough in half and chill briefly. Then, slice one half into thin strips. Gently twist each strip into a spiral. Roll it in sugar and bend the top into a cane shape. (Chilled dough is much easier to twist!)
Step 6: Place your candy canes on the sheets. Bake until the edges are just light brown. Switch the pans halfway for even baking. Let them cool a bit before moving. The waiting is the hardest part, I think!
Creative Twists
You can make these your own. Try a different shape, like little peppermint swirls. Use green food coloring for a festive look. Or, dip just the curved end in dark chocolate. It’s wonderfully rich. Which one would you try first? Comment below!
Serving & Pairing Ideas
These cookies shine on a holiday plate. Pile them high on a vintage cake stand. They look so cheerful next to a cup of hot cocoa. For a grown-up treat, try them with a peppermint schnapps hot chocolate. For everyone, a glass of cold milk is classic. Which would you choose tonight?

Keeping Your Candy Canes Crisp
Let’s keep these sweet treats fresh. Cool them completely first. Store them in a tin with a tight lid. They will stay crisp for a week.
You can also freeze the dough. Wrap the squares well in plastic. They keep for three months. Thaw in the fridge before rolling.
I once left a batch in a bowl. They turned soft overnight. A cookie tin saves the day. Batch cooking lets you share more.
Having cookies ready brings joy. You can gift them or enjoy them yourself. It makes the season feel special and prepared. Have you ever tried storing it this way? Share below!
Twist and Bake Without the Fuss
Is your dough too soft to twist? Chill it longer. Firm dough holds its shape better. I remember when my first canes melted flat.
Are the colors mixing too much? Roll the layers gently. Just press them enough to stick. This keeps the red and white clear.
Do the cookies spread while baking? Your oven might be too hot. An oven thermometer helps a lot. Getting it right builds your confidence.
Small fixes lead to big flavor. A perfect shape makes them extra festive. Which of these problems have you run into before?
Your Quick Questions, Answered
Q: Can I make these gluten-free? A: Yes. Use a good gluten-free flour blend. The texture will be slightly more sandy.
Q: How far ahead can I make them? A: The dough chills for two hours. You can make it up to three days ahead.
Q: What if I don’t have peppermint extract? A: Use all vanilla extract instead. The cookies will be sweet and buttery.
Q: Can I double the recipe? A: Absolutely. Just mix in two separate batches. This ensures everything blends evenly.
Q: Any fun optional tips? A: Sprinkle crushed candy cane on top before baking. *Fun fact: Candy canes were once just straight, white sticks!* Which tip will you try first?
From My Kitchen to Yours
I hope you love making these. The twisting part is my favorite. It feels like playing with clay.
Your kitchen will smell wonderful. Share them with someone you love. That is the best part of baking.
I would love to hear from you. Tell me all about your baking adventure. Have you tried this recipe? Happy cooking!
—Elowen Thorn.
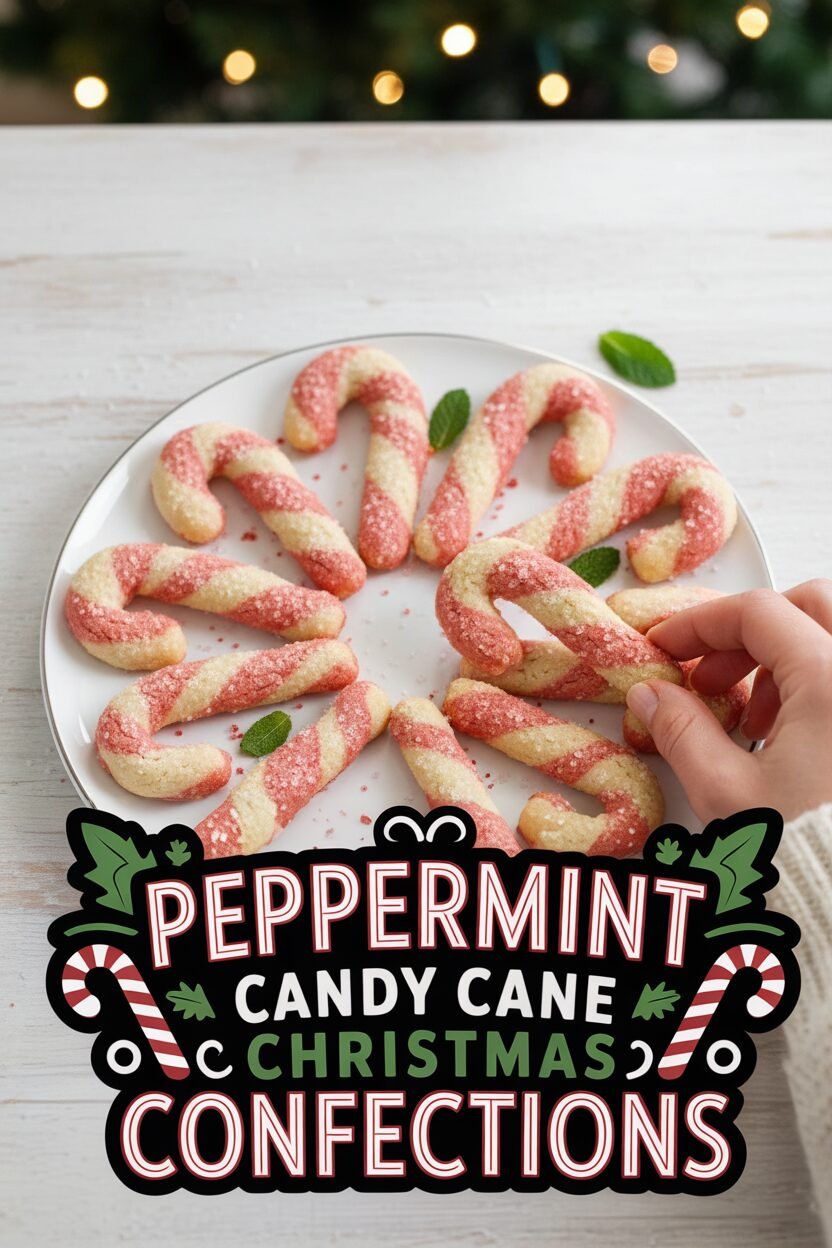

Peppermint Candy Cane Christmas Confections
Description
Peppermint Candy Canes
Ingredients
Instructions
- Whisk flour and salt together in bowl. Using stand mixer fitted with paddle, beat butter, ¾ cup granulated sugar, and confectioners’ sugar on medium-high speed until pale and fluffy, 3 to 6 minutes. Add egg yolks, peppermint extract, and vanilla and beat until well incorporated. Reduce speed to low, slowly add flour mixture, and mix until combined. Set aside half of dough; add food coloring to remaining dough and mix until fully incorporated. Shape each half into 5-inch square, wrap tightly in plastic wrap, and refrigerate until firm, about 2 hours.
- Adjust oven racks to upper-middle and lower-middle positions and heat oven to 325 degrees. Line 2 baking sheets with parchment paper. Spread remaining ½ cup granulated sugar in shallow dish.
- Roll each dough square into 9-inch square on piece of parchment. Flip 1 dough square on top of other dough square and gently roll to adhere. Cut square in half and refrigerate until firm, about 15 minutes. Cut 1 half into 4½ by ¼-inch strips. Gently twist each strip into spiral, rolling to smooth out edges. Roll in granulated sugar, shape into candy canes, and space 1 inch apart on prepared sheets. Bake until edges are light brown, 13 to 15 minutes, switching and rotating sheets halfway through baking. Let cookies cool on sheets for 5 minutes, then transfer to wire rack. Repeat with remaining dough. Let cookies cool completely before serving.
Notes
- For best results, ensure dough is well chilled before rolling and shaping. Store cookies in an airtight container at room temperature for up to 5 days.