

My Kitchen, Full of Stories
Let me tell you about custard slices. They are my happy memory food. I used to make them with my Nana. We would get flour everywhere. I still laugh at that.
This recipe is a hug on a plate. It is sweet, creamy, and crunchy all at once. Making it is a little project. But every step is worth it. What is your favorite memory food? I would love to hear about it.
The Secret is in the Pastry
First, we bake the puff pastry. Prick it all over with a fork. This stops it from puffing up too much. We want it flat and crisp for our layers.
Here is the funny part. You bake it, then press it down with a tray. You do this twice. It feels a bit silly, pressing hot pastry. But it works. This matters because a flat base holds all that lovely custard.
Making the Heart of the Slice
Now for the custard. Mix the powder and sugar with a little milk first. This makes a smooth paste. No lumps allowed. Doesn’t that smell amazing already?
Cook it slowly and stir, stir, stir. Then add the egg and butter. This makes it rich and silky. Let it cool a bit before you pour. A warm custard over the pastry makes everything perfect. *Fun fact: The word “custard” comes from an old word for “crust.” It was meant to be in a pie!
The Icing Dance
The icing is where you can play. Make the simple white icing. Smooth it over the top. Then, make a little chocolate icing. Put it in a bag.
Draw lines with the chocolate. Then take a skewer. Drag it through the lines. You will make a beautiful pattern. It looks like a professional did it. Do you like plain icing or patterns on your treats?
The Hardest Part
You must wait. Put the whole slice in the fridge. Leave it for many hours, or even overnight. This is the hardest step. I always want to peek.
Waiting matters. It lets everything set firmly. Then you can cut clean squares. Use a sawing motion with a bread knife. This keeps the pastry from crumbling. Now, share it with someone you love. That is the best part of cooking. Who will you share your first slice with?
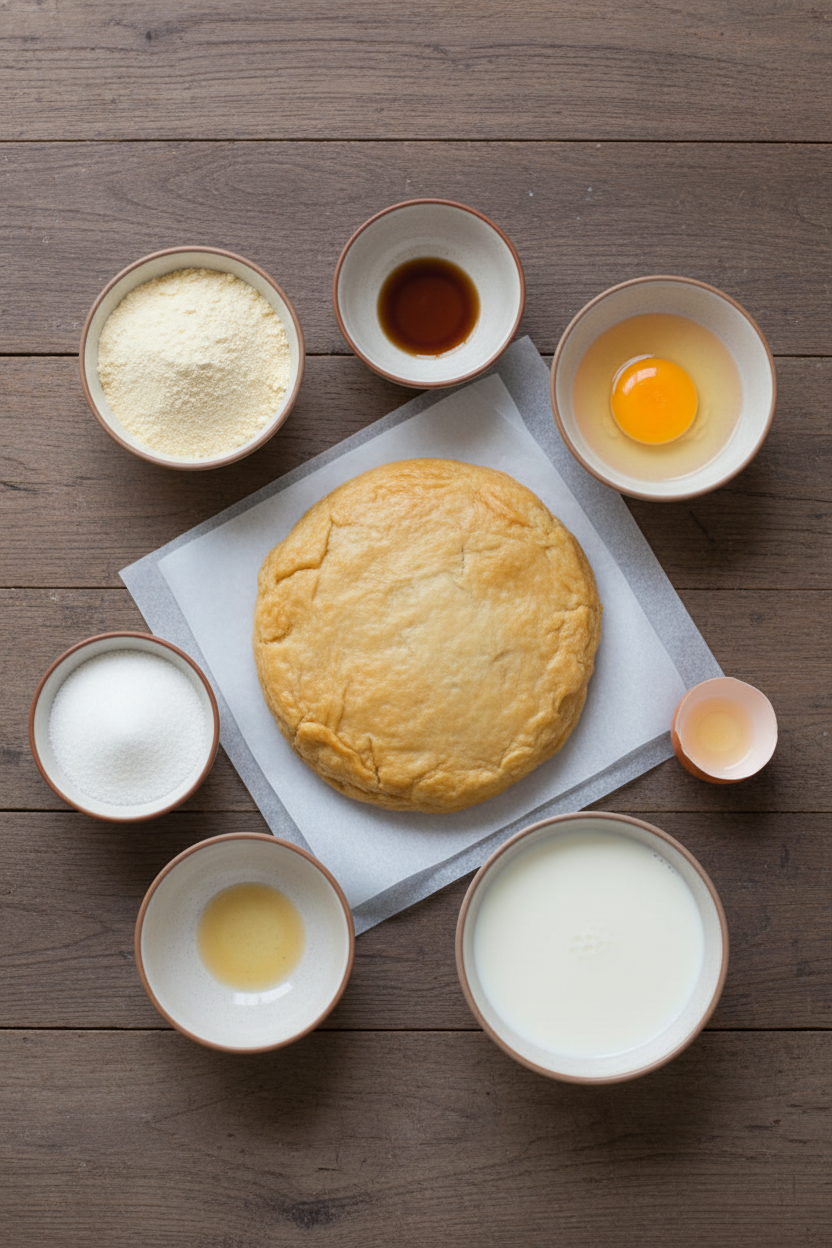
Ingredients:
| Ingredient | Amount | Notes |
|---|---|---|
| Flaky puff pastry | 2 sheets | Defrosted |
| Custard powder | ⅔ cup | |
| Sugar | ⅔ cup | |
| Vanilla essence | 2 tsp | |
| Milk | 1L | |
| Egg | 1 | |
| Butter | 50g | |
| For the Icing: | ||
| Icing sugar | 2 cups | |
| Butter, softened | 25g | |
| Hot water | 4-5 Tbsp | |
| Cocoa | 1 Tbsp | |
Instructions
Step 1: First, let’s bake our pastry. Heat your oven nice and hot. Lay out the pastry sheets on a tray. Prick them all over with a fork. This stops them from puffing up too much. (A hot tip: press them down flat halfway through baking!)
Step 2: Now, make the custard filling. Mix the custard powder, sugar, and a little milk. In another bowl, whisk the egg with more milk. This keeps the egg from cooking too fast. Doesn’t that vanilla smell amazing?
Step 3: Cook the custard in a saucepan. Stir it until it’s thick and cozy. Then, stir in your egg mixture and butter. Let it cool a bit. What’s your favorite thing to make with custard? Share below! I still think of my Nana at this step.
Step 4: Build your slice! Fit one pastry piece into your tin. Pour the custard on top. Gently place the second pastry piece over it. Press down lightly. (Always line your tin well, or it will stick!)
Step 5: Time for the fancy icing. Make a simple white icing. Put some in another bowl and mix in cocoa. Pipe chocolate lines on the white icing. Drag a skewer through for a pretty pattern. It’s like magic!
Creative Twists
Add a layer of sliced strawberries or bananas with the custard.
Swap the chocolate lines for a drizzle of passionfruit icing.
Sprinkle the top with toasted coconut for a little crunch.
Which one would you try first? Comment below!
Serving & Pairing Ideas
Serve this slice cold with a cup of milky tea. For a special treat, add a dollop of whipped cream on the side. A few fresh berries on the plate make it look lovely. It’s perfect for a weekend afternoon. Which would you choose tonight?

Keeping Your Custard Slice Perfect
Let’s talk about storing this sweet treat. Always keep your slice in the fridge. Cover the tin tightly with plastic wrap. This stops the pastry from getting soft from fridge smells.
You can freeze slices for a happy future surprise. Wrap each piece in baking paper first. Then pop them into a freezer bag. They will keep well for a month.
I remember my first batch. I left it on the counter. The icing wept and the custard got warm. Now, the fridge is my best friend for storage.
Batch cooking this recipe is wonderful. Make the full tray for your week. It saves so much time and effort. Having a homemade treat ready matters. It brings a little joy to a busy day.
Have you ever tried storing it this way? Share below!
Three Little Hiccups and How to Fix Them
Sometimes the pastry puffs up too much. Just press it flat with a tray while hot. I once had a pastry that looked like a pillow! Pressing it gives you a flat, even base.
Is your custard too thin or lumpy? Mix the powder with cold milk first. This stops those pesky lumps from forming. Cooking it slowly until it thickens is key.
The icing might seem tricky. If it’s too runny, add a bit more icing sugar. If it’s too thick, add hot water one drop at a time. Getting these textures right matters. It builds your confidence in the kitchen. It also makes your slice look and taste perfect.
Which of these problems have you run into before?
Your Quick Questions, Answered
What is the secret to a crisp, not soggy, pastry in a custard slice?
The secret is baking the pastry well. Prick it with a fork before baking. This stops big air bubbles. Press it down flat when it comes out of the oven. Let the pastry cool completely before adding the custard. A hot pastry will make the custard warm and soft. A cool, crisp base is the best start.
How do you make a thick and creamy homemade custard for slices?
First, mix the custard powder with cold milk. This makes a smooth paste with no lumps. Heat the rest of the milk gently. Whisk in the paste and cook until it boils. Keep stirring for five minutes until it is very thick. Then add the egg mix and butter. This creates a rich, creamy, and perfect custard filling.
Can you make custard slices ahead of time, and how do you store them?
Yes, you absolutely can make them ahead. They need to set in the fridge for five hours. Overnight is even better. Keep the whole slice covered in its tin. Use plastic wrap pressed right on the surface. Store it in the refrigerator. This keeps the pastry crisp and the custard firm. It is a great make-ahead dessert for guests.
What’s the best way to cut a custard slice without squashing it?
Use a sharp, serrated knife. A bread knife works perfectly. Make sure the slice is very cold from the fridge. Do not press down hard. Use a gentle sawing motion to go through the top pastry. Let the knife do the work. This gives you clean layers and neat squares. Wipe the knife clean between cuts for the prettiest slices.
Is there a simpler version of a custard slice recipe for beginners?
For a simpler version, use a packet custard mix. Follow the directions on the packet to make it thick. Let it cool completely. You still bake the pastry as the recipe says. Layer the cool custard between the pastry sheets. You can even skip the fancy icing. Just dust the top with icing sugar. It is still delicious and much easier.
How do you get the classic icing on top without it melting into the custard?
The custard must be completely cold first. If it is warm, it will melt the icing. Make your icing thick, like a smooth paste. Spread it gently over the cool, firm custard layer. *Fun fact: The butter in the icing helps it set.* Work quickly to add the chocolate lines. Then put the whole slice in the fridge immediately to set.
Which tip will you try first?
From My Kitchen to Yours
I hope you love making this slice as much as I do. It is a classic for a good reason. The layers of crisp pastry and smooth custard are pure happiness.
I would love to hear about your baking adventure. Tell me how it went in your kitchen. Your stories are my favorite thing to read.
Have you tried this recipe? Let me know in the comments below!
Happy cooking!
—Danielle Monroe

Perfect Custard Slice Recipe for Home Bakers
Description
A classic bakery treat made at home with layers of crisp puff pastry and rich, creamy vanilla custard, topped with a beautiful chocolate-swirled icing.
Ingredients
Instructions
- Preheat the oven to 220°C fan bake. Line a 21cm square tin with baking paper including up the sides. Place the pastry sheets on a lined oven tray and prick all over with a fork. Cook for 8 minutes then remove from the oven. Use a baking tray to firmly press the pastry down flat. Return to the oven for a further 8 minutes. Remove from the oven again and press down flat one more time, then leave to cool.
- In a mixing bowl combine the custard powder, sugar, vanilla and ½ a cup of milk. Mix until smooth. Crack the egg into a separate bowl with ½ a cup of milk. Whisk to combine.
- Pour the remaining 3 cups of milk into a medium saucepan over a medium heat. Add the custard mixture to the milk and bring to the boil. Reduce to a simmer, then stir until thickened, about 5 minutes.
- Add in the egg mixture and butter. Stir for 2 minutes then set aside to cool.
- Trim both pieces of the pastry to fit the tin. Press one piece into the lined tin. Pour the custard over the pastry spreading out to the edges. Cover with the second piece of pastry, press down gently.
- Sift the icing sugar into a mixing bowl, add the butter and boiling water, mix till smooth. Take 3 tablespoons of icing and place in a small bowl. Add the cocoa powder and mix to combine. Add extra hot water if needed. Place chocolate icing in a piping bag or small snap lock bag.
- Smooth the white icing over the slice. Then snip the corner off the piping bag creating a 1-2mm opening. Draw lines of chocolate icing across the slice then quickly use a wooden skewer drag the tip through the lines in alternating directions.
- Set in the fridge for at least 5 hours or overnight. Cut while cold with a sharp serrated bread knife sawing through the pastry.
Notes
- For best results, ensure the custard is completely cool before assembling. Use a hot, sharp knife to cut clean slices. Store leftovers in the refrigerator.