

My First Cheesecake Brownie Mess
I have a funny story for you. My first try at these brownies was a mess. I was so excited to make them. I forgot to let the butter and chocolate cool. I poured it right into the sugar. Can you guess what happened? My sugar started to melt! It made a grainy, funny-looking batter. I was so disappointed. But I baked it anyway. You know what? They were still delicious. Just a little ugly. I still laugh at that. It taught me a good lesson. Always let things cool a bit. It makes everything smoother. Have you ever had a baking mess turn out okay? I’d love to hear your story.
That little mistake matters. Baking is about patience. Rushing can change how things feel in your mouth. Letting the chocolate mix cool helps the sugar blend in right. It gives you that perfect, fudgy brownie texture we all love. It’s a small step with a big reward.
Why Two Layers Are Magic
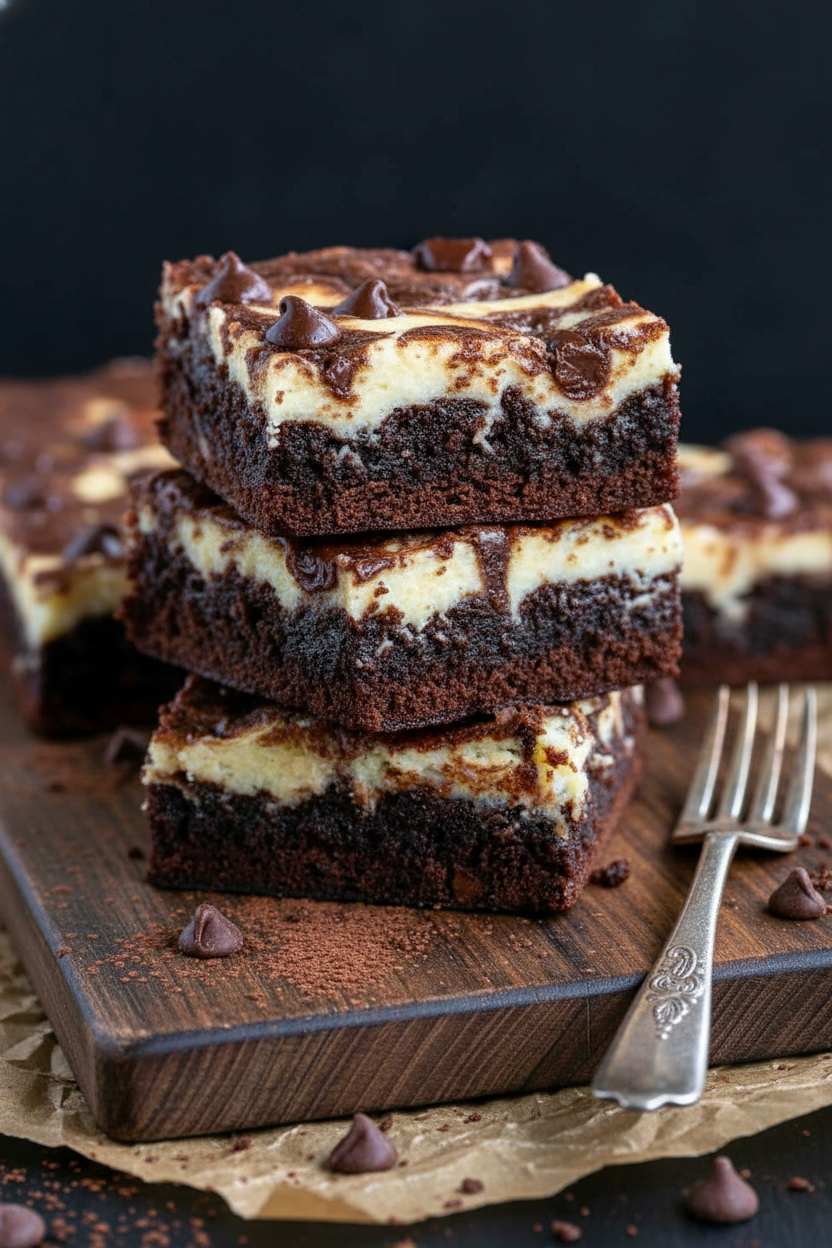
Let’s talk about the two parts. You have the rich, dark brownie. Then you have the creamy, tangy cheesecake. They are so different. But together, they are perfect. It’s like a happy dance in your mouth. The brownie is deep and chocolatey. The cheesecake is light and sweet. Doesn’t that sound amazing? This combo matters because it pleases everyone. Someone might love fudge. Another might love cream cheese. This dessert makes them both smile.
*Fun fact*: The cornstarch in the brownie layer is a quiet helper. It makes the brownies extra tender. It soaks up moisture so they stay soft. It’s my little secret for a perfect cheesecake brownie bite. What’s your favorite dessert combo? Is it chocolate and peanut butter? Or maybe fruit and cream? Tell me yours!
The Best Part: Making the Swirl
Now for the really fun part. After you spread the cheesecake layer, you get to swirl. You take little spoons of brownie batter. You drop them on top. Then you take a knife. You gently drag it through the two batters. You make beautiful, wavy lines. There is no wrong way to do this. Every swirl is unique. It’s like making edible art. It makes the brownies look so special. Do you like to make pretty designs when you bake?
This step isn’t just for looks. It lets the two flavors marry in every bite. You get a bit of both in every single piece. It’s why this easy and delicious treat feels so fancy. It shows you cared enough to make it beautiful.
The Waiting Game
This is the hardest step. You have to wait. The recipe says to cool them, then chill for hours. I know, I know. It’s so hard! You want to eat them right away. The smell is incredible. But trust this old grandma. Waiting is the final, important ingredient. If you cut them warm, they will be a gooey puddle. A tasty puddle, but a puddle.
Chilling them makes everything set. It gives you a clean, neat slice. The brownie swirl recipe needs this time to become its best self. It’s a lesson in delayed joy. The reward is worth it. A perfect, firm-yet-creamy square. Do you find it hard to wait for desserts to cool?
Make It Your Own
Once you know the basic dance, you can change the music. Try using white chocolate chips on top. Or add a sprinkle of sea salt before baking. You could even mix a little raspberry jam into the cheesecake layer. Baking is about sharing joy. It’s also about having fun. What would you add to make these brownies yours?
This is why I love baking. You start with a simple plan. Then you add your own heart. Every time you make it, it’s a little gift. Whether you follow the recipe exactly or add your own twist, you are creating something wonderful. That’s what matters most.
Instructions
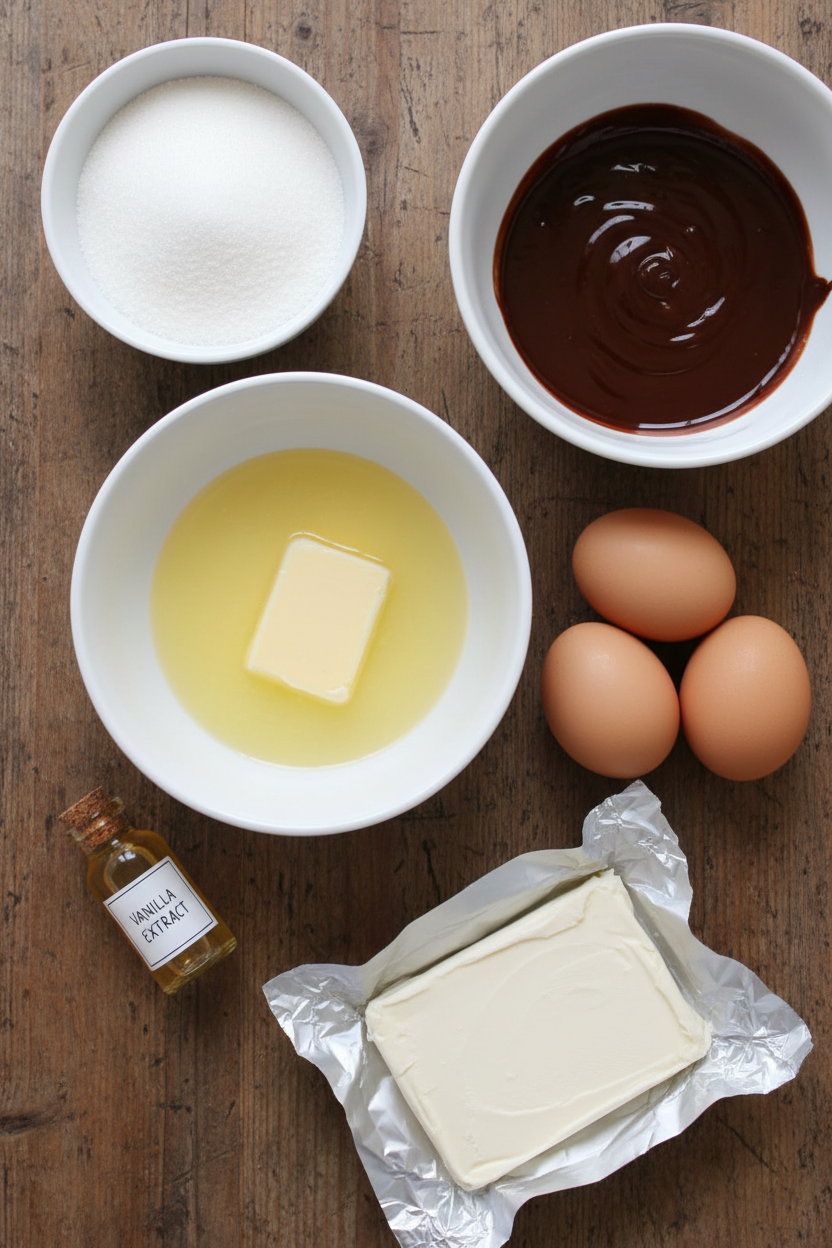
Step 1: First, let’s get cozy. Heat your oven to 350°F. Line your pan with paper and give it a little spray. This simple prep work makes cleanup a breeze later. I always do this first. It feels like getting the table ready for guests.
Step 2: Now, melt the butter and chocolate chips together. Go slow, in 30-second bursts. Stir until it’s gloriously smooth. Let it cool a bit. (Hot mixture will cook your eggs!) Whisk in the sugar next. Doesn’t that smell amazing? Then add the eggs, one by one.
Step 3: In another bowl, mix your cocoa and cornstarch. Gently fold these dry friends into the chocolate mix. Just until you don’t see flour. Overmixing makes tough brownies. Pour this thick batter into your pan. What’s your favorite chocolate treat? Share below! I still think of my first batch.
Step 4: Time for the cheesecake magic. Beat the softened cream cheese until it’s smooth. Add the sugar and vanilla. Beat it all until it’s creamy and dreamy. Finally, mix in that one egg on low. Pour this over your brownie layer. Use a spoon to spread it gently.
Step 5: Sprinkle chocolate chips on top. Take tiny spoons of the brownie batter. Dot them over the cheesecake. Swirl it with a knife for a beautiful marble effect. Bake for about 50 minutes. The center should have a tiny wiggle. Cool it completely, then chill. Waiting is the hardest part!
Creative Twists
Peanut Butter Swirl: Add spoonfuls of peanut butter to the cheesecake layer before swirling.
Mint Chip Delight: Use mint extract in the cheesecake and top with dark chocolate chips.
Berry Surprise: Drop a few fresh raspberries into the batter before baking for a tart pop.
Which one would you try first? Comment below!
Serving & Pairing Ideas
Serve these squares chilled for the best, fudgy texture. A dollop of whipped cream on top makes it feel extra special. For a fun party treat, cut them into small bites. A cold glass of milk is the perfect partner. It cuts the richness just right. Sometimes I just eat one straight from the fridge. It’s a lovely little secret. Which would you choose tonight?
Keeping Your Cheesecake Brownies Happy
These bars store beautifully. Let them cool completely first. Then, cover the pan tightly. They love the fridge for up to five days. You can also freeze them for a month. Just wrap slices well in plastic wrap.
I remember my first batch. I was so eager, I cut them warm. It was a delicious, gooey mess. Now I always wait. Storing them right makes every slice perfect. For more storage ideas, peek at this helpful guide.
Batch cooking is a lifesaver. Making a double batch saves future-you time. It means a sweet treat is always ready. This matters because good food should bring joy, not stress. Have you ever tried storing it this way? Share below!
Simple Fixes for Common Baking Hiccups
First, a cracked cheesecake top. This often means it baked too hot. I once rushed and my oven was too fierce. The solution is simple. Bake low and slow, and don’t overmix the batter.
Second, brownies that stick to the pan. Always line your pan with parchment paper. Spray it well with nonstick spray. This little step saves so much frustration. It ensures your beautiful bars come out cleanly.
Third, a messy swirl. If you mix too much, the layers blend. Just drop small dollops and make a few gentle passes with a knife. Fixing these issues builds your confidence. It also makes the flavor and texture just right. Which of these problems have you run into before?
Your Quick Questions, Answered
How do you make swirled brownie cheesecake bars?
You make two layers. First, prepare a rich brownie batter and spread it in a pan. Then, make a simple cheesecake layer and pour it over. Top with chocolate chips and dollops of leftover brownie batter. Swirl it gently with a knife before baking. For a detailed walkthrough, this gooey recipe is a fantastic resource.
What is the best way to swirl cheesecake into brownie batter?
The best way is to be gentle. Drop small spoonfuls of brownie batter on top of the cheesecake layer. Then, use a knife to make a few figure-eight motions. Do not over-swirl. You want pretty ribbons, not a muddy mix. The key is a light hand for that perfect marbled look.
Can you use a box mix for brownie cheesecake bars?
Yes, you absolutely can. Prepare the box mix as directed. Then, pour it into your prepared pan. Make your cheesecake layer separately and pour it over. Swirl and bake as usual. It is a wonderful shortcut for a busy day. *Fun fact: my grandkids love helping with the box mix version!*
How do you prevent the cheesecake layer from cracking?
To prevent cracks, avoid overbeating the cheesecake batter. Mix just until it is smooth. Also, do not overbake it. The center should still have a slight jiggle when you take it out. Let it cool slowly in the oven with the door cracked. This gentle process helps it set without stress.
Can swirled brownie cheesecake bars be made ahead?
They are perfect for making ahead. These bars need time to chill and set. Baking them the day before is actually ideal. The flavors meld together beautifully overnight in the fridge. This makes them even more delicious. It also makes party planning so much easier for you.
What are some tips for cutting clean cheesecake bars?
Use a long, sharp knife. Dip the blade in hot water and wipe it clean between each cut. This gives you neat, professional-looking slices. Chilling the bars thoroughly is the most important step. A warm bar will always be messy. For perfect slices every time, check out these cutting tips. Which tip will you try first?
From My Kitchen to Yours
I hope you love making these bars as much as I do. Baking is about sharing joy and creating sweet memories. My kitchen is always full of both. I would love to hear about your baking adventures.
Tell me all about it in the comments. Have you tried this recipe? Did your family gobble them up? I am always here with a virtual cup of tea and more stories. Happy cooking!
—Elowen Thorn.

Swirled Brownie Cheesecake Bars Recipe
Description
A decadent dessert featuring a rich, fudgy brownie base swirled with a creamy, smooth cheesecake layer and topped with chocolate chips.
Ingredients
Brownie Layer:
Cheesecake Layer:
Topping:
Instructions
- Preheat oven to 350°F. Line a 9×9 inch baking pan with parchment paper or foil and spray with nonstick cooking spray.
- For the Brownie Layer: Melt butter and 2 cups chocolate chips together in a large, microwave-safe bowl. Heat in 30-second increments, stirring, until smooth. Let cool slightly. Whisk in sugar until combined. Add eggs, one at a time, whisking just until combined after each. Stir in vanilla extract.
- In a separate bowl, whisk together cocoa powder and cornstarch. Gently fold the dry ingredients into the wet ingredients until just combined. Do not overmix. Spread the brownie batter into the prepared pan. Set aside.
- For the Cheesecake Layer: In a large bowl, beat softened cream cheese until smooth. Add sugar and vanilla extract and beat until creamy and smooth, scraping down the sides as needed. Add egg and beat on low speed just until combined.
- Pour the cheesecake batter over the brownie layer in the pan and spread into an even layer.
- For the Topping: Sprinkle ½ cup chocolate chips over the cheesecake layer. Take a tablespoon of the reserved brownie batter and drop small dollops over the top. Use a knife to gently swirl the brownie batter into the cheesecake layer.
- Bake for 45 to 55 minutes or until the edges are set and the center is just slightly jiggly.
- Place the pan on a wire rack to cool completely, then refrigerate for at least 4 hours, or overnight, before slicing and serving.
Notes
- For clean slices, use a hot, sharp knife and wipe it clean between cuts. Store leftovers covered in the refrigerator for up to 5 days.