

The Turkey That Lies Flat
Let’s talk turkey. But not the big, round kind. We are going to flatten it. This is called spatchcocking. It sounds funny, I know. I still laugh at that word.
You cut out the backbone with strong scissors. Then you press down. The turkey lies flat in the pan. This matters because it cooks evenly. No more dry breast and raw legs! Everything gets golden and juicy together.
A Secret Under the Skin
Now for a little secret. Use your fingers. Gently push them under the turkey skin. You are making little pockets. We rub a simple salt and sugar mix inside.
This sits in the fridge for a day. The salt works its magic. It makes the meat tender and full of flavor. Fun fact: This method is called dry-brining. It’s like a flavor massage for the bird! Have you ever tried a trick like this on your chicken?
Stuffing That Sits Below
Most stuffing is cooked inside the bird. Ours is different. We make a big square of it in the pan. Then we place the turkey right on top. The turkey becomes a cozy blanket for the bread.
As the turkey roasts, all its wonderful juices drip down. They soak right into the stuffing. Doesn’t that smell amazing? This matters. It makes the stuffing rich and savory. It tastes like the whole holiday in one bite.
Slow and Steady Roasting
We start the oven hot. Then we turn it down. This gives us crispy skin and soft meat. We cover the breast with foil for a while. This keeps it from cooking too fast.
My grandson once peeked in the oven every five minutes. He was so excited! Patience is the real ingredient here. The wait is always worth it. What part of dinner makes you most impatient?
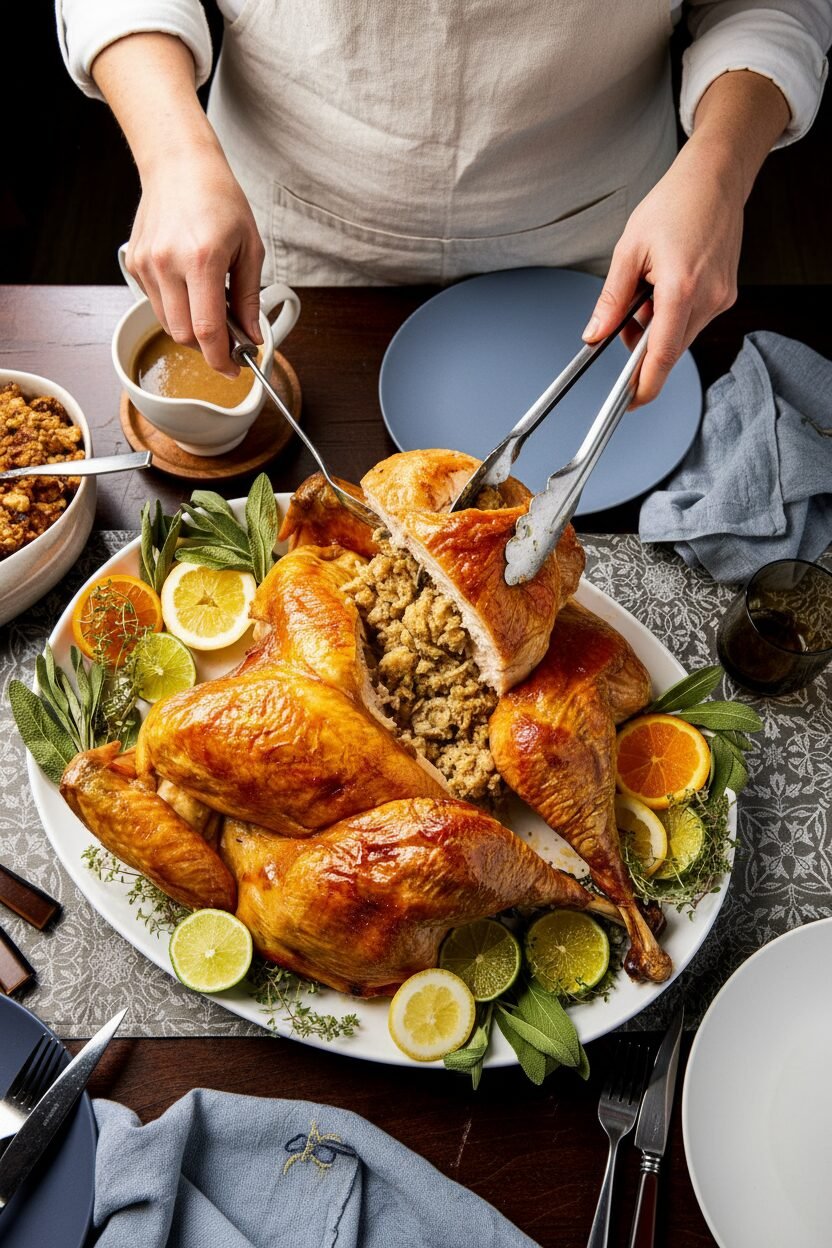
The Best Part: Resting
When the turkey is done, do not carve it. Let it rest on the board. I know, it’s hard to wait. But this is the most important step.
While it rests, the juices settle back into the meat. If you cut too soon, all that goodness runs out. Meanwhile, we put the stuffing back in the oven. It gets a beautiful, crispy top. Then, we gather everyone. We carve and serve. What is your family’s favorite part of the holiday meal? Tell me yours.
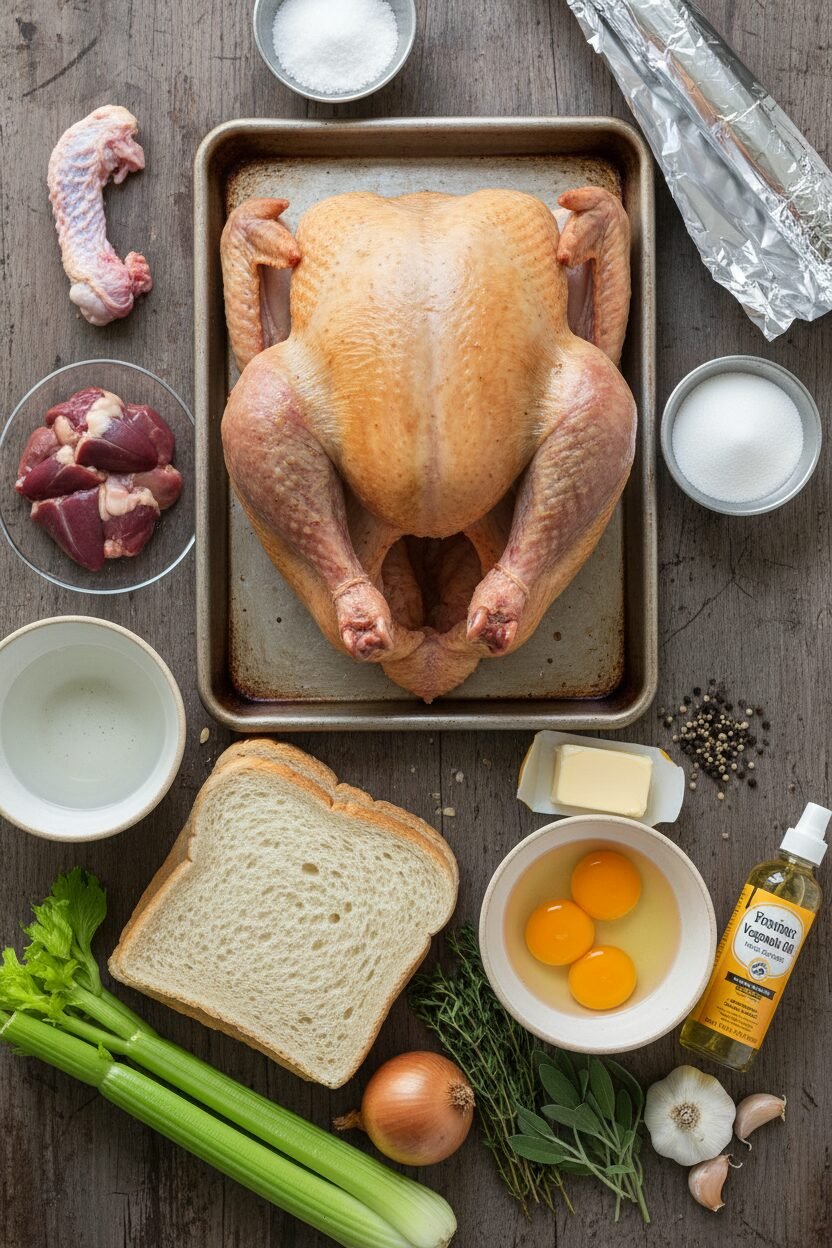
Ingredients:
| Ingredient | Amount | Notes |
|---|---|---|
| kosher salt | ¼ cup | |
| sugar | 4 teaspoons | |
| turkey | 1 (12- to 14-pound) | neck and giblets removed and reserved for gravy |
| hearty white sandwich bread | 1½ pounds | |
| large eggs | 3 | |
| water | ½ cup | |
| unsalted butter | 5 tablespoons | divided |
| onions | 3 | chopped |
| celery ribs | 6 | chopped fine |
| fresh thyme | 2 tablespoons | minced |
| fresh sage | 2 tablespoons | minced |
| garlic cloves | 6 | minced |
| pepper | 1 teaspoon |
Instructions
Step 1: Mix your salt and sugar in a bowl. This little rub makes the turkey so juicy. Now, place your turkey breast-side down. Carefully cut out the backbone with shears. Save that bone for gravy! Press down hard to flatten the bird. It always makes me giggle, like giving it a little hug.
Step 2: Gently loosen the skin over the breast and legs. Rub that salt mixture underneath. This gets flavor right into the meat. Tuck the wings under and put the turkey on a rack. Let it rest in the fridge, uncovered, for a day or two. (This dry-brine step is the secret to crispy skin!)
Step 3: Heat your oven to 250 degrees. Cut your bread into little cubes. Bake them on sheets until they are dry and toasty. Let them cool completely. Your house will smell like a bakery. What’s your favorite smell of the holidays? Share below!
Step 4: Whisk the eggs and water in a big bowl. Add the cooled bread cubes and toss them gently. In a skillet, melt butter and cook the onions and celery until soft. Stir in the herbs, garlic, and pepper. Now, mix those lovely veggies into the bread bowl.
Step 5: Spray your roasting pan. Shape the stuffing into a neat square inside it. Pat your turkey dry and place it right on top. Cover the breast with foil. Roast it for 45 minutes. I still laugh at how the turkey sits on its stuffing throne.
Step 6: Take the turkey out and remove the foil. Turn the oven down to 325. Brush the turkey with melted butter. Roast it until the skin is golden and perfect. This takes about two more hours. Doesn’t that smell amazing?
Step 7: Let the turkey rest on a board. Stir the stuffing right in the pan to catch all the drippings. Bake the stuffing alone for 15 more minutes to crisp up. Finally, carve your turkey and serve. (Letting the bird rest keeps all the juices inside!)
Creative Twists
This recipe is wonderful as it is. But sometimes, a little change is fun. Try adding chopped apples and walnuts to the stuffing for a sweet crunch. Use cornbread instead of white bread for a different flavor. Or, mix a little orange zest into the butter you brush on top. Which one would you try first? Comment below!
Serving & Pairing Ideas
This turkey deserves a beautiful table. I love serving it with simple roasted carrots and mashed potatoes. A big spoonful of cranberry sauce on the side is a must. For a drink, a glass of apple cider is so cozy. Grown-ups might enjoy a glass of chilled Riesling wine. Both are lovely with the savory turkey. Which would you choose tonight?
Keeping Your Feast Fresh
Let’s talk about leftovers. They are a holiday gift to yourself. First, carve all the meat off the bone. Store it in a shallow container in the fridge for up to four days. The stuffing should go in its own container too. You can freeze the meat and stuffing separately for a month. I once froze stuffing in muffin tins. It made perfect single servings!
To reheat, add a splash of broth to the turkey. Cover it and warm it in the oven. This keeps it moist. For the stuffing, sprinkle it with a little water. Then cover and heat it until warm. Planning ahead like this saves future you a lot of work. It turns one big meal into several easy ones. Have you ever tried storing it this way? Share below!
Simple Fixes for Common Hiccups
Sometimes cooking a big bird feels tricky. Here are three common issues and their easy fixes. First, the skin isn’t crispy. Pat the turkey very dry before roasting. A wet skin will steam, not crisp. I remember when my first turkey had soft skin. I was so disappointed!
Second, the stuffing is too dry. The recipe seems dry before cooking. Do not add more liquid. The turkey juices will soak in during roasting. Trust the process. Third, the breast cooks faster than the legs. Spatchcocking fixes this by making the bird flat. Everything cooks evenly. Solving these small problems builds your cooking confidence. It also makes your food taste its very best. Which of these problems have you run into before?
Your Quick Questions, Answered
Q: Can I make this gluten-free? A: Yes! Use your favorite gluten-free bread for the stuffing cubes. Make sure it is a hearty kind.
Q: What can I do ahead? A: You can dry the bread cubes a day early. You can also make the vegetable mixture for the stuffing. Keep them separate until mixing.
Q: I don’t have fresh herbs. A: Use dried thyme and sage. Use one-third the amount since dried herbs are stronger.
Q: Can I use a smaller turkey? A: You can. Just reduce the roasting time. Use a meat thermometer to check for doneness.
Q: Any optional tips? A: Let the turkey rest after roasting. This keeps all the juicy goodness inside the meat. Fun fact: Letting meat rest is called “carryover cooking.” It finishes the job! Which tip will you try first?
From My Kitchen to Yours
I hope this recipe brings joy to your table. Food is about sharing stories and making memories. My grandkids always fight over the crispy skin. It makes me smile every time.
I would love to hear about your cooking adventure. Tell me how it went in the comments below. Your stories are my favorite thing to read. Have you tried this recipe? I am cheering for you in your kitchen.
Happy cooking!
—Elowen Thorn.
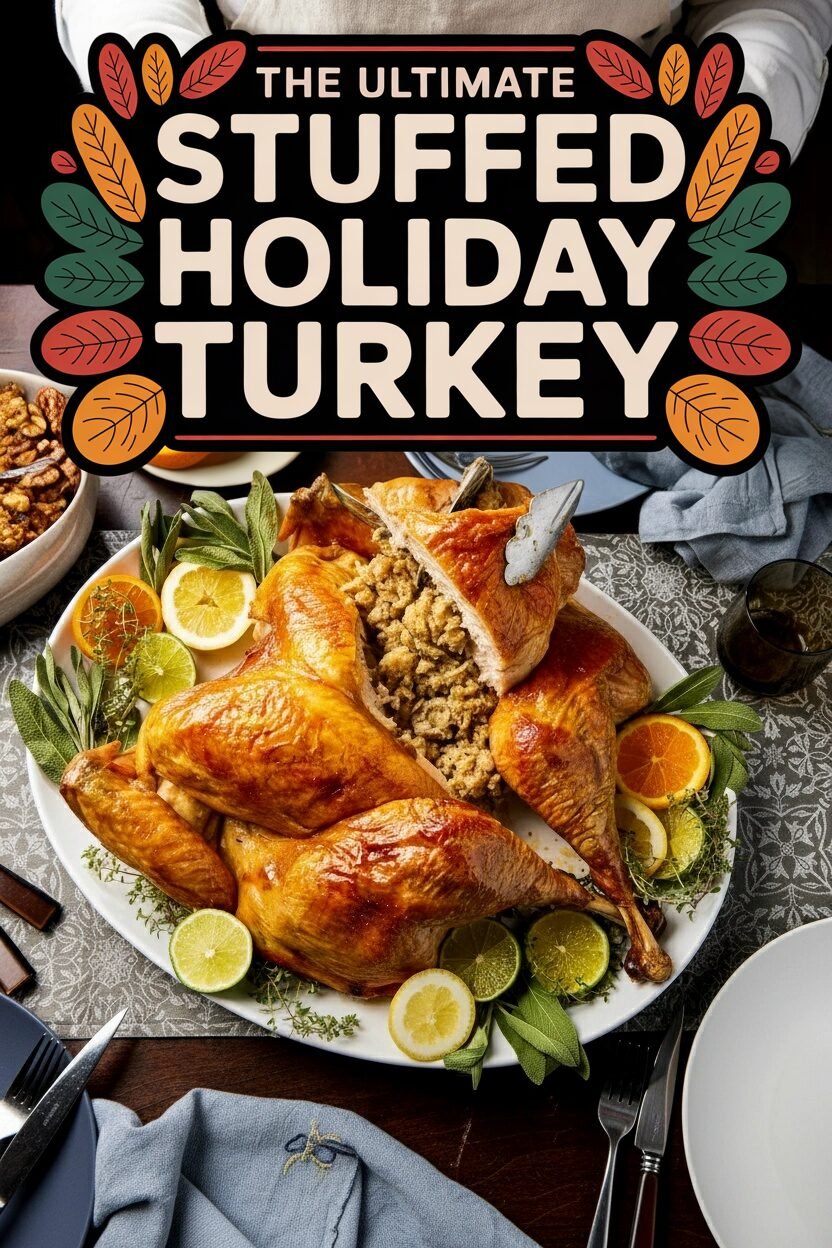

The Ultimate Stuffed Butterflied Holiday Turkey
Description
A show-stopping holiday centerpiece featuring a spatchcocked turkey seasoned under the skin and roasted directly over a savory bread stuffing.
Ingredients
Instructions
- Combine ¼ cup kosher salt and 4 teaspoons sugar in bowl.
- Place a 12- to 14-pound turkey, breast side down, on a cutting board. Remove neck and giblets and reserve for gravy. Using kitchen shears, cut through bones on either side of backbone, staying as close as possible to backbone. Remove backbone and save for gravy, if making. Flip turkey over and press down firmly with heels of your hands to flatten breastbone.
- Using your fingers, carefully loosen skin covering breast and leg quarters. Rub 5 teaspoons salt mixture under skin of each side of breast, 2 teaspoons under skin of each leg, and remaining mixture onto cavity.
- Tuck wings under turkey and place turkey skin side up on wire rack set in rimmed baking sheet. Refrigerate, uncovered, for at least 24 hours or up to 2 days.
- Adjust oven racks to upper-middle and lower-middle positions and heat oven to 250 degrees. Cut 1½ pounds hearty white sandwich bread into ½-inch cubes. Spread bread cubes in even layer on 2 rimmed baking sheets and bake until mostly dry and very lightly browned, 40 to 50 minutes, stirring halfway through baking. Remove bread from oven and cool on sheets for at least 15 minutes.
- While bread cools, adjust upper oven rack to middle position and increase oven temperature to 425 degrees. Whisk 3 large eggs and ½ cup water in large bowl until combined.
- When bread is cool, add to egg mixture and toss gently so bread is fully coated but does not break apart; set aside.
- Melt 4 tablespoons unsalted butter in 12-inch nonstick skillet over medium heat. Add 3 chopped onions and 6 finely chopped celery ribs and cook, stirring occasionally, until softened, 8 to 10 minutes.
- Stir in 2 tablespoons minced fresh thyme, 2 tablespoons minced fresh sage, 6 minced garlic cloves, and 1 teaspoon pepper and cook until fragrant, about 30 seconds. Transfer vegetables to bowl with bread and stir gently to combine (stuffing will seem dry). (Stuffing can be refrigerated for 24 hours.)
- Spray roasting pan with vegetable oil spray. Transfer stuffing to pan and shape into level 9 by 9-inch square.
- Pat turkey dry with paper towels. Arrange turkey on top of stuffing. Tuck any exposed stuffing under bird, so all of stuffing is covered. Cover breast with double layer of aluminum foil. Roast on middle rack for 45 minutes.
- Remove turkey from oven and discard foil. Reduce oven temperature to 325 degrees. Melt remaining 1 tablespoon unsalted butter and brush evenly over turkey.
- Return turkey to oven and continue to roast until skin is deep golden brown and breast registers 155 degrees and thighs register 175 degrees, 2 to 2½ hours longer.
- Transfer turkey to carving board and let rest, uncovered, for 30 minutes.
- While turkey rests, stir stuffing well to incorporate drippings and scrape up any browned bits. Redistribute stuffing over bottom of roasting pan in even layer. When turkey has rested for 15 minutes, return stuffing to oven and bake until golden brown, about 15 minutes.
- Transfer stuffing to serving dish. Carve turkey and arrange on serving platter. Serve turkey with stuffing.
Notes
- For food safety, ensure the stuffing reaches an internal temperature of 165°F. The turkey’s carryover cooking will bring the breast to 165°F during the rest.