

A Sweet Gift From Your Hands
This is not just a recipe. It is a gift of love. You make it with your own two hands. That makes it special. I learned this from my own mother. She would bake my birthday cake every year. I still laugh at her flour-covered apron.
The time you spend is the real gift. It says, “I love you enough to make this.” That matters more than anything you can buy. Doesn’t that feel good to give? What is the best homemade gift you have ever received?
The Magic of Vanilla
Let’s talk about vanilla. It is a simple flavor. But it is warm and comforting. It feels like a hug in a bowl. We use real extract here, not imitation. The smell while baking is amazing.
*Fun fact*: Real vanilla comes from the seed pod of an orchid flower. Each flower only blooms for one day! That is why real vanilla is so precious. It reminds us that good things take time.
Building Your Edible Garden
Now, for the fun part. We turn cupcakes into flowers. Do not worry if your first rose swirl looks messy. Mine always did! The secret is a steady hand and a deep breath. Just start in the middle and swirl out.
The fondant sunflowers are my favorite. You shape them over little foil pillows. This makes the petals curl up. They look so real! Which flower do you think you will try first, a rose or a sunflower?
A Basket Full of Love
Putting the bouquet together is like gardening. You place the heavy fondant flowers in the middle first. They are your anchor. Then you add the lighter buttercream blooms around them. The green tissue paper leaves make it all come alive.
Poking the sticks in can feel tricky. Remember, push the stick, not the cupcake. I use a little fondant under the base for extra support. This little trick saves your beautiful work. It shows that a strong foundation matters, in baking and in life.
Your Turn to Create
This project is a joy. It is messy and sweet. Your kitchen will be a happy mess of color and sprinkles. That is a good kind of mess. It is the mess of making something wonderful.
I would love to see what you make. Will you use pink and purple like I did, or choose your own colors? Share a picture of your bouquet with someone you love. Tell me, what color makes you think of your mom?
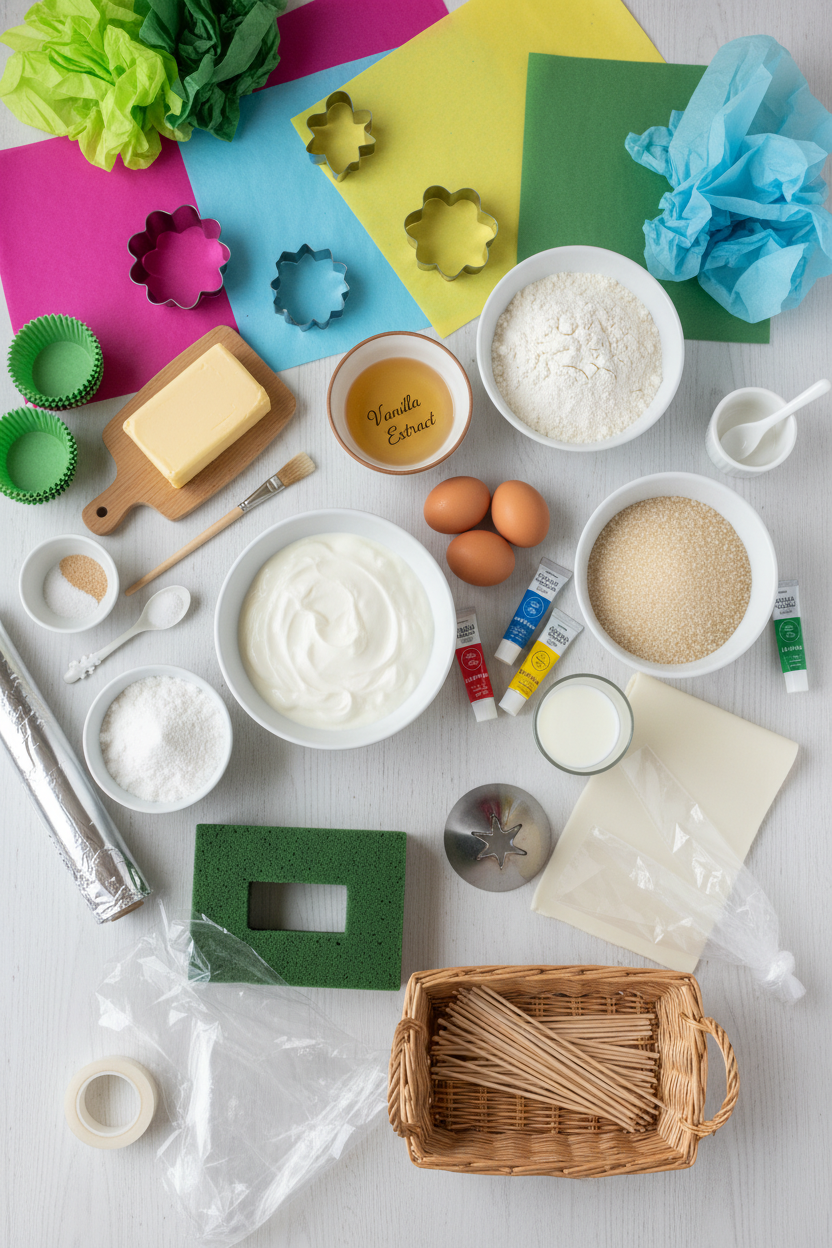
Ingredients:
| Ingredient | Amount | Notes |
|---|---|---|
| Unsalted butter | 300g | For the cakes |
| Natural yogurt | 250g | For the cakes |
| Eggs | 6 | Beaten, for the cakes |
| Vanilla extract | 2 tsp | For the cakes |
| Self-raising flour | 250g | For the cakes |
| Golden caster sugar | 300g | For the cakes |
| Ground almond | 140g | For the cakes |
| Baking powder | ½ tsp | For the cakes |
| Unsalted butter, softened | 300g | For the buttercream |
| Icing sugar | 600g | For the buttercream |
| Milk | 2 tbsp | For the buttercream |
| Vanilla extract | 2 tsp | For the buttercream |
| Food colouring paste | As needed | Pink and purple suggested |
| White fondant icing | 500g | |
| Green muffin cases | 15 | You will need |
| Disposable piping bags | 2 | You will need |
| Large curved star piping nozzle | 1 | You will need |
| 3-piece sunflower cutters | 1 set | You will need |
| Coloured tissue paper | To wrap | Pink and blue suggested |
| Oasis foam frame | 23cm | You will need |
| Basket or bowl | 24-25cm | You will need |
| Lollipop sticks | 15 | You will need |
| Light and dark green tissue paper | For leaves | You will need |
Instructions
Step 1: First, melt your butter. Let it cool a bit. Mix it with yogurt, eggs, and vanilla in a big jug. Doesn’t that smell amazing already? I love this part.
Step 2: Now, mix all your dry stuff in a bowl. Make a little well in the middle. Pour your wet mix right into that well. Stir it all up until it’s smooth. (A little lump is okay, don’t worry!)
Step 3: Spoon the batter into your muffin cases. Fill them about two-thirds full. Bake them until they’re golden and springy. How do you test if a cake is done? Share below! Let them cool completely on a rack.
Step 4: Time for buttercream! Beat the butter and sugar until fluffy. Add milk and vanilla. Split it into bowls for pink and purple colors. (Always color icing a little at a time!) Keep it covered so it doesn’t dry out.
Step 5: Let’s make fondant sunflowers. Roll the icing nice and thin. Use your cutters to stamp out flower shapes. I still laugh at my first lopsided flower. Rest them on foil to set their shape.
Step 6: Stack your flowers with a dab of white buttercream. Big one on bottom, medium in middle, small on top. Gently press them together. See, it’s like building a tiny cake tower!
Step 7: Now, the fun piping! Paint stripes of color inside your bag. This makes pretty roses. Pipe a swirl starting from the middle. Go slow and steady. You’ll make six beautiful pink roses.
Step 8: Do the same with purple for hydrangeas. Pipe little stars all over the cupcake top. Cover it completely like a fluffy purple cloud. It’s so satisfying to see it come together.
Step 9: Use white buttercream on three cupcakes. This is the glue. Carefully place a fondant sunflower on each one. Press gently so it sticks. Aren’t they pretty? Just like a garden.
Step 10: Put the oasis in your basket. Make tissue paper leaves. Poke a stick into each cupcake base. Arrange them in the oasis, starting with the sunflowers in the middle. (Use fondant balls under the heavy ones for support!)
Step 11: Tuck your green tissue leaves between the cupcakes. Wrap your basket in pretty tissue paper and cellophane. Keep it somewhere cool. It’s a gift made with love, ready to surprise someone special.
Creative Twists
Lemon Sunshine: Add lemon zest to the cake batter. Use yellow buttercream for a bright, cheerful bouquet.
Chocolate Bloom: Swap 50g flour for cocoa powder. Make chocolate buttercream roses for a rich, decadent treat.
Confetti Garden: Mix rainbow sprinkles into the vanilla batter. Use white buttercream to let the confetti colors peek through.
Which one would you try first? Comment below!
Serving & Pairing Ideas
Serve each cupcake on its own little plate. A glass of cold milk or a cup of herbal tea is perfect with them. For a real treat, add a scoop of vanilla ice cream on the side. The warm cake and cold ice cream are magic together. Which would you choose tonight?
Keeping Your Cupcake Bouquet Beautiful
Let’s talk about storing these special cupcakes. They will keep for up to four days. Just pop them in an airtight container. Keep it in a cool, dry spot.
You can bake the cakes a day ahead. Let them cool completely first. Then wrap them well in cling film. Frost them the next day for the freshest taste.
I remember my first bouquet. I left it on the sunny counter. The buttercream got so soft! Now I know to keep it cool. This matters because a little planning means your gift stays perfect.
Have you ever tried storing it this way? Share below!
Three Little Cupcake Hiccups (And How to Fix Them!)
First, a runny cake batter. This recipe is quite thin. Do not add extra flour! It bakes up light and fluffy. Trust the process.
Second, buttercream that splits. Your butter might be too cold. Let it soften at room temperature first. Beat it slowly with the sugar. This makes it smooth and dreamy.
Third, fondant flowers that sag. I once made this mistake. You must let them set on foil shapes. This gives them strength. It matters because pretty food should also be sturdy.
Good fixes build your kitchen confidence. Which of these problems have you run into before?
Your Quick Questions, Answered
How to make vanilla cupcakes for Mother’s Day?
Follow the recipe steps with love. Melt your butter and mix the wet ingredients. Combine your dry ingredients in another bowl. Gently mix them together until smooth. Fill your muffin cases two-thirds full. Bake until a skewer comes out clean. Let them cool before you decorate. The special bouquet presentation makes it a wonderful Mother’s Day gift she will always remember.
What is a good vanilla cupcake recipe for beginners?
This recipe is great for beginners. It uses simple melting and mixing methods. You do not need a fancy electric mixer. A spatula or whisk works just fine. The ground almonds keep the cakes moist. This means they are forgiving if baked a minute too long. The clear steps help you build confidence as you create something beautiful and delicious from scratch.
How to decorate vanilla cupcakes for Mothering Sunday?
Turn them into a flower bouquet. Pipe pretty buttercream roses and hydrangeas. Use food colouring paste for vibrant pinks and purples. Make fondant sunflowers for a special touch. Arrange them on sticks in an oasis foam inside a basket. This creates a stunning, edible bouquet. It is a decoration that is also a beautiful centerpiece for your Mothering Sunday tea table.
Can I make vanilla cupcakes ahead of time for Mother’s Day?
Yes, you can plan ahead beautifully. Bake the cupcakes one day before. Cool them completely and wrap them tightly. Make your buttercream and store it covered at room temperature. Assemble the bouquet on the morning of Mother’s Day. This split method saves you time and stress. It ensures your fresh, homemade gift is ready to present with a big smile and hug.
What are some special Mother’s Day cupcake decorating ideas?
The basket bouquet is our top idea. Use coloured tissue paper for pretty wrapping. Try different flower piping nozzles for variety. Use her favourite colours in the buttercream. *Fun fact: The striped piping bag trick creates beautiful two-tone flowers.* You can also write sweet messages with icing pens. Personal touches make the gift extra special and show how much thought you put into her day.
Are there easy vanilla cupcake recipes for kids to make for Mother’s Day?
Children can help with many steps. They can stir the batter and spoon it into cases. They can help choose the food colouring. Kids love painting stripes inside the piping bag. An adult should handle the oven and sharp tools. Decorating together makes wonderful memories. The proud look on their face when they give the bouquet is the best gift of all.
Which tip will you try first?
From My Kitchen to Yours
I hope you enjoy making this bouquet. It is a project filled with love. The best gifts come from your own two hands.
I would love to hear about your baking adventure. Did your mum’s face light up with joy? Tell me all about it in the comments below.
Have you tried this recipe? I am so excited to see your creations!
Happy cooking!
—Elena Rutherford
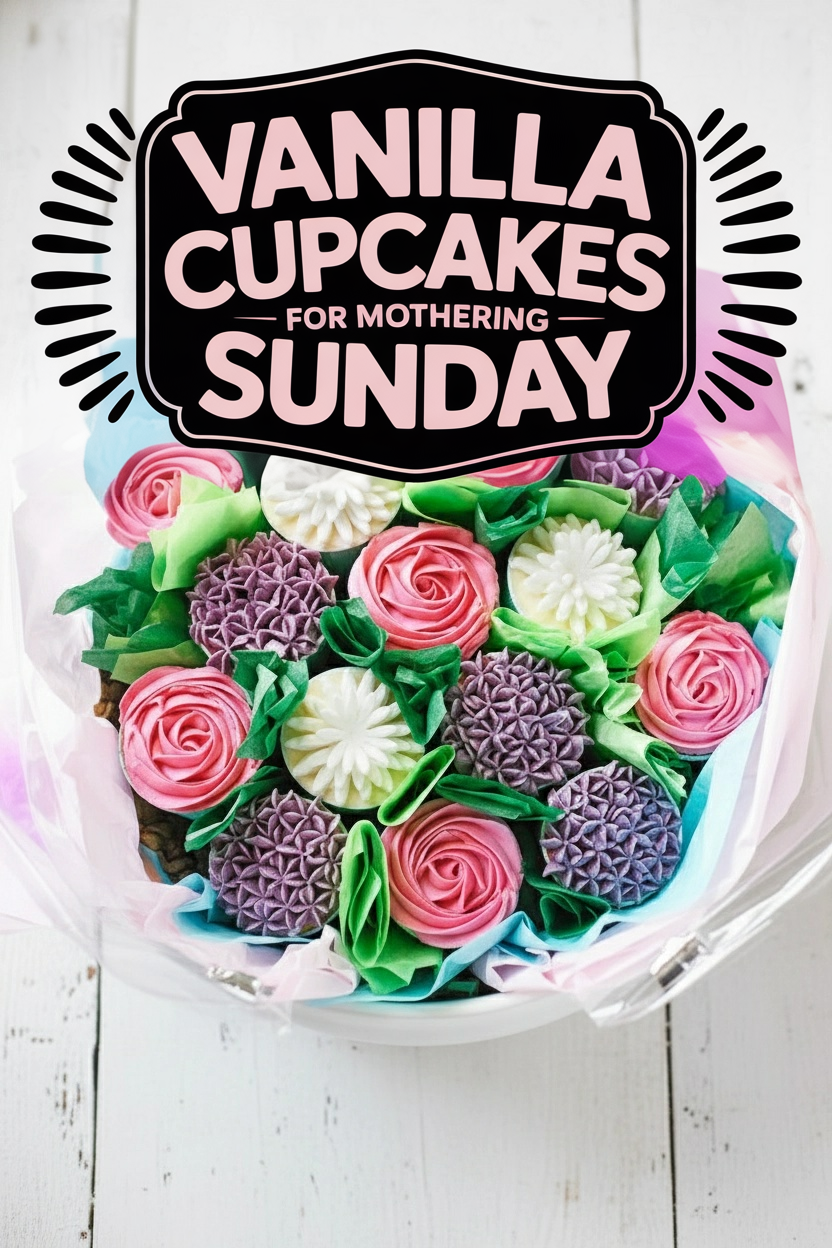

Vanilla Cupcakes for Mothering Sunday
Description
A beautiful and delicious vanilla cupcake bouquet, perfect for celebrating Mothering Sunday. Features fluffy almond cupcakes topped with piped buttercream roses, hydrangeas, and fondant sunflowers.
Ingredients
For the cakes:
For the buttercream:
You will need:
Instructions
- Heat oven to 180C/160C fan/gas 4 and line two 12-hole muffin tins with 15 muffin cases. Melt the butter in a small saucepan or in the microwave, then leave to cool a little. Transfer to a large jug and stir in the yogurt, eggs and vanilla. Beat until combined.
- Tip the flour, sugar, almonds, baking powder and 1/2 tsp salt into a large bowl. Stir to combine, then make a well in the centre. Pour in the wet ingredients and mix using a spatula or electric whisk until lump-free. It will be quite a runny mixture.
- Spoon the mixture into the muffin cases so they are two-thirds full, using all of the mixture. Bake in the oven for 25-30 mins or until a skewer inserted into the centre comes out clean. Transfer to a wire rack to cool completely.
- Beat the butter with half the icing sugar, then, once smooth, add the remaining icing sugar, the milk and vanilla extract. Beat again until fluffy and smooth. Reserving two large spoonfuls of the icing for the fondant cupcakes, halve the remaining icing and put into two bowls. Use a little of the pink food colouring to turn half of the icing pink, beating the icing until it changes colour. Use the purple colouring to do the same with the other half. Set all the icing aside at room temperature and cover the surface with cling film (or keep in the fridge overnight).
- Roll out 250g of the fondant icing to a £1 coin thickness. Use the 3-piece cutters to stamp out three sunflowers. You will need to use each cutter three times. Scrunch pieces of foil into doughnut shapes and place in the muffin tin. Sit the flowers on top and leave to set for 30 mins. This will set the shape so the petals look more 3D. If you need more icing, roll out a little more until you have the right amount of flowers.
- Using the reserved white buttercream, gently sandwich the flowers together. Dot a little buttercream in the middle of the biggest flower and put the medium-sized flower on top of it. Repeat with the smallest flower on top.
- Pipe the buttercream roses and hydrangeas onto 12 of the cupcakes. Use the paintbrush to paint four stripes of pink food colouring from the bottom to the middle of a piping bag – this will create a dark pink outline for the roses. Drop the curved 2D nozzle into the end of the bag and snip off the end so that the tip is fully exposed. Pop the bag over a jug or large glass and fold over the top. Make sure all the air is out of the piping bag when you take it out of the jug, as this will ensure you pipe evenly. Starting in the middle of the cupcake, hold the bag directly above the cake and pipe a swirl in a clockwise motion, applying a steady pressure until you reach the edge of the cupcake. Repeat with another five cupcakes until you have six pink rose cupcakes. Set aside.
- Use the paintbrush to paint four stripes of purple food colouring from the bottom to the middle of another piping bag, to create a dark purple outline for the hydrangeas. Hold the piping bag directly above the cupcake and pipe small star shapes to cover the entire surface.
- Next, spoon the remaining white buttercream onto the remaining three cupcakes to completely cover. This will be the ‘glue’ for the fondant flowers. Carefully place each fondant flower on top of the cupcakes.
- Sit the oasis in your basket or bowl. Cut the green tissue paper into small squares, laying a lighter piece over a darker piece, and fold in half, then half again, to create the leaves. Ruffle them up a little for a more natural look. Using a small sharp knife, poke a little hole in the bottom of your cupcakes and carefully insert a lollipop stick into each one. One at a time, push the bottom of the stick into the oasis – ensuring that you push the stick, not the actual cupcake, or you may damage the icing. Arrange the flowers so the three fondant flowers are near the middle, working outwards with the rest of the cupcakes until it starts to resemble a bunch. As the fondant flowers are quite heavy, roll out some small balls of leftover fondant to push under each cupcake base as support.
- Slot the green tissue in between each cupcake so it surrounds them. Then lay the blue tissue paper over the pink paper and sit your basket carefully on top. Use sellotape to cover the entire basket in the tissue. Once it’s covered, do the same with the cellophane, if using. Keep in a cool place until presenting. The cupcakes will keep up to 4 days in an airtight container.
Notes
- Nutrition information is per cupcake. The fondant flowers are decorative and can be removed before eating if preferred.