

My First Fig Tree
I will never forget the old fig tree in my grandmother’s backyard. It looked like a giant, crooked umbrella. Every summer, we would race to pick the soft, purple fruit before the birds did. I still laugh at the memory of my cousin slipping on a fallen fig and landing right in the tomato patch. Doesn’t that smell amazing when you walk past a warm fig tree?
That tree taught me something important. Good things take a little patience. You cannot rush a fig to ripen, just like you cannot rush a pot of jam. I bet you have a food memory like that too. What is the first fruit you ever picked yourself?
Why We Preserve
Back then, my grandma would say we make jam to “catch the summer.” She meant it. When winter comes and the trees are bare, you open a jar and taste the sunshine. That is why this matters. Preserving food is not just about saving money. It is about saving a little bit of happiness for later.
I also love that jam is a gift. You can give a jar to a neighbor and say, “I made this for you.” It says more than words ever could. Have you ever given someone a homemade gift? How did it feel?
The Simple Science of Sweetness
Now, let us talk about the sugar in this recipe. Four cups sounds like a lot, I know. But sugar does more than make things sweet. It helps the jam “set” and keeps it from going bad. *Fun fact:* Sugar was once called “white gold” because it was so rare and valuable.
The lemon juice in this recipe is not just for taste. It adds acid, which helps the fruit hold its bright color. It also balances the sweetness so your jam does not taste like candy. That is why this matters. Getting the balance right means you will have a jar that tastes like real figs, not just sugar. Do you prefer your jam more tart or more sweet?
A Trick My Grandma Taught Me
Here is a little story from my kitchen. The first time I made fig jam alone, I set the kitchen timer and walked away. Big mistake. I came back to a pot that smelled like burnt toast. My grandma just laughed and said, “Jam needs a friend to watch it.” Now I always pull a chair close to the stove. I read a book or just listen to the radio while I stir.
Stirring often is the secret. Do not let the pot sit alone for too long. That is how you get a smooth, thick jam without any black spots. Have you ever burned something in the kitchen and had to start over? It happens to all of us, so do not worry.
To Blend or Not to Blend
This recipe gives you a choice. You can leave the fig pieces in the jam for a chunky texture. Or you can use an immersion blender to make it smooth like jelly. I have made it both ways.
My family is split right down the middle. My husband loves the chunky bits. My daughter wants it smooth enough to spread on toast without any bumps. I think that is the best part of cooking. You get to make it exactly how you like it. Which side would you be on? Chunky or smooth?
The Cold Plate Test
The hardest part for new jam makers is knowing when it is done. That is why we use the cold plate trick. You put a small plate in the freezer before you start cooking. When you think the jam is ready, drop a tiny spoonful on the cold plate.
Wait a few seconds. Then push it with your finger. If the top wrinkles like a little brain, it is perfect. If it runs back together like soup, let it cook a bit longer. I still do this test every single time. It never gets old, and it always works. Next time you try a new recipe, will you remember this little trick?
A Safe Jar is a Happy Jar
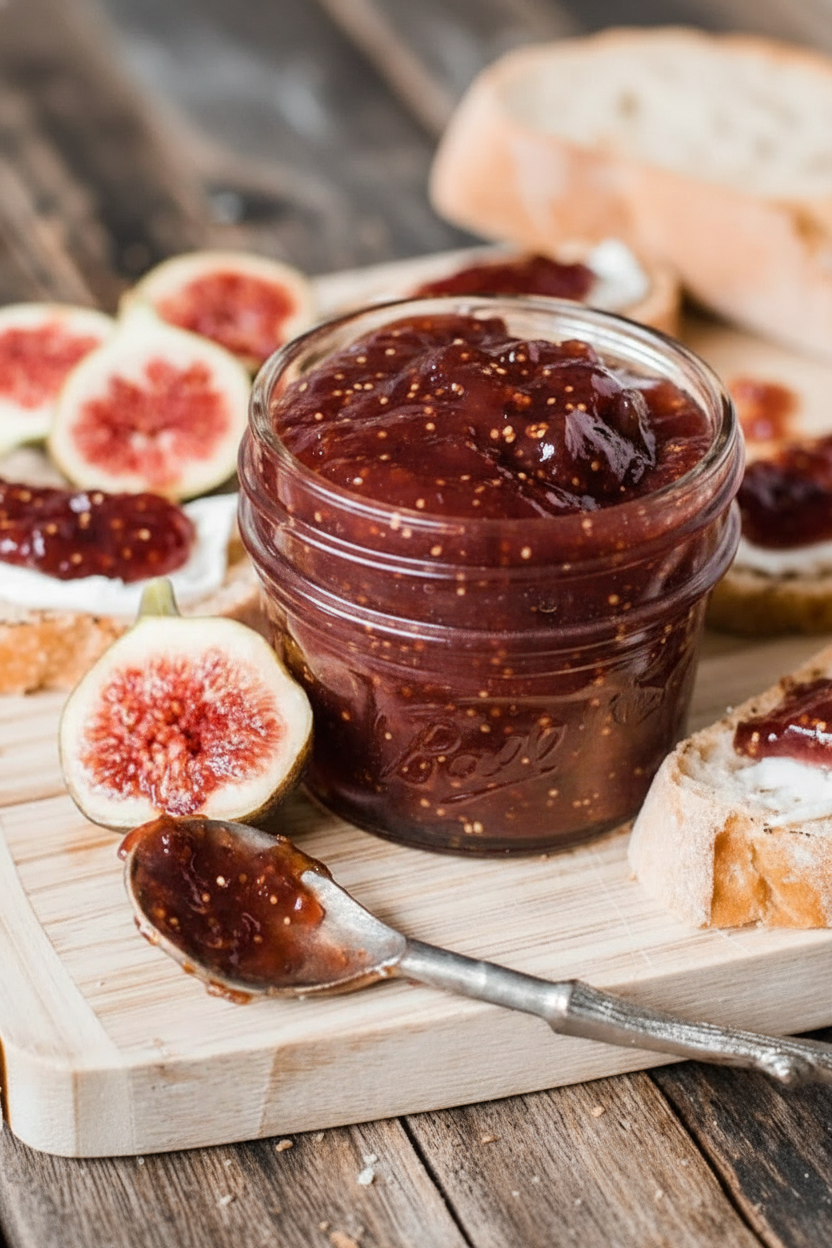
The last step is my favorite. You fill the jars with hot jam, wipe the rims clean, and screw the lids on tight. Then you give them a warm bath in boiling water for ten minutes. That step seals the jars so they last on your shelf for a year.
I always listen for the “pop” sound as the jars cool down. That pop means you did it right. It is like the jar is saying, “Thank you, I am safe now.” It makes me smile every time. Have you ever processed jars in a water bath before? If not, this is a great one to try first.
Ingredients:
| Ingredient | Amount | Notes |
|---|---|---|
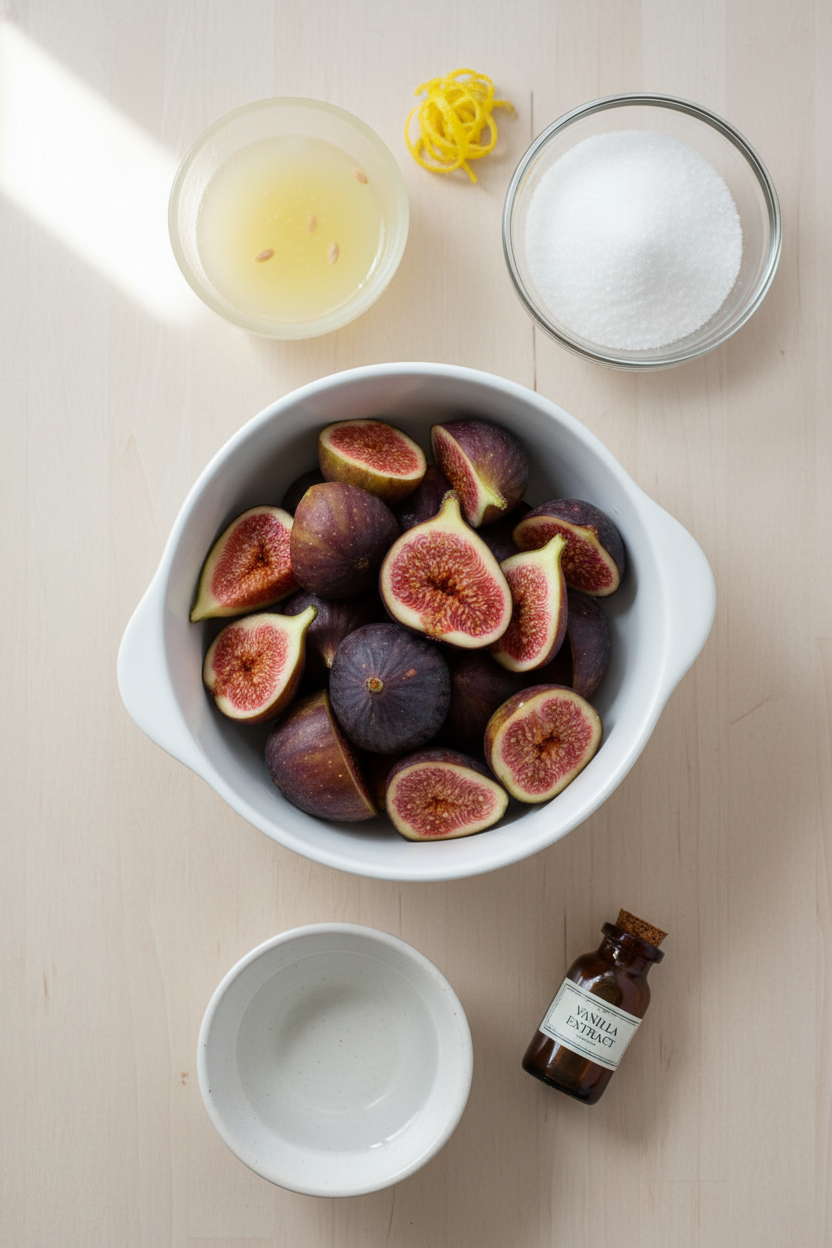
| Fresh Figs | 2 pounds | Rinse, remove stems, and cut into quarters |
| Granulated Sugar | 4 cups | |
| Lemon Juice | 1/4 cup | |
| Lemon Zest | 1 tablespoon | Optional |
| Water | 1/2 cup | |
| Vanilla Extract | 1 teaspoon | Optional, add during last 10 minutes |
| Cinnamon Stick | 1 | Optional, add during last 10 minutes |
Instructions
Step 1: Rinse two pounds of fresh figs under cool water. Remove the stems and cut each fig into quarters. (I once forgot to remove a stem and found it later — trust me, don’t skip this step!)
Step 2: Sterilize your jars by boiling them in water for 10 minutes. Set them on a clean towel to dry. Doesn’t that feel like prepping for something special?
Step 3: In a large pot, combine the figs, sugar, lemon juice, lemon zest, and water. Stir everything together gently. What fruit do you think pairs best with figs? Share below!
Step 4: Bring the mixture to a boil over medium heat, stirring often. Reduce the heat and let it simmer for 45-60 minutes. Stir frequently so it doesn’t burn — your nose will know if it does!
Step 5: For smooth preserves, use an immersion blender now. If you like chunky texture, skip this step. I love a little chew in my jam — reminds me of Grandma’s kitchen.
Step 6: For extra flavor, stir in vanilla extract or add a cinnamon stick during the last 10 minutes. Your whole house will smell like autumn. Doesn’t that smell amazing?
Step 7: Test the consistency by placing a spoonful on a chilled plate. If it wrinkles when you push it, it’s ready. If not, cook a few more minutes and test again. I still laugh at how many tests I did my first time!
Step 8: Ladle the hot preserves into your sterilized jars, leaving 1/4 inch of space at the top. Wipe the rims clean and seal. Process in a boiling water bath for 10 minutes to store at room temperature.
Creative Twists
… Add a pinch of black pepper for a spicy-sweet kick. It sounds odd but tastes wonderful on toast.
… Stir in a handful of chopped walnuts right before jarring. They add a lovely crunch for spreading.
… Swap the cinnamon stick for a sprig of fresh rosemary. It gives the preserves a surprising, savory twist.
Which one would you try first? Comment below!
Serving & Pairing Ideas
Spread this fig jam on warm buttermilk biscuits for a cozy breakfast. It also pairs beautifully with a sharp cheddar cheese on crackers. Drizzle a little over vanilla ice cream for a quick, fancy dessert. Which would you choose tonight?
Why Storing Fig Preserves Right Matters
I remember my first batch of fig preserves. I was so proud. Then I left a jar on the counter for a week. It grew fuzzy mold. What a waste!
Now I always store my fig preserves in the fridge after opening. They stay good for months this way. The cold keeps the sugar and fruit happy.
For freezer storage, use sturdy plastic containers. Leave a little room at the top. The preserves expand as they freeze. Batch cooking is a lifesaver for busy weeks. Spend one afternoon making a double batch. Then you have gifts or quick breakfasts ready.
Why does this matter? Proper storage saves money and food waste. Plus, you always have homemade jam on hand for toast or yogurt.
Have you ever tried storing it this way? Share below!
Three Common Fig Preserve Problems and Easy Fixes
I once made a batch that turned into sticky candy. It was too thick. The fix is simple. Watch the cooking time carefully.
Fun fact: Figs are technically inverted flowers, not fruit!
Problem 1: Preserves are too runny. You probably did not cook them long enough. Try the chilled plate test. If the jam does not wrinkle, cook five more minutes.
Problem 2: Preserves are too thick or burned. This happens when heat is too high. Always simmer on low. Stir every few minutes, especially near the end.
Problem 3: Sugar crystals form. I had this happen once. It tasted fine but looked strange. To fix it, make sure all sugar dissolves before boiling. Stir gently.
Why do these fixes matter? They help you feel confident in the kitchen. You learn to trust your eyes and nose. That confidence makes cooking more fun. And the flavor? Perfect preserves taste like summer in a jar.
Which of these problems have you run into before?
Your Quick Questions, Answered
How long does it take to make fig preserves from scratch?
From start to finish, expect about one hour and fifteen minutes. You will spend fifteen minutes washing, stemming, and quartering your figs. Then you cook the mixture for forty-five to sixty minutes until it thickens into that perfect syrupy consistency. The steps are simple and forgiving, so do not rush. Take your time and enjoy the sweet smell filling your kitchen. I always find that slow cooking brings out the best fig flavor.
What are the best types of figs for making preserves?
Black Mission figs are my favorite for preserves. They have deep, rich sweetness and hold their shape well during cooking. Brown Turkey figs also work nicely, with a milder honey taste. Avoid very soft or mushy figs because they break down too quickly. Firm, ripe figs give you the best texture and flavor. You want figs that feel tender but not squishy, like a perfectly ripe peach.
Do I need to peel figs before making preserves?
No, you do not need to peel them at all. The skins are thin, tender, and full of natural pectin, which helps your preserves set properly. Leaving the skins on also adds nice texture and pretty color flecks. Just wash them gently and remove the stems. Quarter them as the recipe says. The skins soften beautifully as they simmer, so no one will even notice them.
How do I prevent fig preserves from crystallizing?
I learned this lesson the hard way after one grainy batch. To stop crystals, make sure your sugar dissolves fully before the mixture reaches a boil. Stir slowly and gently while the sugar melts. Adding lemon juice helps too because acid prevents sugar from recrystallizing. Also avoid stirring once the preserves are boiling hard. And finally, do not scrape the sides of the pot.
Can I use less sugar in fig preserves and still get them to set?
Yes, you can reduce sugar, but you must adjust your approach. You will need to add commercial pectin to help the preserves set properly without all that sugar. Follow the pectin package instructions carefully. Keep in mind that less sugar means a shorter shelf life. Refrigerate these lower-sugar batches and use them within three weeks. The flavor will taste brighter and more like fresh figs.
How do I know when fig preserves are done cooking?
Use the chilled plate test every time. Place a small plate in the freezer for five minutes. Spoon a tiny bit of hot preserves onto the cold plate. Let it sit for thirty seconds. Push it gently with your finger. If the surface wrinkles, your preserves are ready. If it stays runny, cook another five minutes and test again. This trick never fails me.
Which tip will you try first?
A Warm Goodbye from My Kitchen to Yours
I hope these tips help you feel brave in the kitchen. Fig preserves are a gift you give your future self. Spread them on warm toast or spoon over ice cream.
Have you tried this recipe? I would love to hear how your batch turned out. Did you add vanilla or cinnamon? Tell me in the comments below.
Remember, cooking is all about sharing love. Each jar holds a little bit of your heart. Keep stirring, keep tasting, and keep sharing.
Happy cooking!
—Grace Ellington.

A Home Cooks Guide to Perfect Fig Preserves
Description
A step-by-step guide to making perfect homemade fig preserves with fresh figs, sugar, lemon, and optional vanilla or cinnamon.
Ingredients
Instructions
- Start by giving your figs a good rinse under cool running water. Once clean, remove the stems and cut the figs into quarters.
- Sterilize your jars by boiling them in water for 10 minutes. Place them on a clean towel to dry.
- In a large, heavy-bottomed pot, combine the figs, sugar, lemon juice, lemon zest (if you’re using it), and water. Stir everything together.
- Bring the mixture to a boil over medium heat, stirring occasionally to dissolve the sugar. Once it’s boiling, reduce the heat to low and let it simmer. Stir frequently to prevent sticking and burning. You’re aiming for a thick, syrupy consistency, which should take about 45-60 minutes.
- If you prefer your preserves smooth, now’s the time to use an immersion blender to puree the mixture to your desired consistency. If you love a bit of texture, you can skip this step.
- For an added depth of flavor, stir in the vanilla extract or drop in a cinnamon stick during the last 10 minutes of cooking.
- To test if your preserves are ready, place a small spoonful on a chilled plate. If it wrinkles when you push it with your finger, it’s done! If not, give it a few more minutes and test again.
- Carefully ladle the hot preserves into your sterilized jars, leaving about 1/4 inch of headspace. Wipe the rims clean and seal with lids. If you plan to store the jars at room temperature, process them in a boiling water bath for 10 minutes.
Notes
- For best results, use ripe but firm figs. Store unopened jars in a cool, dark place for up to 1 year. Refrigerate after opening.