

A Sweet Surprise From My Kitchen
I remember the first time I made this jam with my neighbor, Mrs. Gable. She brought over a bag of figs that were so ripe, they were practically singing. I had no idea what to do with them. She just laughed and said, “We’re making magic.” I still laugh at that memory. Doesn’t that sound like a good afternoon?
This recipe is special because it uses strawberry gelatin. That might sound strange, but it gives the preserves a beautiful ruby color and a soft, wiggly texture. My grandkids call it “jiggly jam.” What funny names does your family give to your favorite foods?
Why Figs and Strawberries Belong Together
Figs are sweet and a little bit like honey. Strawberries are bright and tangy. When you put them together, they become best friends. That is why this matters: the flavors balance each other so the jam isn’t too sugary or too flat.
Most people think you need pectin powder to make jam set. But here, we use strawberry gelatin. It does the same job, but it adds a cheerful pink color and a fruit punch taste. *Fun fact: Strawberry gelatin was invented in 1897 and was once called a “dainty dessert.”* It is still a shortcut that works like a charm.
My Little Secret for Perfect Figs
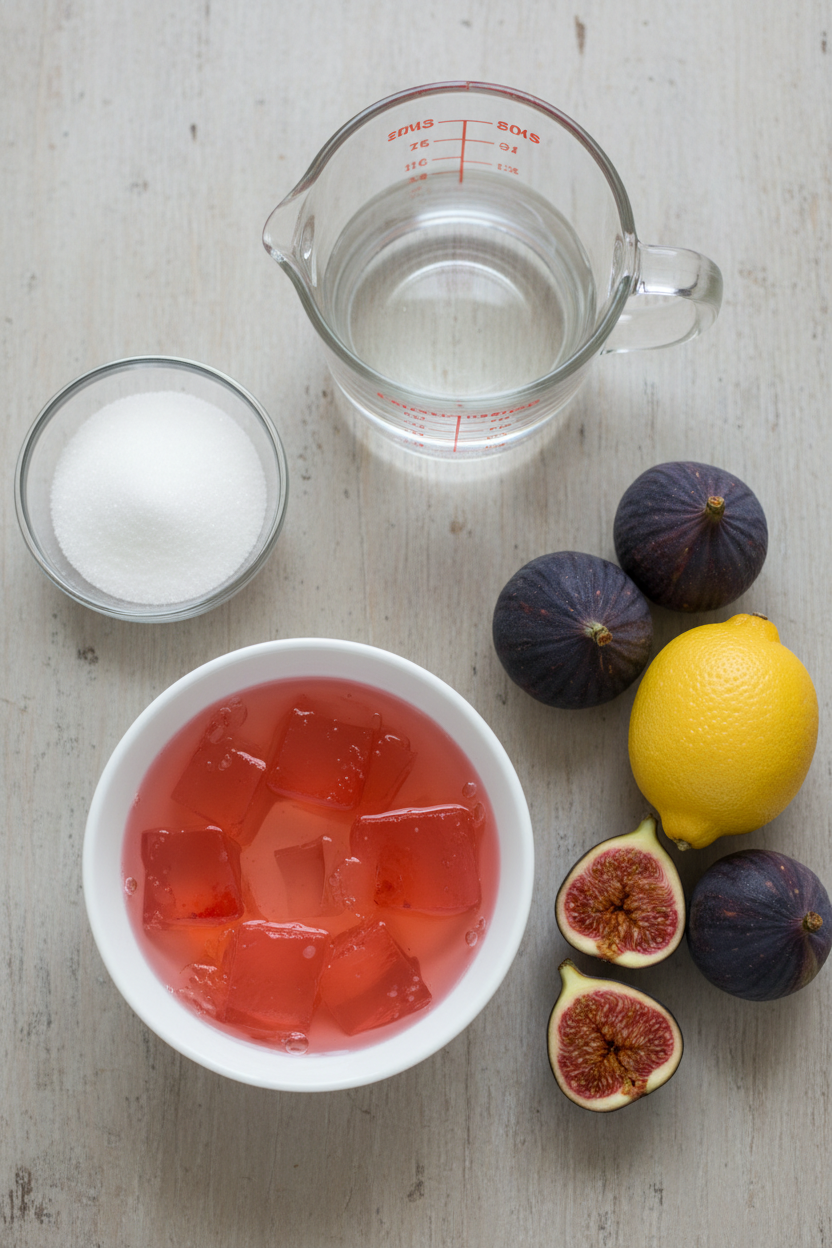
When I wash my figs, I put them in a bowl of cool water and swirl them around. Then I drop them into boiling water for two minutes. This softens the skins so they mash easily. You do not need to peel them. That saves so much time.
After that, I just snip off the little stems and any bruised spots. I like to leave a few chunky pieces of fig in the pot. That way, every spoonful has a little surprise. Do you like your jam smooth or with fruit chunks in it?
The Stirring Part That Feels Like a Hug
Once you add the sugar, lemon juice, and gelatin, you put the pot on low heat. Stir it gently for about fifteen minutes. This is the part where the kitchen gets warm and smells like a strawberry field. Doesn’t that smell amazing?
Why this matters: slow and gentle heat lets the sugar dissolve without burning. If you rush it, the jam can get grainy. Just let it bubble softly, and stir every few minutes. It is a good time to tell a story to whoever is nearby.
Filling the Jars Without a Mess
I always warm my jars in the oven at 300 degrees. This keeps them from cracking when you pour in the hot jam. The lids get a bath in warm water too. Use a kitchen funnel so you do not spill. If a little jam drips on the rim, just wipe it with a clean cloth before you put the lid on.
I close the jars only finger-tight. That means tight enough so the lid stays on, but not so tight you can’t open it later. Then I flip the jars upside down for five minutes. This helps the lid seal. Have you ever tried the upside-down trick for canning? I would love to know if it worked for you.
How to Know Your Jam Is Sealed
After you flip the jars right side up, wait a few hours. Press the center of each lid with your finger. If it is firm and does not pop up and down, you have a good seal. It makes a quiet little “thunk” sound when you tap it. That sound always makes me smile.
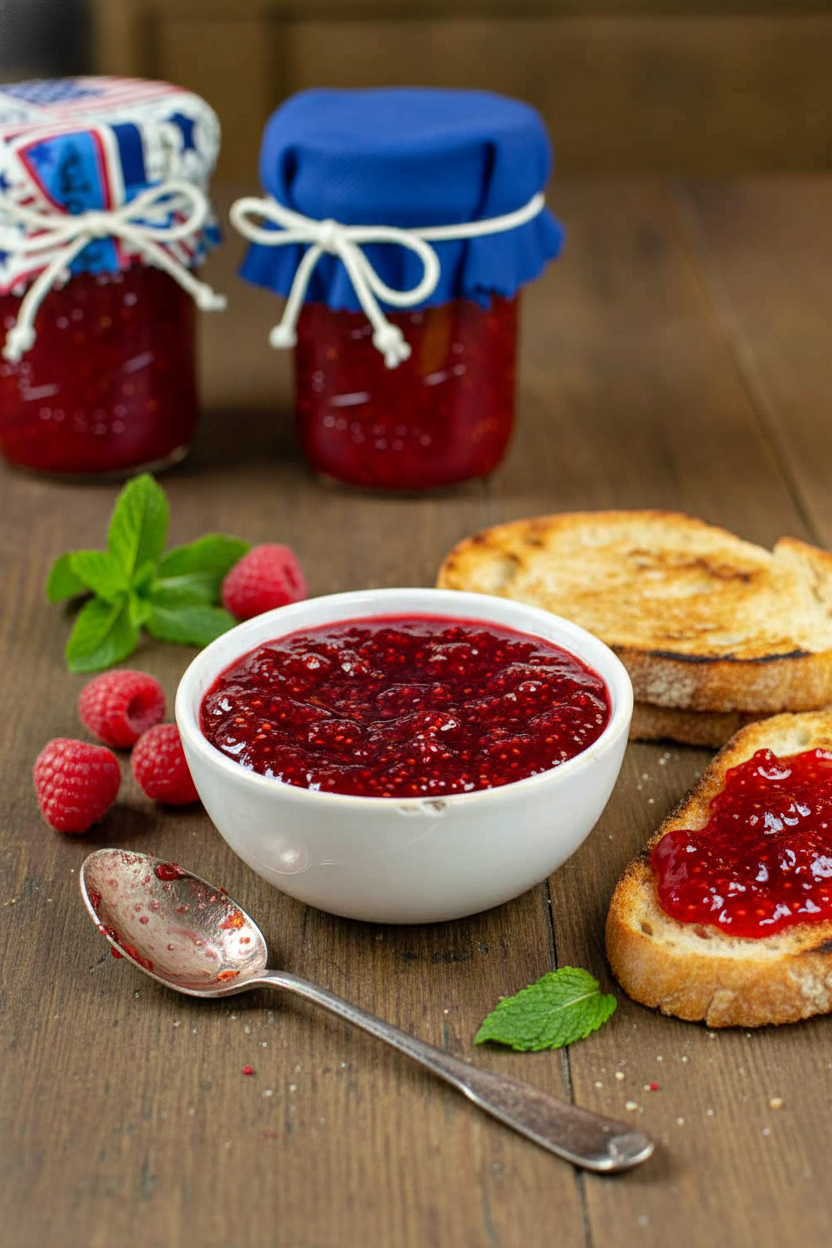
This preserve is wonderful on toast, biscuits, or even a spoonful right out of the jar. I keep one jar in the fridge for myself. The rest I give to friends. Have you ever given homemade jam as a gift? What did the person say?
One Last Scoop of Advice
This recipe makes a small batch, about three or four jars. That is perfect for trying something new. If you love it, you can double the figs and gelatin next time. Start small, taste often, and share with people you love.
Now I have a question for you: If you made this jam, who would you share the first jar with? I am curious to hear your story.
Ingredients:
| Ingredient | Amount | Notes |
|---|---|---|
| Fresh figs | 3 cups (about 40 figs) | Washed, stems removed, gently mashed |
| Sugar | 2 cups | |
| Strawberry gelatin | 2 boxes (3 oz each) | Jell-o or other brand |
| Lemon juice | 2 tbsp |
Instructions
Step 1: Heat your oven to 300 degrees. Place clean mason jars inside to sterilize. (I once forgot a jar and it cracked. Learn from my mistake!) Warm the lids in shallow water on the stove for 10 minutes.
Step 2: Drop fresh figs into boiling water for 2 minutes. Drain them, then cut off the stems and any bruised spots. Gently mash the figs in a big pot. Leave some chunky bits for a nice texture.
Step 3: Add 2 cups of sugar, 2 tablespoons of lemon juice, and 2 boxes of strawberry gelatin to the mashed figs. Stir it all together. Doesn’t that smell amazing already? What is your favorite fruit to preserve? Share below!
Step 4: Cook the mixture on low heat for about 15 minutes. Stir it now and then until it thickens up. Your kitchen will smell like a strawberry field.
Step 5: Use oven mitts to take the hot jars out. Pour the preserves in using a kitchen funnel. Wipe the rims clean if any spills happen. I still laugh at the time I got sticky jam on my nose.
Step 6: Put the lids on finger-tight. Flip the jars upside down for 5 minutes. Flip them back. You will know they are sealed when the lid center is indented.
Creative Twists
… Swap the strawberry gelatin for raspberry or peach for a new flavor. … Add a pinch of cinnamon or a splash of vanilla for a warm, cozy kick. … Stir in chopped walnuts or pecans for a little crunch. Which one would you try first? Comment below!
Serving & Pairing Ideas
Spread this preserve on warm, buttered toast for a simple breakfast. It also tastes wonderful over a block of cream cheese with crackers. For a fun dessert, spoon it over vanilla ice cream or pancakes. Which would you choose tonight?
How to Keep Your Fig Preserves Fresh and Tasty
I learned the hard way not to put hot jars right in the fridge. I once cracked a jar and lost a whole batch of preserves. Let your sealed jars cool on the counter first. Once they are cool, store them in a cool, dark pantry or the fridge. This keeps the flavor bright and the texture just right.
For reheating, spoon out what you need into a small bowl. Microwave it for ten seconds, then stir. Never microwave the whole jar, or the gelatin can get rubbery. Batch cooking is a lifesaver. You can make a double batch and give jars as gifts. It feels so good to share something you made with your own hands.
Have you ever tried storing it this way? Share below! Storing preserves right means they last longer and taste better. That matters because nobody wants to waste good food or hard work.
Three Common Problems and Easy Fixes
Sometimes your preserves come out too runny. This happens if you don’t boil them long enough. I remember my first batch was like syrup. The fix is simple: cook it for another five minutes, stirring gently. It will thicken up as it cools.
Another issue is fruit floating to the top. This is normal with figs because they are light. Just stir the preserves gently before you pour them into jars. If the mixture is too sweet, add an extra splash of lemon juice next time. A little tang balances the sugar perfectly.
Which of these problems have you run into before? Fixing these issues builds your confidence in the kitchen. It also makes your preserves taste like you knew exactly what you were doing.
Your Quick Questions, Answered
Can I use dried figs instead of fresh figs for this small batch recipe? You can use dried figs, but you must rehydrate them first. Soak them in warm water for about 30 minutes until they are soft. Drain the water and mash them well. Dried figs are sweeter, so you might want to reduce the sugar by a few tablespoons. The texture will be chewier than with fresh figs. It still makes a tasty preserve, just different from the original recipe. It is a good option when fresh figs are out of season.
How long does homemade fig preserves last in the refrigerator? Once you open a jar, your fig preserves will last about three weeks in the refrigerator. If the jar is sealed correctly and unopened, it can last up to one year in a cool pantry. Always check for mold or a funny smell before eating. I always write the date on the lid with a marker. That way, I never have to guess how old it is. Keeping them cold is the best way to keep them safe.
Do I need to peel the figs before making preserves? No, you do not need to peel the figs for this recipe. The skins are thin and soft, especially after you boil them for two minutes. They break down as you mash and cook the preserves. The skins add a little texture and fiber, which is good for you. Leaving the peels on saves time and effort. Just make sure to wash your figs well before cooking. That is all the prep they need.
Can this recipe be doubled or tripled for canning? Yes, you can double or triple this recipe easily. Just make sure you have a large enough pot for all the ingredients. The cooking time might increase by five to ten minutes because there is more liquid. Stir more often so the bottom does not burn. You will need more jars and lids, of course. This recipe is perfect for making gifts or stocking your pantry for the year. I always triple it when figs are in season.
What is the best substitute for fresh lemon juice in fig preserves? The best substitute for fresh lemon juice is bottled lemon juice. It has a consistent acidity, which is important for preserving. You can also use lime juice for a different, tangy flavor. White vinegar works in a pinch, but it changes the taste. Use about half the amount of vinegar if you try it. Lemon juice keeps the preserves from being too sweet and helps it set. I keep a bottle in my fridge just for this reason.
How can I tell when fig preserves are done cooking? The easiest way to test is the cold plate method. Put a small plate in the freezer for a few minutes. Drop a spoonful of preserves on the cold plate. Let it sit for 30 seconds. If it wrinkles when you push it with your finger, it is done. If it stays runny, cook it for a few more minutes. The preserves will also look darker and thicker in the pot. Trust your eyes and the plate test, and you will never overcook them.
Which tip will you try first?
A Warm Send-Off From My Kitchen to Yours
Thank you for spending time with me today. I hope you feel ready to make your own fig preserves. Remember, every batch teaches you something new. The first time I made this, I burned the sugar a little. It still tasted wonderful on toast. Cooking is about trying, learning, and sharing what you love.
Have you tried this recipe? I would love to hear how it turned out in the comments below. Did you change anything? Did your family love it? That is what makes cooking so special. You make a recipe your own every time you stir the pot. I cannot wait to read your stories.
*Fun fact: Figs are not actually a fruit. They are inverted flowers that bloom inside the pod.*
Happy cooking!
—Grace Ellington.

My Kitchen Tested Small Batch Fig Preserves Recipe
Description
Experience the rich, sweet flavor of homemade small-batch fig preserves, perfect for spreading on toast or pairing with cheese.
Ingredients
Instructions
- Prepare jars for canning: Before cooking your small-batch fig preserves, you’ll need to heat the glass mason jars in the oven at 300 degrees to sterilize them. Then, place the lids in a pot with shallow water, and warm them on the stove at medium heat. Once you have heated the lids for about 10 minutes, remove them from the hot water and place them on a clean towel.
- While the jars and lids are heating, prepare the figs: Place the figs (with stems and peels) in boiling water for 2 minutes. Then drain, remove stems and any bruised ends of the figs. Gently mash figs and transfer to soup pot. There is no need to remove skins. When mashing your figs, leave a few small- or medium-sized pieces if you desire a thicker texture.
- Add all ingredients to mashed figs: Add lemon juice, sugar, and gelatin mix to mashed figs.
- Place preserves on the stove and bring to a boil: At low heat, cook for about 15 minutes, stirring occasionally until the mixture thickens.
- Pour preserves into mason jars: Remove the heated mason jars from the oven, and use canning tongs or an oven mitt to handle the warmed jars. When canning fig preserves, use a kitchen funnel. You’ll want to wipe the rims if the preserves do spill over the edge.
- Seal the mason jars: After filling the jars and replacing the lids (finger-tight only), flip the jars over to set for about 5 minutes. Once the jars are set, flip them right-side-up again. You’ll know the jars are sealed when the tops of the jars have an indented lid.
Notes
- This recipe makes about 24 servings (1 Tbsp each). Store sealed jars in a cool, dark place. Once opened, refrigerate.