

My Easter Table Secret
I want to share my favorite spring treat. These mini cheesecakes are like little bites of cloud. They are no-bake, which is perfect for busy days.
I started making them years ago for my grandkids. They loved how they looked like Easter nests. I still laugh at how fast they disappeared. Do you have a dessert that always vanishes from your table?
The Crunchy Bottom Layer
Let’s start with the crust. You mix graham cracker crumbs with melted butter and a little sugar. It should feel like wet sand at the beach.
Press this into a muffin tin. Use a spoon to pack it down tight. This matters because a firm crust holds everything together. Then just pop it in the fridge to chill.
The Dreamy Filling
Now for the creamy part. Beat your softened cream cheese until it’s smooth. Then mix in powdered sugar and vanilla. Doesn’t that smell amazing?
In another bowl, whip the heavy cream until it’s fluffy. Gently fold it into the cream cheese. This gentle folding matters. It keeps the filling light and airy. *Fun fact: This “no-bake” method has been a lifesaver for cooks on hot days for over a century!*
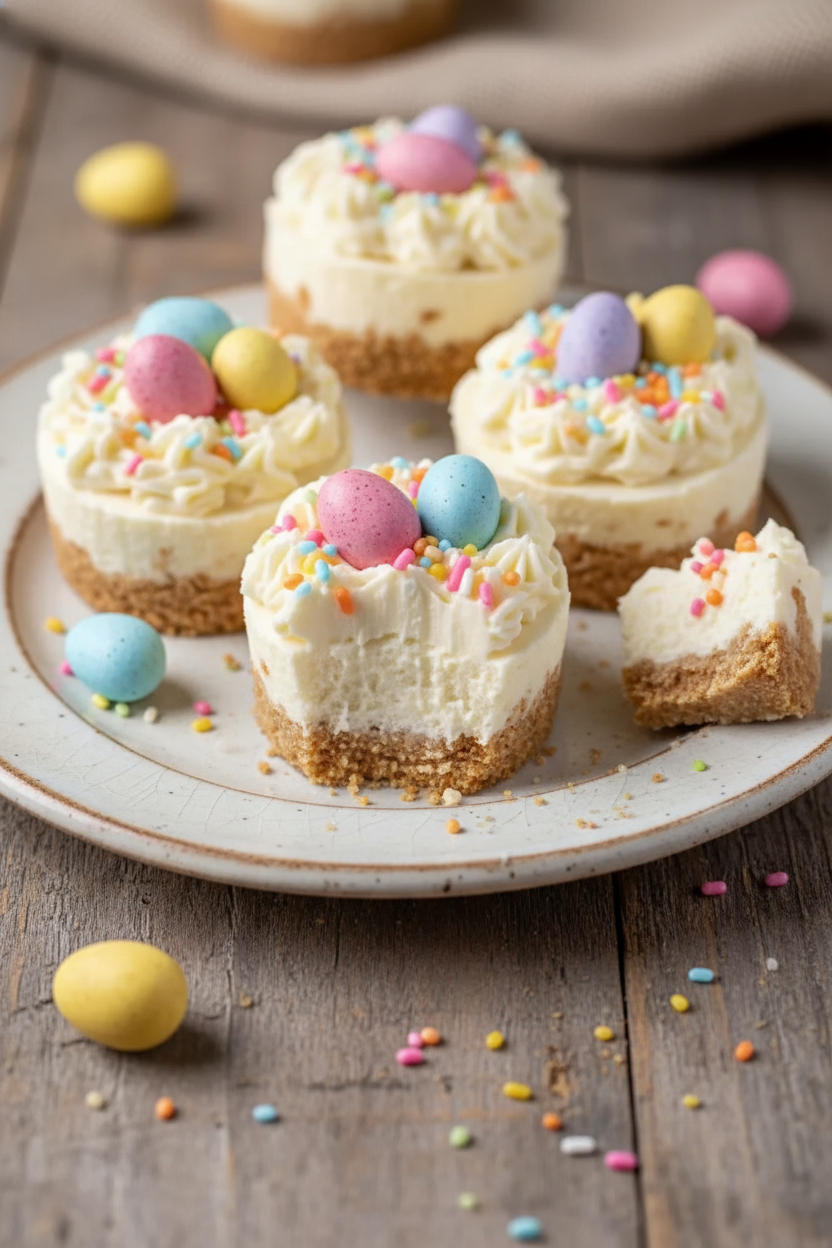
Making Them Easter Pretty
Spoon the filling onto your cold crusts. Smooth the tops. Let them chill for a few hours until they’re firm. Patience is hard, I know!
Then comes the fun. Melt some pastel candy melts. Drizzle it over the tops. Add mini eggs, jelly beans, and sprinkles. What’s your favorite Easter candy to use as a topping?
Sharing the Joy
Carefully lift your cheesecakes from the tin. Serve them cold. They look so cheerful on a plate.
Food is about more than eating. It’s about making moments special. These little cakes create a happy pause in our day. That is why this simple recipe matters so much. Will you be making any special treats this weekend? I’d love to hear about them.
Ingredients:
| Ingredient | Amount | Notes |
|---|---|---|
| Graham cracker crumbs | 1 1/2 cups | |
| Unsalted butter | 1/4 cup | Melted |
| Granulated sugar | 1 tbsp | For the crust |
| Cream cheese | 12 oz | Softened |
| Powdered sugar | 1/2 cup | |
| Vanilla extract | 1 tsp | |
| Heavy whipping cream | 1 cup | |
| Pastel-colored candy melts | As needed | For drizzling |
| Mini chocolate eggs or jelly beans | As needed | For topping |
| Easter-themed or pastel sprinkles | As needed | For topping |

Instructions
Step 1: Mix your graham crumbs, melted butter, and sugar. It should look like wet sand. I love that buttery smell. (Tip: Use the back of a spoon to press the crumbs firmly. It keeps your crust from crumbling later!)
Step 2: Now, beat your softened cream cheese until it’s super smooth. Add the powdered sugar and vanilla. Doesn’t that smell amazing? Keep mixing until it’s all creamy and dreamy.
Step 3: In another bowl, whip the heavy cream until it forms soft peaks. Then, gently fold it into your cream cheese. Be gentle, like folding a cloud. What’s your favorite part of making cheesecake? Share below!
Step 4: Spoon that creamy filling onto your chilled crusts. Smooth the tops. Then, the hardest part—wait! Let them chill for two hours. I still peek in the fridge sometimes.
Step 5: Time to decorate! Melt your pastel candy. Drizzle it over the tops. Add mini eggs and sprinkles. Make them as colorful as a spring garden. They’re almost too pretty to eat.
Creative Twists
Lemon Sunshine: Add a spoonful of lemon zest to the filling. It tastes like spring.
Berry Surprise: Hide a fresh raspberry in the center of each one.
Cookie Crunch: Use crushed vanilla wafers instead of graham crackers.
Which one would you try first? Comment below!
Serving & Pairing Ideas
Serve these on a big platter with fresh strawberries. They look so cheerful. For a special touch, add a dollop of whipped cream on the side. A glass of cold milk is the perfect partner. It cuts the sweetness just right. Which would you choose tonight?
Keeping Your Mini Cheesecakes Happy
These little cheesecakes love the cold. Keep them in the fridge for three days. Cover them well so they stay fresh. You can also freeze them for a month. Just wrap each one tightly first.
I remember my first batch. I left one out too long. It got a little soft and sad. Now I always put them away right after dessert. This matters because good storage keeps treats special. It means no waste and a sweet surprise later.
Making a double batch is a smart idea. You get a ready-made treat for busy days. It turns cooking into a gift for your future self. Have you ever tried storing it this way? Share below!
Simple Fixes for Common Hiccups
First, a soggy crust. Press your crumbs very firmly. Use the back of a spoon. I once rushed this step. The crust crumbled when I took a bite.
Second, lumpy filling. Your cream cheese must be soft. Leave it on the counter for an hour. This matters for a smooth, creamy bite. It makes the dessert feel luxurious.
Third, runny whipped cream. Make sure your bowl and cream are cold. Whip it until stiff peaks form. This gives your cheesecakes structure. It builds your confidence when it works. Which of these problems have you run into before?
Your Quick Questions, Answered
What is the easiest way to make mini cheesecakes?
The no-bake method is the easiest. You just mix and chill. No oven needed. Make a crust from graham crackers and butter. Then mix cream cheese, sugar, and whipped cream. Spoon it on the crust and let it get cold in the fridge. It is simple and hard to mess up. Perfect for new cooks and busy days.
Can I use a muffin tin for mini cheesecakes?
Yes, a muffin tin is perfect. Use paper or foil liners first. This stops the cheesecakes from sticking. Press the crust into each liner. Then add the filling. The tin gives them a nice shape. It makes them easy to serve. Everyone gets their own little dessert. Cleanup is easy too. Just remove the liners.
How do you keep mini cheesecakes from sticking?
Always use liners in your muffin tin. Cupcake papers work great. For the crust, use enough melted butter. The butter coats the crumbs. This helps the crust hold together. Let the cheesecakes chill fully before removing them. The filling will be firm. Then you can peel the liner off easily. No sticking and no mess left behind.
What toppings are good for Easter cheesecakes?
Use bright, spring colors. Pastel candy melts are lovely drizzled on top. Add mini chocolate eggs or jelly beans. Colorful sprinkles make them fun. A little whipped cream dollop looks like a cloud. Fresh berries like strawberries are pretty too. *Fun fact: The first jelly beans were made for Easter in the 1930s.* Get creative with your favorite small candies.
Can you make mini cheesecakes ahead of time?
You absolutely can. They need at least two hours to chill. Making them the day before is even better. The flavors get happier together overnight. Keep them covered in the fridge. You can add toppings a few hours before serving. This makes party planning so much easier. You are not rushing when guests arrive. Dessert is already done.
How do you get a smooth cheesecake filling?
Start with very soft cream cheese. Beat it alone until creamy. Then add your sugar and vanilla. Mix it well. In another bowl, whip the heavy cream until stiff. Fold the whipped cream gently into the cheese mix. Do not stir hard. Folding keeps the filling light and smooth. No lumps allowed. Which tip will you try first?
From My Kitchen to Yours
I hope you love making these sweet bites. Cooking is about sharing joy. These little cheesecakes are full of it. I think of my grandkids when I make them. Their eyes get so wide.
I would love to hear about your kitchen adventures. Tell me how yours turned out. Did your family like them? Have you tried this recipe? Please leave a comment below with your story.
Happy cooking!
—Grace Ellington.

Easy Easter Mini Cheesecakes I Love to Make
Description
These adorable and easy no-bake mini cheesecakes are the perfect festive treat for Easter, featuring a graham cracker crust, creamy filling, and colorful candy toppings.
Ingredients
Instructions
- Prepare the crust: In a medium bowl, mix graham cracker crumbs, melted butter, and sugar until the mixture resembles wet sand. Ensure the crumbs are well-coated with butter for a cohesive crust.
- Press into muffin tin: Press 1-2 tablespoons of the crumb mixture into the bottom of each lined cup in a 12-cup muffin tin. Firmly pack the crumbs using the back of a spoon to create a solid base.
- Chill the crust: Place the muffin tin in the refrigerator while you prepare the filling.
- Beat the cream cheese: In a mixing bowl, beat the softened cream cheese until smooth and creamy.
- Add sugar and vanilla: Add the powdered sugar and vanilla extract to the cream cheese, mixing until fully combined and smooth.
- Whip the cream: In a separate bowl, whip the heavy cream to stiff peaks.
- Fold in the whipped cream: Gently fold the whipped cream into the cream cheese mixture using a spatula.
- Fill the crusts: Spoon or pipe the filling evenly over the chilled crusts, smoothing the tops.
- Refrigerate to set: Chill for at least 2 hours or until the filling is firm.
- Melt the candy melts: Melt the pastel-colored candy melts following package instructions.
- Drizzle over cheesecakes: Drizzle the melted candy melts over the top of each cheesecake.
- Add toppings: Top each cheesecake with mini chocolate eggs, jelly beans, and festive sprinkles.
- Serve chilled: Carefully remove the cheesecakes from the muffin tin and serve chilled.
Notes
- For a neat presentation, use a piping bag to fill the crusts. Ensure cream cheese is fully softened to avoid lumps. Store leftovers covered in the refrigerator for up to 3 days.