

My Easter Table Secret
I love making Easter special. But big desserts can be too much. A few years ago, I tried something new. I made little cheesecakes in jars. Everyone got their own sweet spring garden. The kids loved them most. I still laugh at that.
These jars are our new tradition. They are easy to make together. You can even decorate your own. Does your family have a favorite Easter treat? Tell me about it in the comments.
Let’s Make the Crust
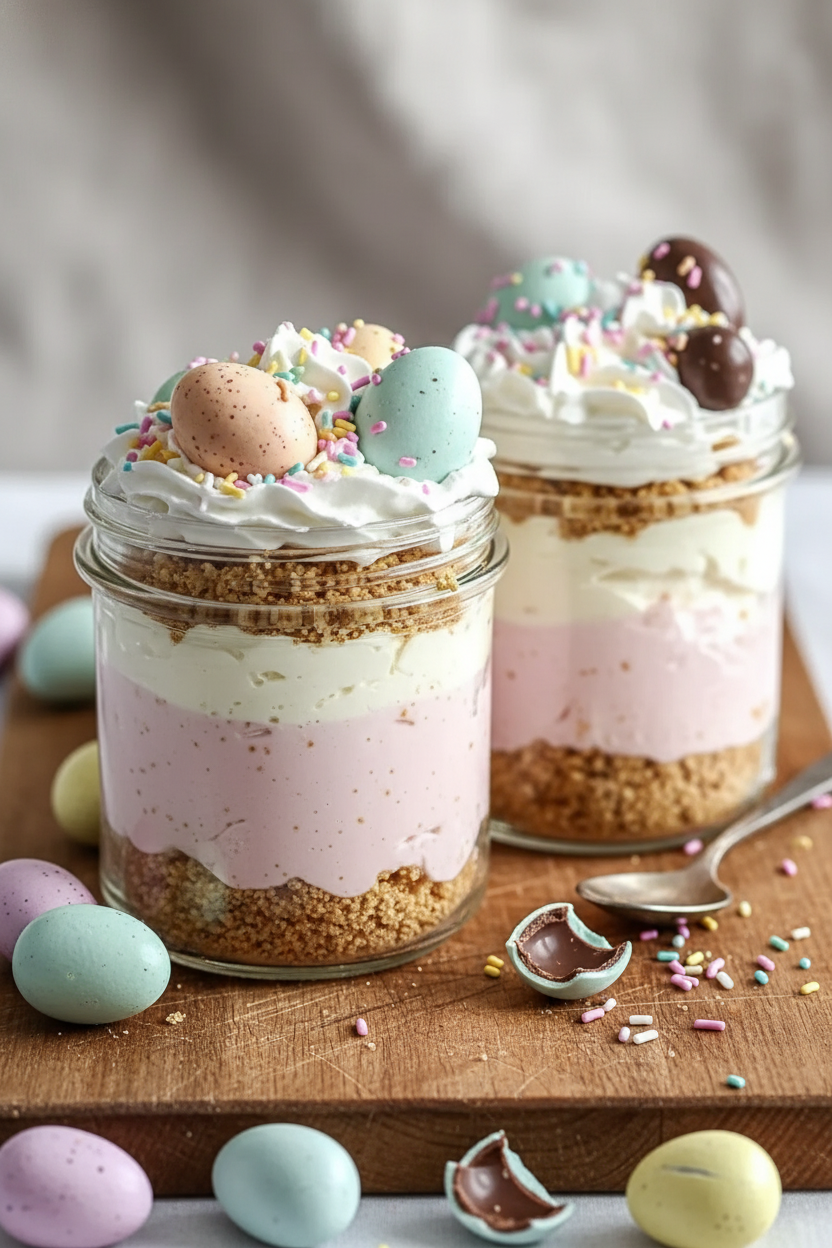
First, we make the dirt. Mix graham cracker crumbs and sugar. Pour in the melted butter. Stir it all up with a fork. It should look like wet sand at the beach.
Spoon some into each jar. Press it down gently with a spoon. This is your cheesecake’s foundation. A good base matters. It means every bite has a sweet, crunchy start.
The Fluffy Cloud Filling
Now, the fun part. Beat the cream cheese until it’s smooth. No lumps allowed. Add the powdered sugar and vanilla. Beat it again. Doesn’t that smell amazing? It’s like a sweet cloud.
Gently fold in the whipped cream. Do this in two parts. It keeps the filling light and airy. This step matters. It’s what makes the cheesecake soft, not heavy.
A Pop of Spring Color
Split the filling into two bowls. Leave one white. Color the other one soft pink. You can use food coloring. Or try strawberry powder for a fruity taste. *Fun fact: Long ago, people used beet juice to color foods pink!*
Layer the pink filling over the crust. Then add the white on top. You can use a spoon or a piping bag. Which color would you make your second layer? I’d love to know.
Time to Decorate!
Add a swirl of whipped cream on top. Now, the garden grows. Place a few candy eggs on the cream. Shake on some pretty sprinkles. It looks like a tiny Easter basket.
Chill the jars until you’re ready. The wait is the hardest part. Making food pretty is a small joy. It turns a simple treat into a happy memory. What’s your favorite way to decorate desserts? Is it sprinkles, fruit, or something else?
Ingredients:
| Ingredient | Amount | Notes |
|---|---|---|
| Graham cracker crumbs | 1 cup | For the crust |
| Granulated sugar | 2 tablespoons | For the crust |
| Unsalted butter | 4 tablespoons | Melted, for the crust |
| Cream cheese | 8 oz (1 block) | Softened, for the cheesecake layers |
| Powdered sugar | ½ cup | For the cheesecake layers |
| Vanilla extract | 1 teaspoon | For the cheesecake layers |
| Heavy cream | 1 cup | Whipped to stiff peaks, for the cheesecake layers |
| Pink gel food coloring or freeze-dried strawberry powder | 1 tablespoon (if using powder) | Optional, for tinting one layer |
| Whipped cream | For topping | For piping or spooning on top |
| Pastel candy eggs | 12–18 total | 2–3 per jar, for decoration |
| Rainbow or pastel sprinkles | To taste | For decoration |

Instructions
Step 1: Let’s make the crust. Mix the crumbs, sugar, and melted butter. It should look like wet sand. My grandson loves to help with this part. (Tip: Use the back of a spoon to press it down neatly.)
Step 2: Now, beat the cream cheese until it’s super smooth. Add the powdered sugar and vanilla. Doesn’t that smell amazing? Beat it all until it’s light and fluffy.
Step 3: Gently fold in your whipped cream. Do it in two parts so it mixes well. This makes the filling so airy and dreamy. What’s the secret to a light filling? Share below!
Step 4: Split the mixture into two bowls. Color one bowl a pretty pink. I still laugh at the time I used too much color! Spoon the pink layer, then the white, into your jars.
Step 5: Time for the best part! Add a swirl of whipped cream on top. Decorate with candy eggs and sprinkles. Chill them for an hour. The waiting is always the hardest part.
Creative Twists
Chocolate Bunny Crunch: Use crushed chocolate cookies for the crust.
Lemon Sunshine: Add a little lemon zest to the white filling.
Carrot Patch: Top with orange sprinkles and a tiny mint “leaf.”
Which one would you try first? Comment below!
Serving & Pairing Ideas
These jars are perfect for a sunny spring picnic. Place them on a big tray with fresh berries. You could also serve them with a glass of cold milk. For a fancy touch, add a sprig of mint. It makes everything feel special. Which would you choose tonight?
Keeping Your Cheesecake Jars Happy
Let’s talk about storing these sweet treats. They live best in the fridge. Just pop a lid on each jar. They will be perfect for three days. You can also freeze them for a month. Thaw them in the fridge overnight before eating.
I remember my first batch. I didn’t cover one jar tightly. It picked up onion smells from the fridge. What a surprise that was! Now I always snap the lids on. Batch cooking these jars is a smart move. It makes a holiday so much easier. You do the work once. Then you have pretty desserts ready for your guests.
This matters because it saves you time. You can enjoy the party too. Have you ever tried storing it this way? Share below!
Simple Fixes for Common Hiccups
Sometimes cooking has little problems. Here are three easy fixes. First, a lumpy filling. Your cream cheese must be soft. Leave it on the counter for an hour. I once used cold cream cheese. My mixer danced across the counter!
Second, a soggy crust. Press the crumbs firmly. But do not pack them like concrete. Third, runny whipped cream. Make sure your bowl and cream are very cold. This helps it whip up thick and fluffy.
Fixing these issues builds your confidence. You learn that mistakes have solutions. It also makes your food taste so much better. A smooth filling is a joy to eat. Which of these problems have you run into before?
Your Quick Questions, Answered
How to make mini cheesecakes in jars?
Follow the recipe steps above. The jars make it simple and fun. Mix your crust and press it in. Make your creamy filling and layer it. Top with whipped cream and candy. The jars are your serving dish. No need to slice or plate anything. It is a very tidy dessert.
Can you make cheesecake jars ahead of time?
Yes, you absolutely can. This is a great make-ahead dessert. Assemble the jars completely. Then keep them chilled in your refrigerator. You can make them one or two days early. This lets the flavors blend nicely. It also makes your day much less busy.
What are the best toppings for Easter cheesecake jars?
Pastel candy eggs are classic for Easter. Rainbow sprinkles add a happy crunch. You could also use fresh berries. A little lemon zest is pretty too. *Fun fact: The first candy eggs were made in the 1800s.* Choose toppings that look spring-like and joyful.
How long do cheesecake jars last in the fridge?
They will keep for about three days. Make sure the lids are on tight. This keeps them fresh and safe to eat. The crust may soften a little after day one. But they will still taste delicious. Always check for any odd smells first.
Can I use a different crust for mini cheesecake jars?
Of course! Crushed vanilla wafers work wonderfully. Chocolate cookie crumbs are a tasty choice. You could even use crushed pretzels for a salty twist. Use the same amount as the graham crumbs. Mix them with the same butter and sugar. This is how you make a recipe your own.
What are some easy no-bake Easter dessert ideas?
These cheesecake jars are a perfect no-bake treat. You could also make a fruit trifle in a big bowl. Dirt cups with pudding and gummy worms are fun. Rice cereal nests with candy eggs are simple. All these ideas are easy and festive. Which tip will you try first?
From My Kitchen to Yours
I hope you love making these cheerful jars. They always bring a smile to the table. Cooking is about sharing joy with people you love. I would be so happy to hear about your baking adventures.
Tell me all about it in the comments below. Have you tried this recipe? What did your family think? Happy cooking!
—Danielle Monroe.

Effortless Mini Easter Cheesecake Jars
Description
These adorable and easy Mini Easter Cheesecake Jars feature a buttery graham cracker crust, a creamy no-bake cheesecake layer, and festive pastel toppings.
Ingredients
For the crust:
For the cheesecake layers:
For the topping:
Instructions
- In a bowl, combine graham cracker crumbs, sugar, and melted butter. Stir until it resembles wet sand.
- Spoon the crumb mixture into mini jars and press gently to form the crust base.
- In a mixing bowl, beat the cream cheese until smooth. Add powdered sugar and vanilla and beat again until fluffy.
- Fold whipped cream into the cream cheese mixture in two batches until fully combined.
- Divide mixture into two bowls. Tint one with pink food coloring or strawberry powder for a fruity layer.
- Spoon or pipe the pink layer over the crust. Follow with the white layer on top.
- Add a swirl of whipped cream on each jar.
- Decorate with candy eggs and sprinkles. Chill until ready to serve.
Notes
- For best results, ensure the cream cheese is fully softened to avoid lumps. Chill for at least 1 hour before serving to allow the layers to set.