

Grandma Bunny’s Secret Weapon
I still laugh when I think about the first peach pie I made. It was a soupy mess. The filling ran all over the plate like a river. My grandma Bunny just smiled and handed me a spoon. “We’ll call it peach soup,” she said. That’s when she taught me her secret. You must drain the peaches. It sounds silly, but it changes everything.
Doesn’t that smell amazing? Just thinking about peaches and cinnamon makes my kitchen feel like home. Have you ever made a pie that turned into soup? I bet you have a funny story to tell.
Why Draining Matters So Much
Peaches are full of juice. That’s what makes them taste like summer. But too much juice in a pie makes the crust soggy. When you let the peaches sit in a colander, the extra liquid drips away. You can actually collect almost a quarter cup of juice. That’s juice you don’t want inside your pie.
This is a “why this matters” moment. A soupy pie is not as fun to eat. The filling slides off your fork. The crust gets wet and mushy. Taking ten extra minutes to drain saves the whole dessert. I promise, it is worth the wait.
What is your favorite summer fruit? I would love to know if you have ever tried this trick with other fruits, like berries or plums.
The Egg Wash Trick
Here is another little secret. Brush the bottom crust with a little beaten egg before you add the filling. This creates a shield. The egg seals the crust so it does not soak up the peach juices. Grandma Bunny called it “giving the crust a raincoat.” I still say that every time I bake.
You use the rest of the egg to brush the top crust later. That gives the pie a beautiful golden shine. It also helps any sugar you sprinkle on top stick to the crust. *Fun fact: That shiny top is called a “glaze” in baking, but Bunny just called it “the pretty part.”
The Temperature Trick
Did you notice the oven starts at 450 degrees? That is hot. Then after ten minutes, you turn it down to 350. This is not a mistake. The high heat at the start helps the crust get flaky. The lower heat finishes cooking the peaches slowly. This makes the filling thick and rich, not runny.
Another “why this matters” insight: Baking is not just about time. It is about heat and patience. If you bake the whole pie at a low temperature, the crust stays pale. If you bake it too high the whole time, the edges burn. That little change in temperature is pure magic.
Have you ever burned the edges of a pie crust? I sure have. That is why Bunny taught me to use little strips of foil to cover the edges. It saves the pie every single time.
Let It Rest, Really
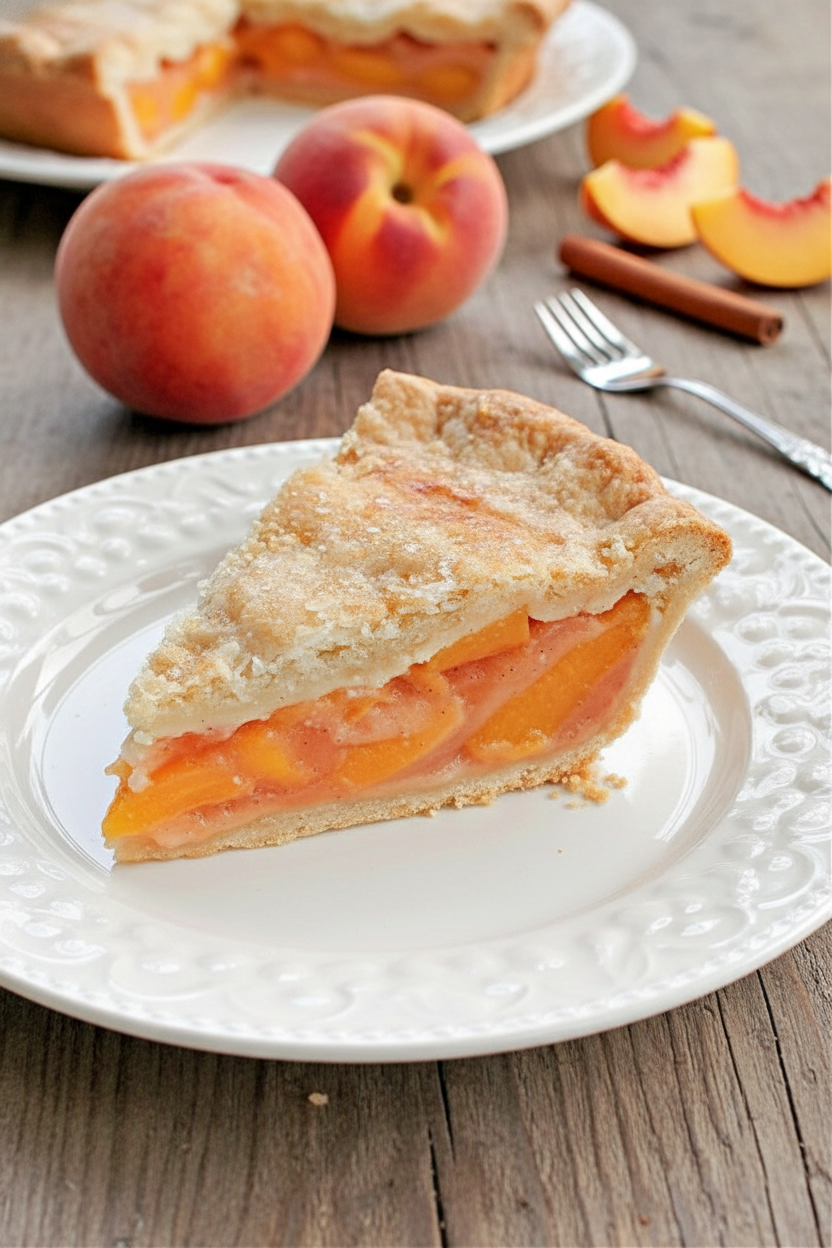
This is the hardest part. After the pie comes out of the oven, you have to let it cool completely. Then you put it in the refrigerator for a couple of hours. I know you want to cut into it right away. I do too. But warm pie filling is loose. Cold pie filling holds its shape.
I once cut into a pie too early. The filling poured out like lava. It was tasty, but messy. Now I wait. The fridge time lets the cornstarch and flour do their job. They thicken the juices into a soft, sliceable filling. That is the difference between a good pie and a perfect pie.
Do you have the patience to wait? Or are you a “cut it while it’s hot” kind of person? Be honest.
A Little Love in Every Bite
When I make this pie, I think about Bunny standing in her tiny kitchen. She always wore a flour-dusted apron. She hummed old songs while she worked. She never rushed. She said pies were made with “slow hands and a happy heart.” I try to remember that every time I bake.
This recipe is simple. Peaches, sugar, flour, cornstarch, butter, and a little cinnamon. No fancy ingredients. Just good food made with care. That is what turns a dessert into a memory. I hope you make this pie for someone you love. And I hope you remember to drain those peaches.
What is a recipe you learned from someone special? I would love to hear your story in your own words. Share it with me, like we are sitting at the kitchen table together.
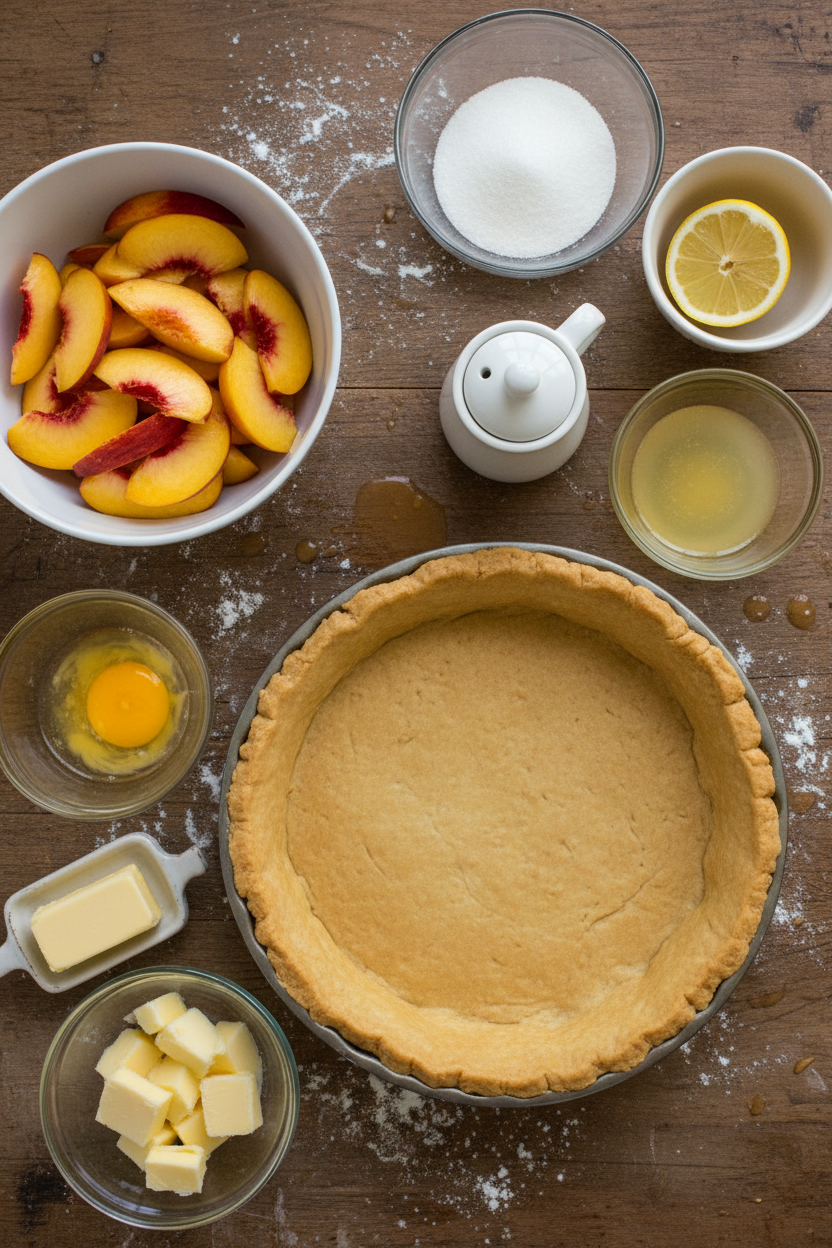
Ingredients:
| Ingredient | Amount | Notes |
|---|---|---|
| Pie crust recipe yielding two crusts or 1 package pastry | 15 ounces | For a 9 inch double crust pie |
| Sliced peaches (about 1/2 inch thick) | 5 cups | Drain after tossing with lemon juice |
| Egg, beaten | 1 | Divide to brush bottom and top crust |
| Lemon juice | 1 tablespoon | Toss with peaches before draining |
| All purpose flour | 1/4 cup | For the filling mixture |
| Cornstarch | 1/4 cup | For the filling mixture |
| White sugar | 3/4 cup | For the filling mixture |
| Brown sugar | 1/4 cup | For the filling mixture |
| Cinnamon | 1/2 teaspoon | For the filling mixture |
| Salt | 1/4 teaspoon | For the filling mixture |
| Cold butter | 2 tablespoons | Dot over peaches before top crust |
Instructions
Step 1: Preheat your oven to 450 degrees. Slice your peaches about half an inch thick. Toss them gently with one tablespoon of lemon juice in a big bowl.
Step 2: Pour the peaches into a colander to drain for 10 to 15 minutes. You will be surprised how much juice comes out. (This little trick stops your pie from getting soupy later.)
Step 3: Place one pie crust in a 9 inch pie pan. Brush the bottom and sides with a bit of beaten egg. This keeps the crust nice and crisp. Doesn’t that smell amazing?
Step 4: In a medium bowl, mix flour, cornstarch, white and brown sugar, cinnamon, and salt. Pour this over your drained peaches. Gently fold everything together until the peaches are coated.
Step 5: Pour the peach mixture into the crust. Dot the top with two tablespoons of cold butter. Place your top crust on, flute the edges, and brush with the rest of the beaten egg. Cut four slits in the top to let steam escape. I still laugh at the time I forgot the slits and had a peach volcano! What is your funniest kitchen mistake? Share below!
Step 6: Bake at 450 degrees for 10 minutes. Then turn the oven down to 350 degrees and bake for 30 to 35 more minutes. Cool the pie completely, then pop it in the fridge for a couple hours before cutting.
Creative Twists
… Add a handful of fresh blueberries or raspberries to the peaches for a berry-peach mix.
… Sprinkle a little nutmeg or ginger with the cinnamon for a warmer, spicier taste.
… Swap half the white sugar for maple syrup for a richer, deeper sweetness.
Which one would you try first? Comment below!
Serving & Pairing Ideas
Serve this pie warm with a big scoop of vanilla ice cream melting on top. A drizzle of caramel sauce makes it extra special. For a fancy touch, add a handful of fresh mint leaves on the side. Which would you choose tonight?
Storing and Reheating Your Peach Pie
Letting your pie cool completely is the first big step. I once set a warm pie on the counter and the crust turned soggy by morning. Now I always refrigerate it for a few hours after it cools. This helps the filling set up firm and keeps the crust flaky. You can store leftover pie in the fridge for up to three days. Cover it loosely with foil or plastic wrap. For reheating, pop a slice in a 350-degree oven for about 10 minutes. The microwave works too, but the crust will be softer.
Batch cooking is a great idea. Make two pies at once and freeze one before baking. Wrap it tightly in foil and then in a freezer bag. When you want it, bake from frozen, just add 15 extra minutes. This saves time and gives you a treat later. Have you ever tried storing it this way? Share below! Storing your pie right matters because it keeps the flavor and texture just right. You worked hard on it, so enjoy every bite.
Three Common Peach Pie Problems (And Easy Fixes)
I remember my first peach pie. The filling ran all over the plate like a lake. That taught me to drain the peaches first. A colander and 15 minutes makes all the difference. This removes extra juice so your pie slices clean. Another problem is a pale, sad top crust. Brushing it with beaten egg gives a golden shine. It also helps sugar stick if you want a sparkly finish.
A third issue is the bottom crust turning soggy. The fix is simple. Brush the bottom crust with a little beaten egg before adding the filling. This creates a shield. Which of these problems have you run into before? Fixing these things matters because it builds your cooking confidence. You learn to trust your hands and your oven. It also makes the flavor shine. A well-made pie tastes like summer in a slice.
Your Quick Questions, Answered
How to prevent a soggy bottom crust in peach pie
Start by brushing the bottom crust with beaten egg before adding the filling. This creates a moisture barrier. Also drain your sliced peaches in a colander for 15 minutes after tossing them with lemon juice. This removes extra liquid. Baking on a preheated baking sheet helps too. The heat hits the bottom directly and crisps it up. These steps together give you a sturdy, flaky crust.
How much cornstarch to use in peach pie filling
This recipe calls for 1/4 cup of cornstarch along with 1/4 cup of flour. That mix thickens the filling without making it gooey. The cornstarch helps the juices set firm when the pie cools. If you use too little, your pie will be runny. Too much makes it stiff. Stick with this ratio for a perfect slice every time.
Should you peel peaches for pie
Yes, you really should peel them. Peach skins get tough and chewy when baked. They can also make the filling look murky. Blanching the peaches in boiling water for 30 seconds makes the skins slip right off. It takes a few extra minutes but gives you a smooth, beautiful filling. Your pie will taste better and look prettier.
Best peaches for baking in a pie
Freestone peaches are the best choice. Their flesh comes off the pit easily. Look for varieties like Elberta, Redhaven, or Georgia Belle. They are sweet, firm, and hold up well in the oven. Avoid clingstone peaches, as they are harder to slice. Ripe but still firm peaches work best. They soften during baking but keep some shape.
How to thicken runny peach pie filling
If your filling is still runny after baking, let the pie cool completely and then refrigerate it for a few hours. This allows the cornstarch to fully set. For next time, make sure you drain the peaches well and measure your cornstarch correctly. You can also add an extra tablespoon of cornstarch if your peaches are very juicy.
Can you use frozen peaches for peach pie
Yes, you can. Thaw them first and drain off all the liquid. Frozen peaches release more juice than fresh ones, so be thorough. You may need to add an extra tablespoon of cornstarch to the filling. Do not skip the draining step. The rest of the recipe stays the same. Your pie will taste just as good. Which tip will you try first?
A Warm Goodbye from My Kitchen to Yours
I hope these tips help you make the perfect peach pie. Every baker learns by doing. I still remember my first soggy crust and runny filling. But each mistake taught me something. Now I love sharing what I learned. Have you tried this recipe? Tell me how it turned out in the comments. Your stories make this community special. Happy cooking!
—Grace Ellington

Bakers Trusted Method for Perfect Peach Pie
Description
A trusted method for achieving a perfect peach pie with a flaky crust and juicy, not soupy, peach filling.
Ingredients
Instructions
- Preheat oven to 450 degrees.
- In a large bowl combine the sliced peaches and lemon juice, gently toss together. Place the sliced peaches in a colander to drain. Don’t skip this step, this eliminates some of the juice so your pie won’t be soupy after it’s cut. When I drained my peaches I collected almost a 1/4 cup of juice. Drain peaches about 10 – 15 minutes. Place drained peaches in a large bowl.
- Place one homemade or pre-made pie crust in the bottom of a 9 inch pie pan. Brush the pie crust (bottom and sides) with a little of the beaten egg. This keeps the crust from getting soggy. Keep the rest of the beaten egg to brush on the top crust.
- In a medium size bowl combine the flour, cornstarch, sugars, cinnamon and salt. Stir to combine. Pour the flour mixture over the drained peaches and gently fold them together.
- Pour peaches into the bottom pie crust and dot with butter. Place the top crust over the peaches and flute edges. Brush with the rest of the beaten egg and cut 4 slits in the top crust to vent steam. You can sprinkle sugar on top of the crust for decoration if you like. Place pie on a baking sheet, I always do this so there’s no chance of spills in the oven.
- Bake the pie at 450 degrees for 10 minutes, reduce heat to 350 degrees. Bake an additional 30-35 minutes until crust is brown and juices bubble up through the slits. If your pie edges brown to quickly, cover the edges with strips of aluminum foil and continue baking. After the pie has cooled completely, refrigerate it for a couple hours before cutting.
Notes
- After the pie has cooled completely, refrigerate it for a couple hours before cutting for best results.