

I remember the first time I made pickles. I was in my own tiny kitchen, and I felt so grown up. The smell of vinegar and dill filled the whole house. Doesn’t that smell amazing? It’s a smell that says something good is coming.
Why Make Your Own Pickles?
Store pickles are fine, but homemade ones are special. You control the crunch. You control the salt. This recipe makes a pickle that tastes just like those fancy Claussen ones in the cold grocery aisle.
Here’s the secret: no boiling water bath. That keeps the cucumbers crisp. *Fun fact: Real kosher dill pickles were not made for religious reasons. They got the name because Jewish delis in New York made them with lots of garlic and dill.*
Why this matters: When you make food yourself, you know exactly what’s in it. No weird chemicals. Just good, simple things like vinegar and garlic. Have you ever checked the back of a jar in your fridge?
The Trickiest Part (And a Little Story)
The first time I tried this, I forgot to slice off the blossom end of the cucumbers. My pickles turned out a little soft. I still laugh at that mistake. My neighbor said they were still good, but I knew better.
That tiny slice is important. It removes an enzyme that can make pickles mushy. Don’t skip it. Trust your Grandma Danielle on this one. Do you have a kitchen story about a little mistake that taught you something?
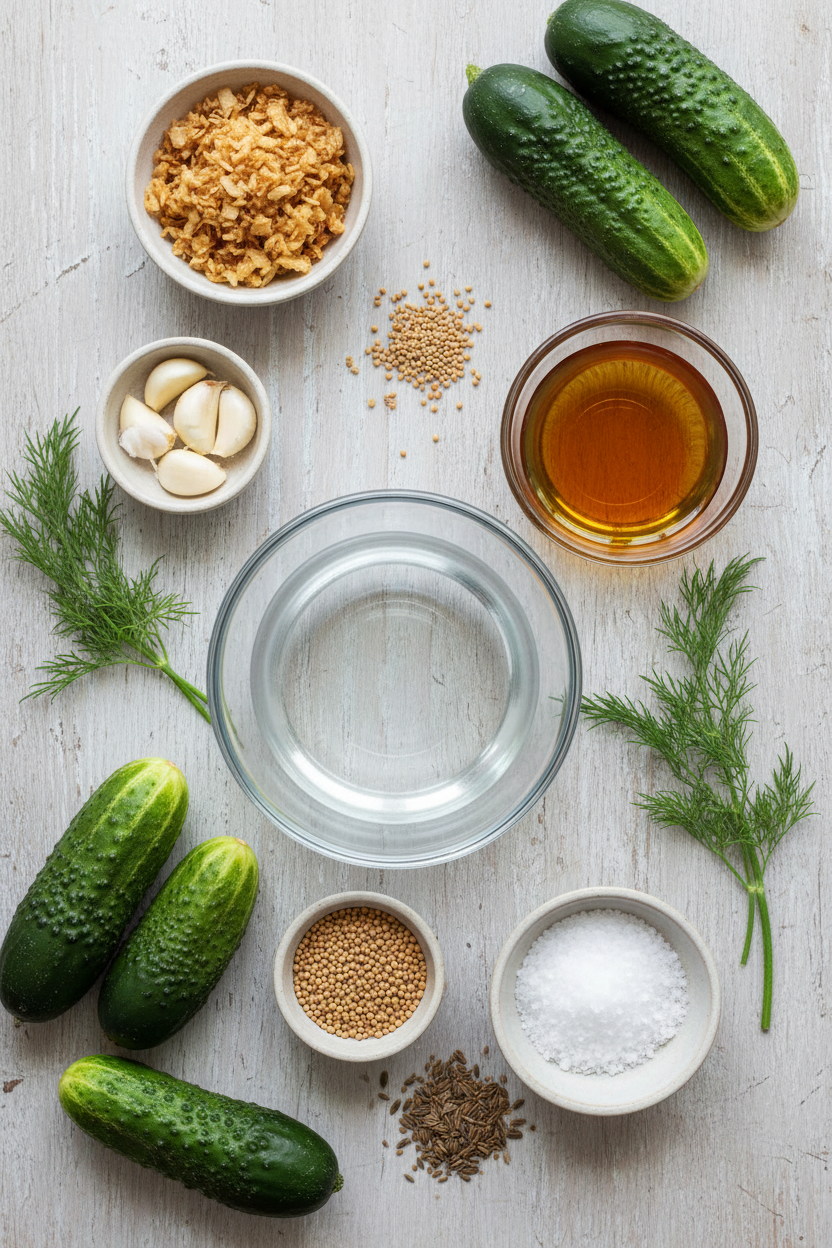
What You’ll Need From the Store
The ingredient list is short. Water, apple cider vinegar, garlic, mustard seed, salt, and dill. You don’t need fancy canning vinegar. Just grab what you have.
The cucumbers matter, though. Look for pickling cucumbers. They are small and bumpy. Regular salad cucumbers are too watery and get soft. How do you pick your vegetables at the store? By feel or by look?
Let’s Get Cooking (Sort Of)
First, you boil the brine. That’s just water, vinegar, onion, garlic, mustard seed, and salt. Bring it to a boil until the salt melts. Then set it aside to cool. Be patient. Hot brine will cook the cucumbers.
While it cools, wash your jars and lids well. You want them clean, not greasy. Pack the cucumbers into the jars with dill and garlic. Pour the cool brine over them. Wipe the rims clean.
Why this matters: Wiping the rims stops bad stuff from growing. It keeps your pickles safe and tasty for months. A little care now means a lot of crunch later.
The Waiting Game
This is the hardest part. You let the jars sit on your counter for three whole days. That’s how the flavors get into the cucumbers. The vinegar works its magic slowly.
Give the jars a gentle shake once a day. You are helping the spices spread around. On the third day, your kitchen will smell like a deli. After that, pop them in the fridge. They last six months in there.
What is the longest you have ever waited for a food to be ready? Tell me in the comments. I want to hear about your patience projects.
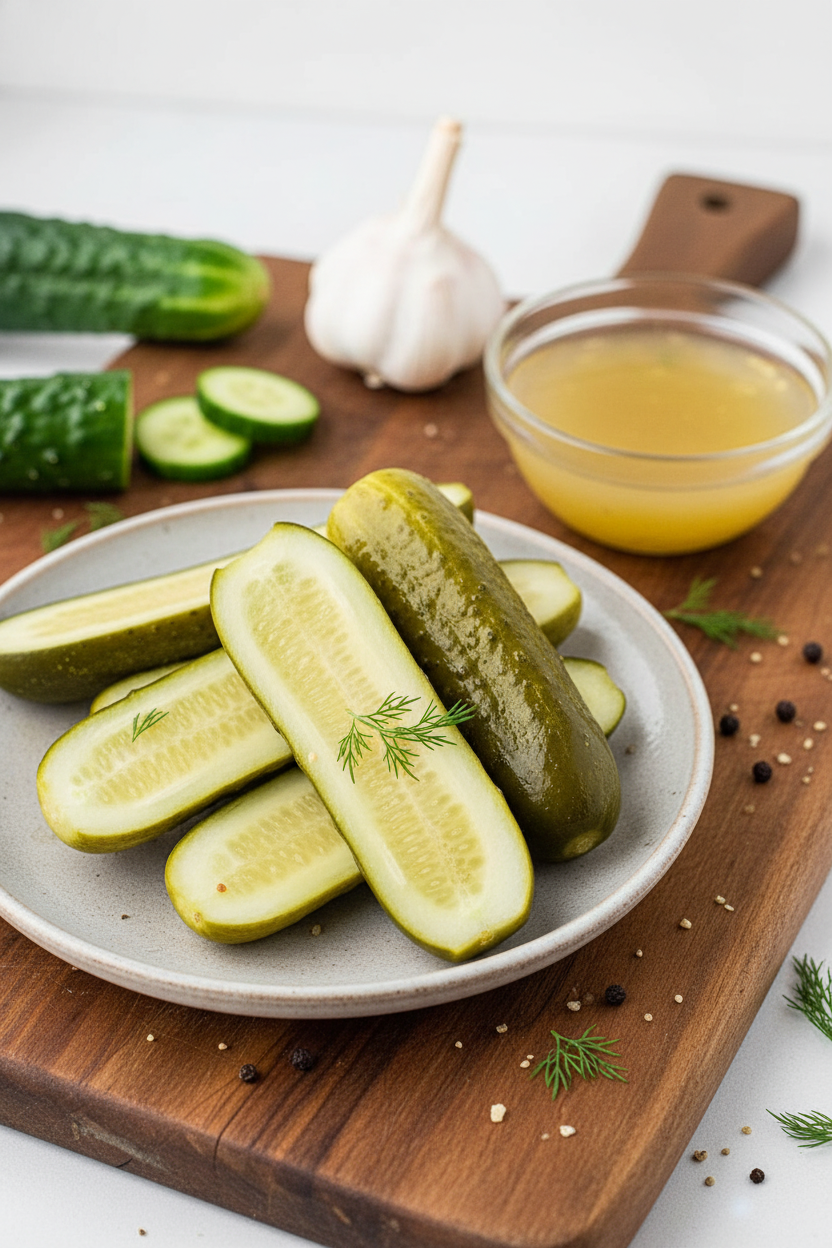
How to Eat Your Prize
These pickles are great on a sandwich. Or just straight out of the jar. I like mine next to a grilled cheese. The salty crunch is perfect with melted cheese.
You can also chop them up for tuna salad or egg salad. They add a little zing. Do you have a favorite food that pickles go with? I am always looking for new ideas.
Ingredients:
| Ingredient | Amount | Notes |
|---|---|---|
| Water | 6 cups | For brine |
| Apple cider vinegar | 2 cups | For brine |
| Dried minced onion | 1/3 cup | For brine |
| Garlic cloves | 6 cloves | Finely minced |
| Yellow mustard seed | 1 1/2 teaspoons | For brine |
| Canning salt | 1/3 cup | For brine |
| Fresh dill or dried dill seed | 6 heads fresh dill or 4 1/2 teaspoons dried | 1 head dill per jar |
| Pickling cucumbers | About 18 | Washed, blossom end removed, sliced |
Instructions
Step 1: In a large pot, bring water, vinegar, onion, garlic, mustard seed, canning salt, and dill seed to a boil. Stir until the salt dissolves completely. Set aside to cool to room temperature. (It is very important to let it cool so the pickles stay crunchy.)
Step 2: Wash six wide-mouth quart jars, lids, and rings in hot soapy water. Rinse well. Set the lids and rings aside. Sterilize the jars by boiling them in a big pot of water for 10 minutes. I still remember my first time dropping a jar — be careful.
Step 3: Wash the cucumbers in cool water and scrub off any dirt. Trim a tiny 1/16-inch slice off the blossom end. Cut each cucumber into halves or quarters lengthwise. What is the first thing you do before making pickles? Share below!
Step 4: Add one head of fresh dill to each sterilized jar. Pack the cucumber pieces tightly inside. Pour the cooled brine over the cucumbers, leaving a little room at the top.
Step 5: Wipe the jar rims clean with a damp paper towel. Close with two-piece canning lids. Turn the ring just until you meet resistance — do not force it tight.
Step 6: Let the jars sit at room temperature for three days. Shake or turn them once a day to mix the spices. After three days, move them to the fridge. They will keep for up to six months unopened.
Creative Twists
… Add a small slice of fresh jalapeno to each jar for a spicy kick.
… Toss in a peeled garlic clove and a pinch of red pepper flakes for extra zing.
… Swap half the cucumber for sliced carrots or green beans for a colorful mix.
Which one would you try first? Comment below!
Serving & Pairing Ideas
Serve these pickles cold alongside a grilled cheese sandwich. They also taste amazing with a classic burger or hot dog. For a fancy touch, slice them into rounds and add to a potato salad. I love pulling out a jar for summer barbecues. Doesnt that smell amazing? Which would you choose tonight?
Storing Your Pickles the Right Way
Once your pickles sit for three days on the counter, they need to go in the fridge. That is where the magic happens. My first batch, I left them out too long and they got soft. Now I set a timer so I never forget.
You can keep these pickles in the fridge for up to six months. Always use a clean fork to take one out. That stops germs from getting in. Batch cooking is a lifesaver. Make a big batch now, and you have crunchy snacks for months.
Why does this matter? Proper storage keeps your pickles crisp and safe to eat. It also saves you money. You will not have to run to the store when a craving hits. Have you ever tried storing it this way? Share below!
Three Common Pickle Problems and Easy Fixes
Problem one: mushy pickles. That happens when you skip cutting off the blossom end. I once forgot this step, and my pickles were sad and soft. Just slice off that tiny tip next time.
Problem two: cloudy brine. This can mean the salt did not fully dissolve. I remember rushing once and pouring in grainy brine. Now I always stir until the water is clear before cooling it down.
Problem three: weak flavor. You might need more garlic or dill. Taste your brine before pouring it in. If it seems weak, add another clove. Why does this matter? Fixing these little things builds your cooking confidence. You will feel like a pro. Which of these problems have you run into before?
Your Quick Questions, Answered
How long do homemade refrigerator pickles last?
Your homemade refrigerator pickles will stay fresh for up to six months if kept unopened in the fridge. Once you open a jar, try to finish them within a month for the best crunch and flavor. Always use a clean utensil to pull pickles out. That keeps the brine safe from bacteria. The longer they sit, the more the garlic and dill flavor seeps in. You will love how the taste deepens over time. Label your jars with the date so you never guess.
Can you reuse the brine for another batch of refrigerator pickles?
Yes, you can reuse the brine one time for a fresh batch. But the flavor will be weaker the second time around. I suggest adding a little extra vinegar and salt to boost the taste. Also, make sure the brine is completely cool before pouring it over new cucumbers. Reused brine works best if you use it within a week. Your second batch might be softer, so eat those pickles first. It is a smart way to waste less.
Why are my refrigerator pickles mushy?
Mushy pickles usually happen because you forgot to cut off the blossom end of the cucumber. That tiny tip holds an enzyme that softens pickles fast. Another reason is using old cucumbers that are already a little limp. Always pick firm, fresh cucumbers from the store or farmer’s market. Also, do not let them sit on the counter longer than three days. The salt in the brine also helps keep them crisp. Follow these tips for crunch every time.
Do I need to sterilize jars for refrigerator pickles?
Yes, you should sterilize your jars for refrigerator pickles. This kills any tiny germs that could spoil your batch. Wash the jars in hot, soapy water first. Then boil them in a big pot of water for ten minutes. Let them cool upside down on a clean towel. This step only takes a little time, but it keeps your pickles safe. I never skip it, even when I am in a hurry. Your family will thank you for the extra care.
Can I add fresh dill and garlic to refrigerator pickles?
Absolutely, you can add fresh dill and garlic to your pickles. In fact, fresh dill heads give the best flavor. Just place one dill head and a few garlic cloves in each jar before packing the cucumbers. The fresh ingredients make the pickles taste bright and zesty. I always use fresh dill from my garden in summer. If you only have dried dill, use about half a teaspoon per jar. Fresh or dried, your pickles will be delicious.
What is the best vinegar for refrigerator pickles?
The best vinegar for these pickles is apple cider vinegar. It gives a mild, slightly sweet taste that goes great with dill and garlic. White vinegar works too, but it is sharper and more sour. I always use apple cider vinegar because it reminds me of my grandma’s pickles. Make sure to use one with five percent acidity for safe pickling. The vinegar helps preserve the cucumbers and keeps them crunchy. Stick with apple cider for the best flavor.
Which tip will you try first?
A Final Crunchy Farewell
I hope you feel ready to make your own crunchy pickles. This recipe is forgiving and fun. Remember, the three-day wait is the hardest part. But that first bite makes it all worth it.
I would love to hear how your batch turns out. Come back and tell me about it. Have you tried this recipe? Share your stories and tips below. Your kitchen adventures brighten my day.
Happy cooking!
—Grace Ellington.

Homemade Refrigerator Pickles by Expert Canner
Description
Experience the delightful contrast of textures and flavors with this Tuna Avocado Crispy Rice Bowl, featuring crispy rice base, fresh tuna, and avocado.
Ingredients
Instructions
- In a large saucepan, bring the water, vinegar, onion, garlic, mustard seed, canning salt and dill seed (if using) to a rapid boil. Cook until the salt has completely dissolved. Set the mixture aside and allow to cool to room temperature.
- Prepare six wide-mouth quart canning jars and lids. Wash the jars, lids, and rings thoroughly in hot, soapy water. Rinse well. Set the lids and bands aside until needed. To sterilize the jars, place the jars in a large pot and fill with water just to cover the jars. Bring to a boil. Boil 10 minutes. Remove the jars from the water using a canning jar lifter and place upside down on a kitchen towel to cool.
- Prepare the cucumbers by washing in cool water being careful to remove any dirt that may cling to the skin. Remove a 1/16” slice from the blossom end of each cucumber. Slice the cucumbers lengthwise into halves or quarters.
- To each sterilized jar, add one head of dill (if using) and pack with the cucumber halves or quarters. Pour the cooled brine mixture over the cucumbers in the jars.
- Wipe the rims with a dampened paper towel. Close the jars using two-piece canning lids but don’t forcefully tighten the ring — turn it just until you meet resistance.
- Allow the jars to sit at room temperature for three days. Shake or turn the jars occasionally to distribute the seasonings. After three days, transfer the jars to the refrigerator. May be stored unopened in the refrigerator for six months.
Notes
- Serving 1 pickle – Calories 24kcal – Carbohydrates 4g – Protein 1g – Fat 1g – Saturated Fat 1g – Polyunsaturated Fat 1g – Monounsaturated Fat 1g – Sodium 1578mg – Potassium 227mg – Fiber 1g – Sugar 2g – Vitamin A 121IU – Vitamin C 5mg – Calcium 27mg – Iron 1mg