

My First Apricot Jam Adventure
I still remember the first time I made apricot jam. I was about your age, helping my grandma in her tiny kitchen. She handed me a spoon and said, “Stir slow, sweetheart, and listen to the fruit.” I didn’t understand then, but I sure do now.
Apricots are special little fruits. They are like little suns wrapped in fuzzy skin. When you cut them open, they smell like summer and happiness. Doesn’t that smell amazing?
Why Making Jam Matters
You might wonder why anyone bothers to make jam when you can buy it at the store. Here is the truth: homemade jam tastes like love. It has no weird stuff you cannot pronounce. Just fruit, sugar, and a little lemon.
This matters because cooking something yourself teaches patience. You learn to watch, wait, and trust your eyes and nose. Jam is not just about eating. It is about slowing down and noticing things.
The Magic of Picking Apricots
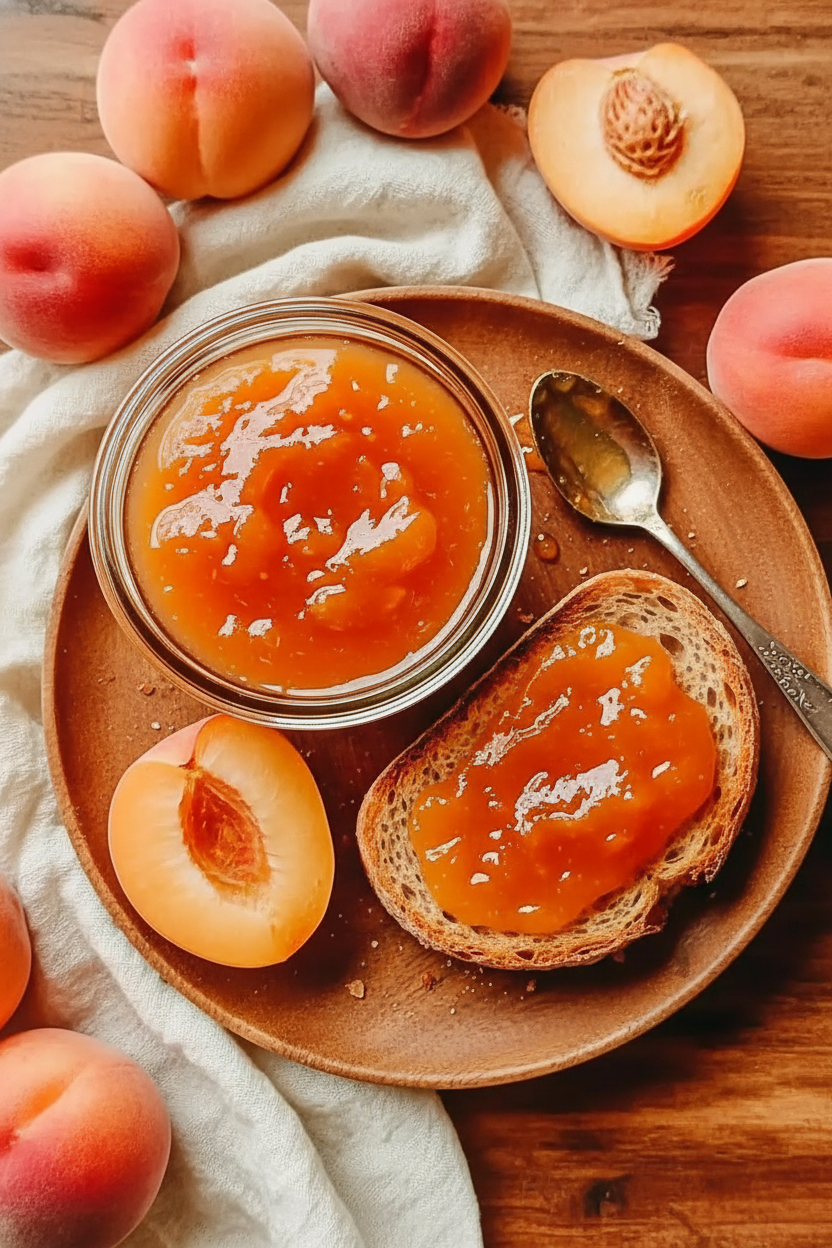
Have you ever picked a fresh apricot right off a tree? They are warm from the sun, and they almost fall into your hand. That is when you know they are ready. For this recipe, you need about seventeen and a half ounces of ripe ones.
I like to wash mine, then sit on the porch and cut them. I pop the pits out and toss them in a bowl. It feels like a little treasure hunt. What is your favorite fruit to pick or eat in summer?
A Little Trick from Grandma’s Kitchen
Here comes the fun part. You simmer the apricots with water and lemon juice until they soften. But here is the trick: do not let them fall apart. You want them to stay a little chunky, like little golden clouds in a pot.
If your apricots are very juicy and ripe, you can skip the extra water. If they are a bit firm, add a little more. I still laugh at that time I forgot to check and ended up with apricot soup. We still ate it, and it was delicious.
The Wrinkle Test That Changed Everything
Now, this is the part that makes you feel like a wizard. You put three small plates in the fridge before you start. After boiling your jam for 15 minutes, you drop a tiny spoonful on a cold plate. Wait five minutes, then push your finger across it.
If the jam wrinkles like a little frown, it is done. If not, boil it five more minutes and test again. This simple test is why your jam turns out perfect every time. *Fun fact: This wrinkle test was invented by home cooks long before fancy thermometers existed.*
Why Sugar Is Your Friend
Some people get scared of sugar. But in jam, sugar is not just for sweetness. It helps the fruit hold its shape and keeps the jam from spoiling. You add it after the fruit softens, stir until it disappears, then bring it to a rolling boil.
That rolling boil is what makes the jam thick and shiny. It is like the fruit and sugar are dancing together. This matters because understanding why you do something makes cooking less scary and more fun.
Your Turn to Try
I hope you give this apricot jam a try. It takes about 30 minutes of your time, and you get a whole jar of sunshine. Spread it on toast, spoon it over ice cream, or just eat it with a spoon when nobody is looking.
So tell me: Would you rather make jam for breakfast or for dessert? Have you ever canned anything before? I would love to hear your sticky, sweet stories.
Ingredients:
| Ingredient | Amount | Notes |
|---|---|---|
| Fresh lemon juice | 2 tbsp | Use freshly squeezed |
| Water | 4 fl oz | For less mature apricots; omit if very juicy and ripe |
| Apricots (fresh, ripe, pitted and roughly chopped) | 17.64 oz | Wash, halve and remove pits before weighing |
| Water | 2 fl oz | Added with apricots for simmering |
| White sugar (granulated) | 17.64 oz | Stir until fully dissolved before boiling |

Instructions
Step 1: Wash and dry your apricots with care. I always think of my Grandma’s old tree out back. Cut each one in half and pop out the stone. (Never rush the pitting—a squished apricot makes a messy jam.)
Step 2: Add water and lemon juice to a saucepan with the apricots. Use 4 ounces of water if they are not super ripe. Simmer gently until the fruit gets soft but still holds its shape. Doesn’t that smell amazing already?
Step 3: Lower the heat and stir in the sugar until it dissolves completely. Be patient here—no grains left behind. This part always reminds me of watching snow melt in spring. What is your favorite fruit to cook with? Share below!
Step 4: Turn the heat up and bring the mix to a rolling boil. Let it bubble for 15 minutes. The kitchen will smell like sunshine and sugar. My dog used to sit right at my feet for this step.
Step 5: Test your jam with the wrinkle test. Place a spoonful on a chilled saucer and pop it in the fridge for five minutes. Push your finger through—if it wrinkles, it is ready. (Keep a second saucer cold just in case.)
Creative Twists
… Stir in a pinch of cinnamon or cardamom for a warm, cozy flavor.
… Swap half the sugar for honey, and watch the jam turn golden and floral.
… Add a handful of chopped almonds right before boiling for a little crunch.
Which one would you try first? Comment below!
Serving & Pairing Ideas
Spoon this jam over warm buttermilk biscuits for a classic treat. It also tastes wonderful swirled into plain yogurt or oatmeal. For a fancy touch, serve it next to soft cheese and crusty bread. I still love putting it on a buttered slice of toast. Which would you choose tonight?
Storing Your Apricot Jam the Right Way
I remember my first batch of apricot jam. I was so proud, I left it out on the counter overnight. Big mistake. The next morning, it had a funny smell. That is when I learned to always store jam in the fridge after opening.
Let your jam cool completely before putting a lid on it. A hot lid traps steam, which can make the jam spoil faster. Pour it into a clean glass jar with a tight seal. It stays fresh in the fridge for about three weeks.
You can also freeze apricot jam for later. Just leave an inch of space at the top of the jar. The jam expands as it freezes. When you want it, thaw it in the fridge overnight. To reheat, place the jar in a bowl of warm water. Stir gently. Never microwave it, because that ruins the soft fruit bits.
Batch cooking this jam saves you time later. Make two or three batches at once. Then you have a sweet gift for friends or a quick topping for pancakes. It matters because you always have something homemade ready to share.
Have you ever tried storing it this way? Share below!
Three Common Jam Problems and Easy Fixes
Every home cook faces trouble with jam now and then. I once made a batch so thick, I could have used it as glue! Here are three problems and how to fix them.
Problem one: your jam is too runny. This happens when you do not boil it long enough. The fix is simple. Just return the jam to the heat and boil for five more minutes. Then do the wrinkle test again. It matters because runny jam drips off your toast and makes a mess.
Problem two: your jam is too thick. This means you boiled it too long or added too much sugar. To fix it, stir in a tablespoon of warm water at a time. Keep stirring until it feels soft and spreadable. Remember when I made glue-jam? A little water saved it.
Problem three: your jam tastes flat or too sweet. Apricot jam needs a bit of tang. Next time, add an extra squeeze of lemon juice. The acid brightens the flavor. This matters because good jam should make your mouth happy, not just your sweet tooth.
Which of these problems have you run into before?
Your Quick Questions, Answered
How do I know when my apricot jam is done setting?
You use the wrinkle test, just like in the recipe. Place three small saucers in the fridge before you start cooking. When you think the jam is ready, drop a teaspoon of it onto a cold saucer. Put the saucer back in the fridge for five minutes. Then push your finger across the jam. If it wrinkles, it is done. If it stays smooth, boil the jam for five more minutes and test again. Do not guess. This test never lies.
Can I use dried apricots instead of fresh apricots for jam?
Yes, you can. Dried apricots need extra water because they are dry. Soak them in warm water for an hour first. Then chop them and use the same steps. The flavor will be richer and more concentrated. Just remember that dried apricots already have sugar. You might want to use a little less sugar in the recipe. Start with half the sugar called for and taste as you go.
Do I need to peel apricots before making jam?
No, you do not need to peel them. The skins are thin and soft. They cook down and blend right into the jam. Leaving the skin on gives the jam a lovely color and extra texture. It also saves you time. I never peel my apricots. The peels have natural pectin, which helps the jam set. One less step and better results.
How much sugar should I use for a low-sugar apricot jam?
For a low-sugar jam, use half the sugar in the recipe. Start with about nine ounces of sugar instead of full sugar. You will need to boil the jam a little longer. Low-sugar jam takes more time to thicken. The flavor will be brighter and more fruity. Just know it will not last as long in the fridge. It stays fresh for about one week because sugar helps preserve it.
Why did my apricot jam turn out too runny or too thick?
Too runny means you did not boil it long enough. The water did not cook off. Too thick means you boiled it too long or used very ripe apricots. Ripe apricots have more water and take longer to set. For runny jam, boil it again for five minutes and retest. For thick jam, stir in warm water one spoonful at a time. Both problems are easy to fix. Do not throw it away.
How long does homemade apricot jam last in the fridge or pantry?
In the fridge, an open jar lasts about three weeks. If you seal it properly in a hot water bath, it lasts in the pantry for up to one year. Always check for mold or a funny smell before eating. I once found a jar I forgot for two years. It had a fuzzy top. Trust your nose. When in doubt, toss it out.
Which tip will you try first?
A Sweet Goodbye from My Kitchen to Yours
Well, dear reader, I hope you feel ready to make your own apricot jam. It is one of the sweetest, simplest things you can do. I love watching the fruit bubble and turn golden in the pot.
*Fun fact: Apricots have been grown for over 4,000 years. People have been making jam for a very long time.
Have you tried this recipe? I would love to hear how it turned out for you. Come back and tell me a story about your jam. Every batch has a story.
If your jam is a little runny or a little thick, do not worry. You tried something new. That is what matters. Keep cooking and keep sharing.
Happy cooking!
—Grace Ellington.

My Signature Apricot Jam Recipe for Beginners
Description
A simple and delicious apricot jam recipe perfect for beginners, using fresh apricots, sugar, and lemon juice.
Ingredients
Instructions
- Start by washing and drying the apricots thoroughly. Once cleaned, cut each apricot in half and remove the stones (pits).
- Add the appropriate amount of water and lemon juice to the apricots: 120 milliliters for unripe apricots or 60 milliliters for ripe apricots. Place the mixture in a saucepan and bring it to a gentle simmer. Cook until the fruit has softened but not falling apart, ensuring the apricots maintain their shape.
- Reduce the heat to low and add sugar to the softened apricots. Stir gently until all the sugar has completely dissolved, ensuring it incorporates well with the fruit.
- Increase the heat and bring the fruit and sugar mixture to a rolling boil. Continue boiling the mixture for 15 minutes. This step intensifies the flavor and starts the setting process for the jam.
- Remove the pan from the heat and perform the wrinkle test to check if the jam is ready to set. Ensure you have placed 3 saucers in the fridge before starting the jam. Take a teaspoon of the jam and place it on one of the chilled saucers. Return the saucer to the fridge for 5 minutes. Afterward, remove the saucer and gently push your finger across the jam. It should form a wrinkle if it is ready. If it does, proceed to the next step; if not, return it to the heat for an additional 5 minutes and test again.
Notes
- Estimated nutrition for the whole recipe (without optional ingredients): Calories: 2200-2400, Protein: 0-5 g, Fat: 0-5 g, Carbohydrates: 550-600 g.